Are you looking to protect your wooden surfaces with something tough and long-lasting? Applying Raptor Liner on wood could be the perfect solution for you.
Whether it’s your trailer sides, workbench, or outdoor furniture, Raptor Liner offers a durable coating that guards against scratches, weather damage, and wear. But before you dive in, it’s important to know how to prepare your wood properly and apply the liner to get the best results.
You’ll discover simple, step-by-step tips to ensure your Raptor Liner sticks well and stands the test of time. Keep reading to transform your wood with a coating that’s built to last!

Credit: www.tnttt.com
Benefits Of Raptor Liner On Wood
Applying Raptor Liner on wood brings many benefits. It improves the wood’s strength and look. This coating forms a tough layer that guards the wood from damage. It also keeps the wood safe from water and sun effects. These benefits make Raptor Liner a smart choice for wood surfaces.
Raptor Liner is easy to apply and lasts a long time. It fits well on outdoor and indoor wood. The following sections explain its main advantages.
Durability And Protection
Raptor Liner creates a thick, hard shell on wood. This shell resists scratches, dents, and impacts. It helps wood survive rough use and heavy traffic. The liner also blocks dirt and stains, keeping the wood clean. It protects wood from cracking and warping over time.
Aesthetic Appeal
The liner adds a sleek, uniform finish to wood surfaces. It hides imperfections and uneven textures well. The coating comes in various colors to match styles. Its matte or satin finish looks modern and fresh. The wood gains a neat, professional appearance that lasts.
Water And Uv Resistance
Raptor Liner seals wood against water damage. It stops water from soaking in and causing rot. The liner prevents mold and mildew growth on wood. It also blocks harmful UV rays from sunlight. This protection keeps wood from fading and aging quickly.
Preparing Wood For Raptor Liner
Preparing wood for Raptor Liner is a key step for a strong and lasting finish. The wood surface needs care before applying the liner. Proper preparation ensures the coating sticks well and resists wear over time.
Each step in preparing wood improves adhesion and durability. Follow the process carefully for the best results with Raptor Liner on wood surfaces.
Cleaning And Dust Removal
Start by removing dirt, grease, and dust from the wood. Use a brush or vacuum to clear loose particles. Wipe the surface with a damp cloth and mild detergent. Let the wood dry fully before moving to the next step.
Sanding For Better Adhesion
Light sanding creates a rough texture for the liner to grip. Use medium-grit sandpaper, around 120 to 150 grit. Sand evenly in the wood grain direction. Remove sanding dust with a clean, dry cloth or vacuum.
Sealing The Wood Surface
Apply a wood sealer to close pores and prevent moisture. Use a sealer compatible with Raptor Liner products. Allow the sealer to dry completely. This step helps avoid bubbles and improves coating strength.
Applying Raptor Liner On Wood
Applying Raptor Liner on wood offers a durable and protective coating. This tough liner shields wood from scratches, moisture, and wear. Proper application ensures the coating lasts longer and looks great. Follow key steps for best results.
Shaking And Mixing The Product
Start by shaking the Raptor Liner container well. This mixes all components evenly. Use a mechanical mixer for thorough blending. Proper mixing prevents lumps and ensures smooth application.
Coating Techniques
Use a brush, roller, or spray for applying Raptor Liner. Spray gives a smooth, even finish on large surfaces. Rollers work well on flat wood panels. Brushes help reach corners and edges. Apply thin, even coats to avoid drips.
Achieving Desired Texture
Texture depends on application method and tools. For a rough finish, use a thick roller or brush strokes. For smooth texture, spray multiple light coats. Adjust spray distance to control thickness. Experiment on scrap wood before final application.
Choosing The Right Sealer
Choosing the right sealer for Raptor Liner on wood is key for lasting protection. Sealers shield the wood and the liner from moisture, dirt, and wear. They also improve the finish’s look and durability. Different sealers offer unique benefits. Picking the best one depends on your project needs and the wood type.
Urethane Sealers
Urethane sealers form a strong, clear coat over Raptor Liner on wood. They resist scratches and chemicals well. These sealers dry fast and add a glossy or satin finish. Urethane protects wood from water damage and UV rays. It works best on outdoor wood exposed to weather.
Acrylic Sealers
Acrylic sealers are water-based and easy to apply. They dry quickly and clean up with water. Acrylic sealers provide a flexible, breathable layer that helps prevent cracking. They keep the wood looking natural while guarding against moisture. Acrylics suit indoor and light outdoor wood projects.
Epoxy Sealers
Epoxy sealers offer the toughest protection for Raptor Liner on wood. They create a hard, dense barrier that blocks water and chemicals. Epoxy seals wood deeply, preventing rot and damage. These sealers need careful mixing and application. Epoxy is ideal for heavy-use surfaces and harsh conditions.
Common Issues And Solutions
Applying Raptor Liner on wood offers strong protection but may face some common problems. These issues often come from surface preparation, application errors, or environmental factors. Understanding these problems helps in applying the right solutions to get a durable finish.
Peeling And Flaking
Peeling happens when the liner does not stick well to the wood. This often occurs if the surface is dirty or oily. Wood must be clean and dry before applying Raptor Liner. Sanding the wood surface creates a rough texture that helps the liner grip better. Applying a primer made for wood can also improve adhesion. Avoid applying the liner in very cold or wet conditions, as this can cause peeling later.
Uneven Texture
Uneven texture looks rough or patchy after the liner dries. This problem arises from inconsistent spraying or rolling techniques. Using a steady hand and keeping a constant distance from the wood helps create an even coat. Thin layers build up better than one thick coat. Stir the liner well before and during use to keep the texture smooth. Check the nozzle for blockages, which can cause uneven spraying.
Adhesion Problems
Adhesion problems mean the liner does not stick and may lift off the wood. This often happens when the wood surface is too smooth or coated with old paint. Remove any old finishes by sanding or stripping. Clean all dust and debris before applying the liner. Using a bonding primer designed for wood improves adhesion. Let the primer fully dry before applying the Raptor Liner. Ensure the wood is not damp or oily, which can prevent proper bonding.
Maintenance Tips For Longevity
Maintaining a Raptor Liner coating on wood ensures it stays strong and looks great for years. Proper care prevents damage and keeps the protective layer intact. Follow simple steps to clean, repair, and guard the surface. These tips help extend the life of your Raptor Liner on wood.
Cleaning The Coated Surface
Use a soft brush or cloth to remove loose dirt and dust. Wash the surface with mild soap and water. Avoid harsh chemicals that can break down the coating. Rinse thoroughly and let it dry completely. Clean regularly to prevent grime buildup and maintain shine.
Touch-up Procedures
Inspect the wood coating for scratches or chips often. Lightly sand damaged areas to smooth edges. Apply a fresh layer of Raptor Liner to these spots using a brush or spray. Allow the coating to cure fully before use. Touch-ups keep the wood protected and looking new.
Protecting From Harsh Conditions
Shield the coated wood from prolonged sun exposure to prevent fading. Cover the surface during heavy rain or snow to reduce wear. Avoid placing hot items directly on the liner. Use protective pads or mats under sharp tools or heavy objects. These measures help preserve the coating’s durability.
Popular Uses Of Raptor Liner On Wood
Raptor Liner is a tough coating that works well on wood surfaces. It adds strong protection against scratches, water, and weather. This makes it ideal for many wood projects. The liner also gives wood a textured, durable finish that lasts long.
Below are some popular uses of Raptor Liner on wood. Each use benefits from the liner’s strength and resistance to damage.
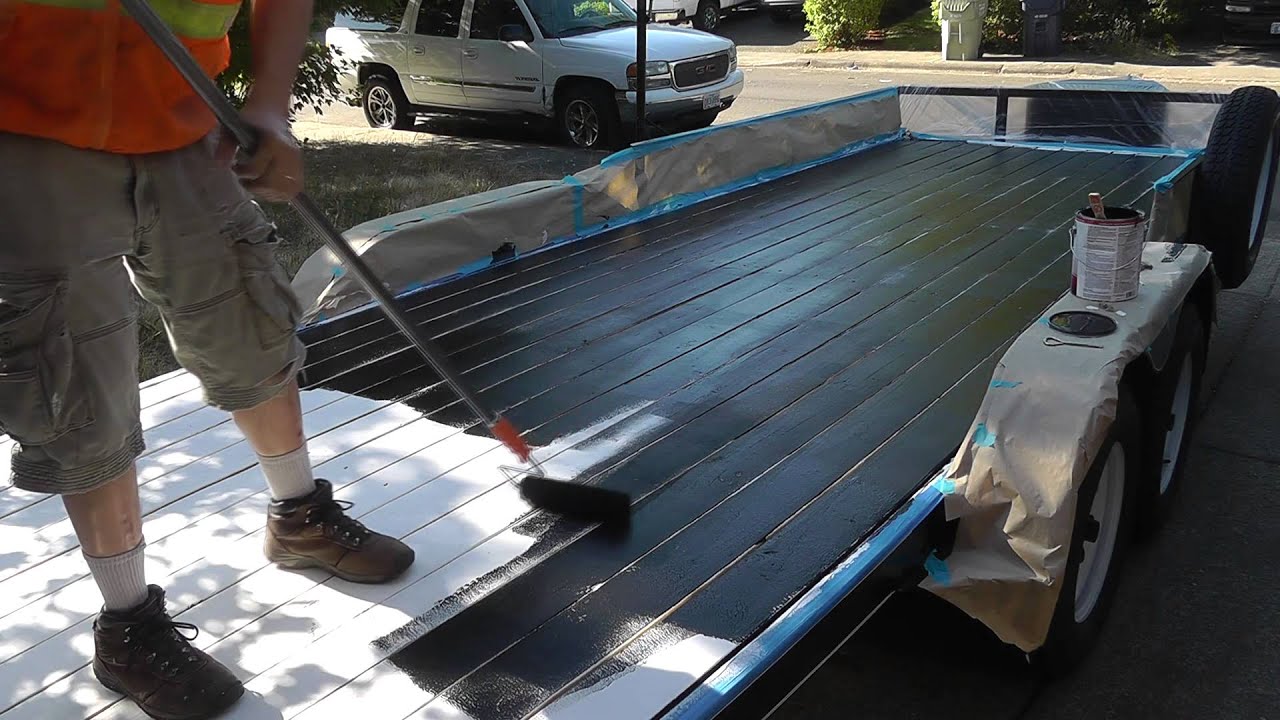
Trailers And Truck Beds
Wood trailers and truck beds often face rough use. Raptor Liner protects these surfaces from wear and tear. It resists chipping and cracking even under heavy loads. The coating helps keep wood safe from moisture and rust. This extends the life of trailers and beds significantly.
Outdoor Furniture
Outdoor wood furniture needs to withstand sun, rain, and dirt. Raptor Liner forms a waterproof barrier that stops water damage. It also protects against fading and stains from the sun. The textured finish adds grip and reduces slipping. This makes outdoor furniture safer and longer-lasting.
Workshop Surfaces
Workbenches and tables in workshops see constant use. Raptor Liner shields wood from spills, cuts, and impacts. It creates a hard surface that is easy to clean. The liner also prevents damage from tools and chemicals. This keeps workshop surfaces looking good and working well.

Credit: www.youtube.com
Credit: www.youtube.com
Frequently Asked Questions
Can Raptor Liner Be Applied To Wood?
Yes, RAPTOR liner can be applied to wood. Prepare the surface by cleaning, sanding, and sealing with a suitable sealer before application. This ensures better adhesion and durability, especially on absorbent woods like plywood.
Will Spray On Bedliner Stick To Wood?
Yes, spray-on bedliner like Raptor can stick to wood if properly prepared. Sand, clean, and seal wood first. Use a suitable sealer, such as urethane or epoxy, to improve adhesion and durability before applying the bedliner.
How To Prep Plywood For Raptor Liner?
Clean plywood thoroughly, remove dust, and sand lightly for better adhesion. Seal the wood with urethane, acrylic, or epoxy sealer. Let it dry completely before applying RAPTOR liner for strong, lasting protection.
Do You Need To Prime Before Raptor Coating?
Yes, priming before applying RAPTOR coating on wood improves adhesion and durability. Seal the wood with a suitable sealer first.
Can Raptor Liner Be Applied Directly On Wood Surfaces?
Yes, Raptor Liner can be applied on wood after cleaning and sanding the surface well.
Conclusion
Applying Raptor Liner on wood offers strong protection and durability. Proper surface preparation ensures better adhesion and longer life. Sealing wood before coating helps prevent moisture damage and peeling. This process makes wood surfaces tougher and more resistant to wear.
Raptor Liner works well on trailers, furniture, and outdoor wood projects. With careful steps, your wood will stay protected and look great. Try it for a reliable, textured finish that lasts.


