Replacing the PCV valve hose is crucial for your car’s health. This simple task can prevent serious engine issues.
The PCV (Positive Crankcase Ventilation) valve hose is vital for maintaining your vehicle’s performance. It helps control harmful emissions and keeps your engine running smoothly. Over time, the hose can wear out, causing leaks and other problems. Replacing it is not only essential for your car’s efficiency but also for the environment.
In this guide, we’ll explore the steps to replace the PCV valve hose, ensuring your car stays in top shape. Whether you’re a seasoned mechanic or a beginner, this guide will provide clear, easy-to-follow instructions. Let’s dive in and keep your engine in optimal condition.

Credit: www.youtube.com
Introduction To Pcv Valve Hose
Discover the importance of replacing the PCV valve hose to maintain your engine’s performance. This small part helps reduce harmful emissions and keeps your engine running smoothly. Ensure regular checks to avoid engine issues.
The PCV valve hose plays a vital role in your car’s engine. It ensures the engine runs smoothly. This small component can have a big impact. Understanding its function and common issues can save you from headaches. It can also save you money.Purpose And Function
The PCV valve hose helps control harmful emissions. It connects the PCV valve to the intake manifold. This connection allows gases to move from the crankcase to the combustion chamber. The engine burns these gases again. This process reduces pollution. It also improves engine efficiency.Common Issues
PCV valve hoses can become clogged or cracked. A clogged hose can cause poor engine performance. It may also lead to increased emissions. A cracked hose can cause a vacuum leak. This may result in rough idling or stalling. Regular checks can help you spot these issues early. Replacing a faulty hose can prevent bigger problems. “`Tools And Materials Needed
Replacing the PCV valve hose is a crucial task for maintaining your vehicle’s performance. To ensure a smooth and successful replacement, you need specific tools and materials. Knowing what to have on hand will save you time and effort.
Essential Tools
Before you start, gather these essential tools:
- Screwdrivers: Both flathead and Phillips screwdrivers are necessary.
- Pliers: Needle-nose pliers help with tight spaces.
- Socket Wrench Set: Various sizes may be needed.
- Hose Clamp Pliers: These ensure a firm grip on hose clamps.
- Flashlight: Provides better visibility in dark engine areas.
Recommended Materials
In addition to tools, having the right materials is essential:
- Replacement PCV Valve Hose: Ensure it matches your vehicle model.
- Hose Clamps: New clamps might be needed for a secure fit.
- Rags or Paper Towels: Useful for cleaning up any spills.
- Engine Degreaser: Helps clean the area around the hose.
- Gloves: Protect your hands from dirt and chemicals.
Having these tools and materials ready makes the replacement process straightforward. Ensure you check your vehicle’s manual for any specific requirements.
Locating The Pcv Valve Hose
Locating the PCV valve hose is a crucial step in vehicle maintenance. The PCV (Positive Crankcase Ventilation) valve hose helps manage engine pressure. This ensures your car runs smoothly. A damaged hose can lead to engine issues. Knowing where to find it can save you time and money.
Engine Bay Inspection
Open the hood of your car. The engine bay is the first area to inspect. Look for the engine cover. It is usually a large plastic piece. Remove it if needed. This will give you a clear view of the engine components.
Check for any hoses connected to the engine. The PCV valve hose is often near the top. It may run from the valve cover to the intake manifold. Use a flashlight if visibility is poor.
Identifying The Hose
The PCV valve hose is usually a rubber hose. It can be black or another dark color. It connects to the PCV valve, a small cylindrical part. The valve is often on the valve cover. Trace the hose from the valve to its other end.
Look for signs of wear or damage. Cracks or loose connections mean the hose needs replacement. A healthy hose should be flexible and free from cracks.
Once you find the hose, take note of its connections. This will help in replacing it correctly. Mark the position of any clamps or clips. This ensures proper reassembly.
Preparing For Replacement
Replacing a PCV valve hose is an essential car maintenance task. It ensures your engine runs smoothly. Proper preparation is key to a successful replacement. Let’s explore the necessary steps.
Safety Precautions
Before starting, ensure safety is your top priority. Follow these precautions:
- Disconnect the battery: This prevents electrical shocks.
- Wear safety gloves and glasses: Protect your hands and eyes.
- Work in a well-ventilated area: Avoid inhaling harmful fumes.
- Keep a fire extinguisher nearby: Be prepared for emergencies.
Work Area Setup
Setting up your work area properly will make the task easier and faster. Here are the steps:
| Step | Details |
|---|---|
| 1. Gather tools | Wrenches, screwdrivers, pliers, and a new PCV valve hose. |
| 2. Clear workspace | Ensure there is enough room to work around the engine. |
| 3. Lay out tools | Organize tools for easy access. |
| 4. Use a drop cloth | Protect the ground from spills and dirt. |
Once your work area is set up and you have taken necessary safety precautions, you are ready to replace the PCV valve hose. Follow the steps carefully to ensure a successful replacement.
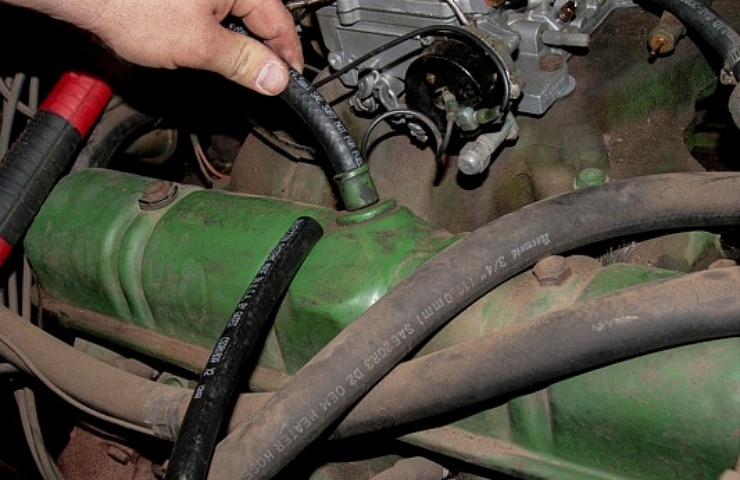
Removing The Old Hose
Removing the old PCV valve hose is a crucial step in the process. A malfunctioning hose can lead to various engine problems. Follow these steps to make the removal process smoother and more efficient.
Disconnecting Components
Start by ensuring the engine is off and cool. Locate the PCV valve hose connected to the valve cover.
- Use a wrench to loosen the clamps securing the hose.
- Disconnect the hose from the PCV valve and the intake manifold.
- Inspect the connections for any signs of wear or damage.
Be gentle to avoid breaking any fragile components. Keep the clamps and other small parts in a safe place.
Extracting The Hose
Once the components are disconnected, you can remove the old hose.
- Gently twist the hose to break any seal formed over time.
- Pull the hose away from the PCV valve and the intake manifold.
- Check the hose for cracks, holes, or other damage.
If the hose is stuck, use a pair of pliers for a better grip. Be careful not to damage other engine parts.
Finally, clean the connections before installing the new hose. This ensures a tight and secure fit.
Credit: www.ebay.com
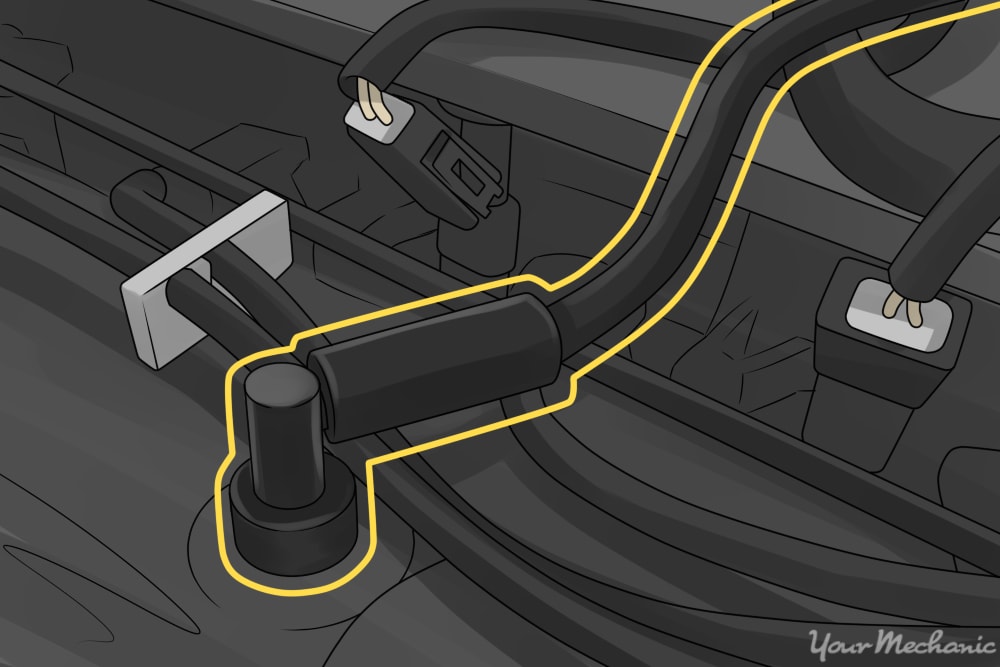
Installing The New Hose
Replacing the PCV valve hose is crucial for your vehicle’s health. Installing the new hose correctly ensures your car runs smoothly. This guide will help you install the new hose with ease. Follow each step carefully for the best results.
Securing Connections
First, secure the connections to prevent leaks. Begin by attaching one end of the hose to the PCV valve. Push it firmly until it fits snugly. Use a clamp to hold the hose in place. Tighten the clamp with a screwdriver. Ensure the hose does not slide off.
Next, attach the other end of the hose to the intake manifold. Again, push it firmly and use a clamp. Tighten the clamp securely. Check both ends to ensure they are tight. This step is vital to avoid vacuum leaks.
Ensuring Proper Fit
After securing the connections, check the fit of the hose. The hose should not be twisted or kinked. A proper fit ensures smooth airflow. If the hose is too long, trim it with a hose cutter. Measure twice to avoid cutting too much.
Make sure the hose is routed away from hot engine parts. Heat can damage the hose over time. Use zip ties to keep the hose in place. This prevents it from moving and ensures a proper fit.
| Step | Action |
|---|---|
| 1 | Attach one end of the hose to the PCV valve |
| 2 | Secure with a clamp and tighten |
| 3 | Attach the other end to the intake manifold |
| 4 | Secure with a clamp and tighten |
| 5 | Check the fit, ensuring no twists or kinks |
| 6 | Trim excess length if necessary |
| 7 | Route away from hot engine parts and secure with zip ties |
Final Checks
After replacing the PCV valve hose, performing final checks ensures everything works correctly. This step is crucial. It helps prevent potential issues down the road. Let’s break it down into two parts: inspecting the installation and testing the system.
Inspecting The Installation
First, inspect the installation to ensure the new hose is properly secured. Look for these key points:
- The hose is securely attached at both ends.
- There are no kinks or twists in the hose.
- The clamps are tight and in good condition.
Use a flashlight to check for any gaps or loose connections. A loose connection can lead to air leaks. This can affect engine performance.
Testing The System
Next, test the system to make sure everything is functioning as expected. Follow these steps:
- Start the engine and let it idle.
- Listen for unusual noises around the PCV valve hose.
- Check for any signs of vacuum leaks.
- Rev the engine slightly and observe the hose for stability.
If you notice any issues, turn off the engine and recheck the hose installation. Repeat the inspection process if necessary.
These final checks are essential for ensuring your engine runs smoothly. Taking the time now can save you from bigger problems later.
Maintenance Tips
Maintaining your PCV valve hose is crucial for your vehicle’s health. Regular checks and timely replacements can prevent engine issues. Below are some essential maintenance tips.
Regular Inspections
Regular inspections help keep the PCV valve hose in good condition. Follow these steps:
- Inspect the hose every 6 months.
- Check for cracks or splits.
- Ensure connections are secure.
By inspecting regularly, you can catch problems early. This can save you from costly repairs.
Signs Of Wear
Knowing the signs of wear can help you decide when to replace the hose. Look out for:
- Cracks: Small or large cracks can affect performance.
- Oil Leaks: Leaks around the hose indicate damage.
- Hardness: A stiff hose can break easily.
Replace the hose if you notice any of these signs. A healthy hose ensures your engine runs smoothly.
Credit: www.yourmechanic.com
Frequently Asked Questions
What Is A Pcv Valve Hose?
A PCV valve hose connects the crankcase to the intake manifold. It helps vent harmful gases.
Why Replace The Pcv Valve Hose?
A worn PCV valve hose can cause engine issues. It may lead to oil leaks and poor performance.
How To Know If The Pcv Valve Hose Is Bad?
Look for cracks, splits, or oil leaks. Engine performance may also suffer if the hose is bad.
Can I Replace The Pcv Valve Hose Myself?
Yes, it’s a simple task. Basic tools and a replacement hose are needed. Always follow the vehicle manual.
How Often Should The Pcv Valve Hose Be Replaced?
Check the hose every 30,000 miles. Replace it if you see signs of wear or damage.
Conclusion
Replacing your PCV valve hose is vital for engine health. It’s a simple task. Follow the steps carefully. Use the right tools. Keep your engine running smoothly. Regular maintenance saves costly repairs. Ensure your car’s performance stays optimal. A well-maintained car lasts longer.
Don’t neglect this essential part. Happy driving!


