Are you struggling with stubborn headliner glue foam residue that just won’t come off? You’re not alone.
Whether you’re restoring your car’s interior or prepping for a new headliner installation, removing that sticky, flaky foam can feel like a frustrating, never-ending task. But don’t worry — with the right approach and tools, you can get your headliner board clean and smooth without damaging it.
You’ll discover simple, effective methods to remove headliner glue foam residue safely and efficiently. Stick with us, and you’ll be ready to give your car’s ceiling a fresh, professional finish in no time!

Credit: www.youtube.com
Prepare The Headliner
Preparing the headliner is the first step to remove glue foam residue effectively. Proper preparation helps avoid damage and makes cleaning easier. It involves carefully removing the headliner assembly and taking safety measures. These steps ensure you can work comfortably and safely on the headliner.
Follow each step carefully to prevent any damage or safety risks. Preparation sets the stage for a smooth cleaning process.
Remove Headliner Assembly
Remove the entire headliner assembly from your vehicle. This allows better access and control while removing glue and foam residue. Start by taking out any trim pieces, dome lights, and handles attached to the headliner. Gently pull the headliner down without bending or cracking it. Place it on a clean, flat surface for easier work.
Disconnect Car Battery
Disconnect the car battery before starting any work on the headliner. This step prevents electrical shorts or accidental airbag deployment. Use a wrench to remove the negative terminal cable first. Keep the battery disconnected until the headliner work is complete. Safety is key during this process.
Credit: nam3forum.com
Manual Foam Removal
Manual foam removal is a straightforward way to clean off headliner glue residue. It requires patience and the right tools. This method avoids harsh chemicals and keeps the headliner intact. Start by fully removing the headliner assembly from your vehicle. This step makes the process easier and safer.
Wear gloves and eye protection to stay safe. Disconnect the car battery to prevent electrical problems. Once ready, begin the foam removal with basic hand tools. The goal is to scrape and brush off all foam and glue bits.
Use Wire Brush
A wire brush helps loosen foam residue from the headliner surface. Use a stiff wire brush and scrub gently. Start with broad strokes to remove loose foam. Then switch to smaller, detailed brushing to clear tight spots.
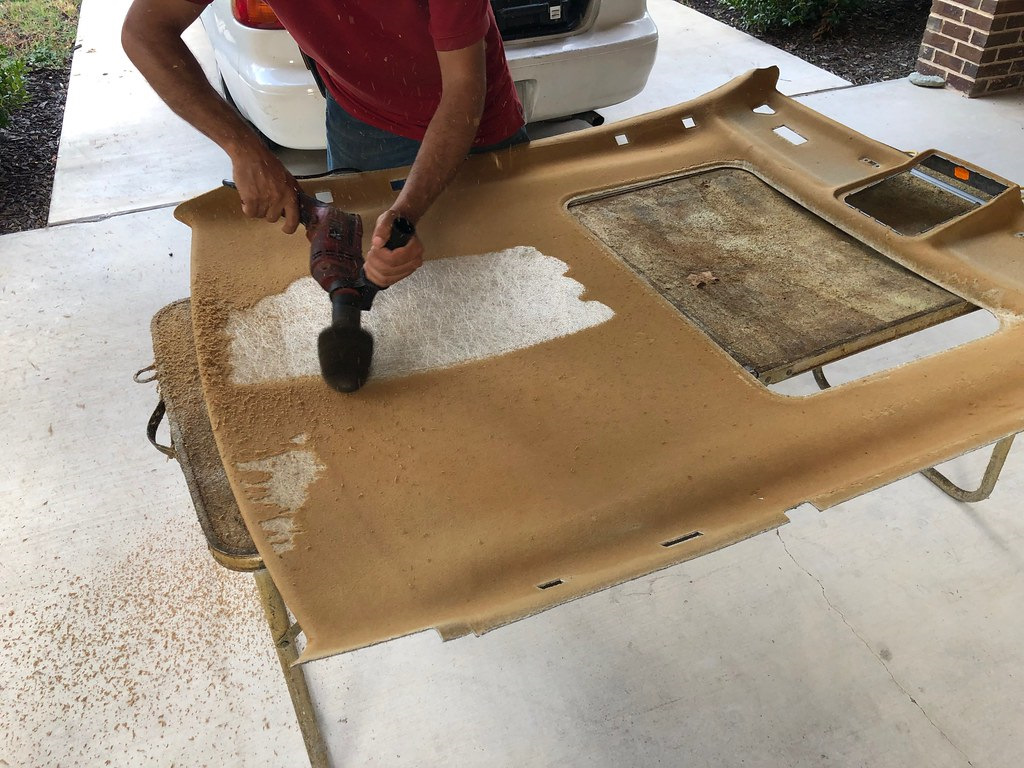
For faster work, attach a wire brush to a power drill. Use low speed to avoid damage. A fine wire brush wheel is best to protect the headliner board. Keep the brush moving to prevent gouging the material.
Scrape Stubborn Residue
Some glue residue may stick tightly and resist brushing. Use a plastic scraper or razor blade carefully to lift these bits. Hold the scraper at a low angle and push gently to avoid tears.
Work slowly and remove small layers of glue. Avoid sharp or metal blades that can damage the headliner fabric. If residue remains, repeat brushing and scraping until clean.
Power Tools For Removal
Power tools help remove headliner glue foam residue quickly and effectively. They reduce manual effort and save time during cleanup. Using the right tool prevents damage to the headliner board. These tools break down foam and old glue with ease. Always work carefully and wear protective gear to avoid injury.
Wire Brush Attachment On Drill
A wire brush attachment on a drill works well for foam residue removal. It scrubs off glue and foam without much force. The drill’s speed helps loosen stubborn patches fast. Use medium speed to control the brush and avoid damage. Hold the headliner steady and work in small sections. This method clears residue while preserving the board underneath.
Fine Wire Wheel On Angle Grinder
A fine wire wheel fits on an angle grinder for tougher residue. It removes thick glue layers efficiently. Use low speed settings to prevent overheating or harming the headliner. The fine wire wheel is gentle enough for delicate surfaces. Move the grinder smoothly across the foam for even removal. This tool makes cleaning easier on large or rough areas.
Using Solvents
Using solvents is a helpful method to remove headliner glue foam residue. Solvents soften the sticky foam, making it easier to scrape off. This approach works well on tough, dried glue spots. Always test solvents on a small area first to avoid damage. Wear gloves and ensure good ventilation while working with chemicals.
Apply Lacquer Thinner Or Mek
Lacquer thinner or MEK (Methyl Ethyl Ketone) breaks down foam residue effectively. Dab a small amount on a clean cloth. Gently rub the glue area until it softens. Avoid soaking the headliner to protect the fabric and board. After softening, use a plastic scraper to remove the residue. Repeat if needed, but do not overuse these strong solvents.
Dish Soap And Water Solution
A simple dish soap and water mix can help remove lighter glue residue. Mix warm water with a few drops of dish soap. Dip a sponge into the solution and apply it to the residue. Let it sit for a few minutes to soften the glue. Wipe gently with the sponge or a soft cloth. This method is gentle and safe for delicate headliner materials.
Wait And Scrape
After applying any solvent, wait a few minutes for it to work on the glue. The residue will loosen and become easier to scrape off. Use a plastic or wooden scraper to avoid damage. Apply gentle pressure and scrape in one direction. Clean the area with a damp cloth to remove leftover solvent and glue bits. Patience improves the results and protects the headliner.
Cleaning Residue
Cleaning residue after removing headliner glue foam is essential for a smooth finish. Residue can be sticky and hard to remove. Proper cleaning ensures the new headliner material will stick well. It also prevents lumps and bumps under the fabric.
Start by removing loose debris. Then, use solvents to break down glue remains. Clean carefully to avoid damage to the headliner board.
Vacuum Thoroughly
Use a vacuum cleaner with a brush attachment. This removes dust and small foam pieces. Vacuum every corner and crevice. It helps prepare the surface for deeper cleaning. Avoid pressing too hard to protect the board underneath.
Wipe With Solvent-soaked Rag
Choose a solvent safe for headliner materials, like isopropyl alcohol or adhesive remover. Soak a clean rag lightly with the solvent. Wipe the surface gently to dissolve glue residue. Change the rag often to avoid spreading dirt. Allow the surface to dry before moving on to any repairs or replacement.

Credit: www.reddit.com
Surface Preparation
Proper surface preparation is essential for removing headliner glue foam residue effectively. It ensures the surface is clean, smooth, and ready for new adhesive application. Taking time to prepare the surface prevents future peeling or bubbling of the headliner fabric. Follow these steps carefully to achieve the best results.
Smooth With Palm Sander
Use a palm sander to smooth the headliner board after removing most foam and glue. The sander helps eliminate tiny bumps and leftover residue that a wire brush may miss. Choose fine-grit sandpaper to avoid damaging the board. Sand gently and evenly to create a flat surface. This step makes the surface perfect for the next adhesive layer.
Ready For New Adhesive
After sanding, clean the surface thoroughly with a vacuum and a tack cloth. Remove all dust and small particles to ensure strong adhesive bonding. The surface should feel dry and free of oils or old glue traces. Now, the headliner board is ready for new adhesive application. Proper preparation guarantees a smooth and long-lasting headliner installation.
Frequently Asked Questions
How To Remove Foam Backing From Headliner?
Remove the headliner assembly first. Use a wire brush or scraper to remove foam backing. Apply lacquer thinner to soften stubborn residue. Scrape gently and vacuum thoroughly. Sand the surface if needed before installing a new headliner.
How To Remove Glue Residue From Car Headliner?
Remove the headliner assembly first. Use a wire brush or scraper to remove glue residue. Apply lacquer thinner on stubborn spots. Let it sit, then scrape again. Clean thoroughly with a vacuum or solvent-soaked rag before reinstalling.
How To Clean The Foam On A Car Headliner?
Remove the headliner from the car first. Use a wire brush or scraper to remove foam and glue. Apply lacquer thinner to soften stubborn residue. Scrape gently, then vacuum thoroughly. Wipe with a solvent-soaked rag to clean before reinstallation.
How Do You Remove Dried Glue Residue?
Remove dried glue residue by scraping gently with a razor blade or wire brush. Apply lacquer thinner or MEK to soften tough spots. Let the solvent sit for a few minutes, then scrape again. Clean the area with a rag and vacuum thoroughly before reapplying adhesive.
How Do I Remove Headliner Glue Foam Residue Safely?
Remove the headliner assembly first, then use a wire brush or scraper to clear foam residue.
Conclusion
Removing headliner glue foam residue takes patience and the right tools. Start by detaching the headliner for easier access. Use a wire brush or scraper to clear off foam and glue. Apply solvents carefully to soften tough spots. Always clean the surface well after removal.
This process restores your headliner smoothly and safely. Keep your workspace clean and work slowly. The effort pays off with a neat, clean finish.


