A trailer’s left turn signal and brake light not working is a common issue. Fixing it can ensure safety on the road.
When your trailer’s left turn signal and brake light stop working, it can be frustrating. This problem can stem from various causes. Wiring issues, blown fuses, and faulty bulbs are just a few. Identifying the source of the problem is the first step.
Once you know what’s wrong, you can fix it or seek help. This blog will guide you through common causes and solutions. Understanding these can save you time and effort. So, let’s dive in and get your trailer’s lights working again.
Common Causes
Experiencing issues with your trailer’s left turn signal and brake light? This can be frustrating and dangerous. Understanding the common causes can help you fix the problem quickly. Here are the main reasons why your left turn signal and brake light might not be working.
Faulty Wiring
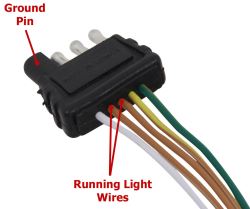
One of the most common causes is faulty wiring. The wires connecting the lights to the power source may be damaged or loose. Inspect the wiring for any visible signs of wear and tear. Look for:
- Frayed wires
- Loose connections
- Corrosion at connection points
Repairing or replacing the damaged wires can often solve the problem.
Burnt-out Bulbs
Another frequent issue is burnt-out bulbs. Check the bulbs in the left turn signal and brake light. If the filament inside is broken or the bulb appears darkened, it’s likely burnt out. Replace the bulb and test the light again.
Here’s a quick guide to replace a bulb:
- Remove the light cover.
- Take out the old bulb.
- Insert a new bulb.
- Test the light.
Blown Fuses
A blown fuse can also cause the lights to stop working. Check your trailer’s fuse box. Look for the fuse that corresponds to the left turn signal and brake light. If the fuse is blown, replace it with a new one. Always use the correct type and amperage of fuse.
Follow these steps to check and replace a fuse:
- Locate the fuse box.
- Identify the correct fuse.
- Remove the blown fuse.
- Insert a new fuse.
By addressing these common causes, you can often resolve issues with your trailer’s left turn signal and brake light. Regular maintenance can prevent these problems from occurring in the first place.
Credit: www.tundras.com
Tools Needed
If your left turn signal and brake light are not working on your trailer, you need the right tools. Having the right tools will help you fix the issue quickly and efficiently. Below, we list the essential tools needed for this job.
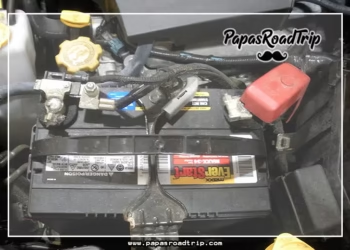
Multimeter
A multimeter is a crucial tool for diagnosing electrical problems. It helps you measure voltage, current, and resistance. With a multimeter, you can check if there is power reaching the lights.
Steps to use a multimeter:
- Set the multimeter to measure voltage.
- Touch the black probe to the ground wire.
- Touch the red probe to the power wire.
- Check the reading on the multimeter.
Screwdrivers
You will need screwdrivers to remove the light covers and access the bulbs. A set of screwdrivers with different types and sizes will be useful.
| Type | Use |
|---|---|
| Phillips | For cross-head screws |
| Flat-head | For flat-head screws |
Replacement Bulbs
Having replacement bulbs on hand is essential. If the bulb is burnt out, you will need to replace it.
Steps to replace a bulb:
- Remove the light cover with a screwdriver.
- Take out the old bulb.
- Insert the new bulb.
- Replace the light cover.
Inspecting Wiring
Inspecting the wiring is essential when the left turn signal and brake light on your trailer stop working. Faulty wiring can lead to many issues, and knowing how to inspect it can save you time and money. This section will guide you through checking connections, looking for damage, and repairing wires.
Checking Connections
Start by inspecting all the connections. Ensure each wire is securely attached. Loose connections can cause the lights to malfunction. Use a multimeter to check for continuity. This tool helps you find any breaks in the wires.
Looking For Damage
Examine the wiring for any visible damage. Look for frayed or cut wires. Damaged wires can prevent signals from reaching the lights. Check for corrosion on the connectors. Corroded connectors can also disrupt the electrical flow.
Repairing Wires
If you find damaged wires, repair them immediately. Cut out the damaged section. Strip the insulation off the ends of the remaining wire. Use a wire connector to join the wires together. Ensure the connection is tight and secure. Cover the repaired section with electrical tape. This will protect it from moisture and further damage.
Replacing Bulbs
If your trailer’s left turn signal and brake light are not working, the solution might be simple. Often, the problem is a burned-out bulb. In this section, we’ll guide you through the process of replacing the bulbs. Let’s get started!
Choosing The Right Bulb
First, you need to choose the right bulb. Check your trailer’s manual. It will list the correct bulb type. Using the wrong bulb can cause more issues.
Here are some common bulb types:
- 1157 – Dual filament for turn signals and brake lights
- 3157 – Another dual filament option
- 194 – Small, single filament bulb for markers
Make sure to buy a bulb that matches your trailer’s specifications.
Removing Old Bulb
Next, it’s time to remove the old bulb. Follow these steps:
- Locate the light housing at the back of your trailer.
- Use a screwdriver to remove the screws holding the housing.
- Carefully pull the housing away from the trailer.
- Twist the bulb socket counterclockwise to remove it.
- Gently pull the old bulb out of the socket.
Be careful not to break the old bulb. Broken glass can be dangerous.
Installing New Bulb
Now, it’s time to install the new bulb. Follow these steps:
- Take the new bulb out of its packaging.
- Insert the new bulb into the socket. Make sure it’s secure.
- Twist the socket clockwise to lock it in place.
- Reattach the light housing to the trailer.
- Screw the housing back into place.
Test the new bulb to ensure it’s working. Turn on the left turn signal and press the brake pedal.
Replacing a bulb is a simple task that can solve your trailer’s light issues. Follow these steps to get your trailer back on the road safely.
Checking Fuses
Experiencing issues with your left turn signal and brake light on your trailer can be frustrating. The first step in troubleshooting is checking the fuses. Fuses are a common cause of electrical problems. Follow these steps to inspect and replace them if needed.
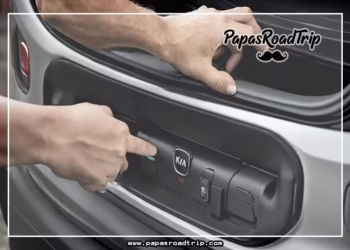
Locating Fuse Box
First, you need to find the fuse box. It’s usually located under the dashboard or near the trailer hitch. Check the owner’s manual if you’re unsure. Some trailers have multiple fuse boxes.
Testing Fuses
Once you locate the fuse box, open it carefully. Use a fuse tester or a multimeter to check each fuse. If a fuse is blown, it will show no continuity. This means the circuit is broken.
Replacing Blown Fuses
If you find a blown fuse, replace it with one of the same rating. Make sure to insert it firmly. Test the left turn signal and brake light again. If they work, the issue is resolved. If not, further troubleshooting is needed.
Credit: www.etrailer.com
Testing The Signals
Testing the signals on your trailer is a crucial step. Faulty left turn signal and brake light can lead to dangerous situations. This guide will help you diagnose the problem effectively.
Using A Multimeter
First, you need a multimeter. This device helps test electrical connections. Set it to measure voltage. Now, place the black probe on a ground point. Use the red probe to touch the connection you are testing. Check for a reading on the multimeter.
Checking Voltage
Voltage should be present when the signal or brake light is on. If there is no voltage, the problem might be in the wiring. Ensure the trailer is connected to the tow vehicle. Check the vehicle’s fuse box for any blown fuses.
Ensuring Proper Function
After confirming voltage, ensure the signal and brake light bulbs work. Replace any burnt-out bulbs. Also, inspect the trailer’s wiring for any damage. Proper wiring ensures smooth signal and brake light operation.
Preventative Maintenance
Maintaining your trailer’s left turn signal and brake light is crucial. This ensures safety on the road. Preventative maintenance helps avoid unexpected breakdowns. It also saves you time and money. Let’s explore three key aspects of preventative maintenance.
Regular Inspections
Perform regular inspections on your trailer. Check the wiring, bulbs, and connections. Look for signs of wear or damage. Ensure all lights work properly. Use a checklist to keep track of your inspections.
- Check connections
- Inspect wiring
- Test bulbs
Regular inspections help catch issues early. This prevents bigger problems down the road.
Keeping Spare Parts
Always keep spare parts on hand. This includes extra bulbs, fuses, and wiring. Having these parts ready ensures you can fix problems quickly.
| Part | Quantity |
|---|---|
| Bulbs | 4 |
| Fuses | 6 |
| Wiring | 2 rolls |
Keeping spare parts saves time during repairs. This ensures your trailer is always ready to go.
Proper Storage
Store your trailer properly. This protects it from the elements. Use a cover to shield it from rain and sun. Proper storage prolongs the life of your trailer’s electrical components.
- Use a trailer cover
- Store in a dry place
- Check for pests
Proper storage ensures your trailer remains in good condition. It helps keep your lights working reliably.
Follow these steps for preventative maintenance. This will help keep your trailer’s left turn signal and brake light in top shape.
Credit: www.etrailer.com
When To Seek Professional Help
Seek professional help if your trailer’s left turn signal and brake light stop working. Fixing electrical issues requires special skills and tools.
Finding the left turn signal and brake light not working on your trailer can be frustrating. While some issues are easy to fix, others need professional help. Knowing when to call an expert can save time and ensure safety.Complex Electrical Issues
Trailer wiring can be intricate. If the wiring looks tangled or damaged, seek help. Experts can diagnose and repair complex electrical issues. They have the tools and knowledge to fix intricate problems.Persistent Problems
If the left turn signal and brake light issues keep recurring, it’s time to call a professional. Persistent problems may indicate deeper issues. An expert can find and fix the root cause. This ensures long-term reliability.Safety Concerns
Faulty trailer lights can pose serious safety risks. If unsure about the repair, consult a professional. They will ensure all lights work correctly. This helps prevent accidents and keeps you safe on the road. “`Frequently Asked Questions
Why Is My Trailer’s Left Turn Signal Not Working?
The left turn signal may have a blown fuse, a faulty bulb, or a wiring issue.
How Can I Test The Trailer Brake Light?
Use a multimeter to check for voltage at the brake light socket. Ensure proper grounding.
What Tools Do I Need To Fix A Trailer Light?
You’ll need a multimeter, screwdrivers, replacement bulbs, and possibly a wiring diagram.
Can A Bad Ground Cause Trailer Light Problems?
Yes, a bad ground can cause lights to malfunction. Check and clean all ground connections.
How Do I Troubleshoot Trailer Wiring Issues?
Inspect all wiring for damage. Test connections with a multimeter. Ensure all wires are connected properly.
Conclusion
Fixing a trailer’s left turn signal and brake light may seem daunting. But with patience and the right tools, you can succeed. Start by checking the wiring and connections. Replace any faulty bulbs. Ensure the ground wire is secure. If problems persist, consider consulting a professional.
Regular maintenance prevents future issues. Safe travels depend on fully functioning lights. Stay proactive and enjoy peace of mind on the road. Your trailer’s lighting system is crucial for safety. Keep it in top shape for a worry-free journey.


