Is your car’s clear coat looking dull, scratched, or peeling? You might be wondering if clear coat can be reapplied to restore that shiny, smooth finish you once loved.
The good news is—you can reapply clear coat, but it’s not as simple as just spraying over the old layer. If you want your car’s paint to look flawless and last longer, you need to prepare the surface correctly and follow the right steps.
You’ll discover how to bring back that fresh, glossy look by properly reapplying clear coat, what tools you’ll need, and common mistakes to avoid. Keep reading to learn how to protect your investment and make your car shine like new again!

Credit: www.youtube.com
Clear Coat Basics
Clear coat is a vital part of your vehicle’s paint system. It acts as a protective shield. Understanding clear coat basics helps you maintain your car’s finish. This layer keeps the color vibrant and safe from damage.
Knowing what clear coat does and common problems helps you decide if reapplication is needed. Proper care extends the life of your paint and keeps your vehicle looking new.
What Clear Coat Does
Clear coat forms a transparent, hard layer over the paint. It protects the color underneath from UV rays, dirt, and moisture. This layer prevents fading and dullness. It also guards against scratches and minor damage. Clear coat enhances shine and depth, giving a glossy finish. Without it, paint can quickly lose its look and weaken.
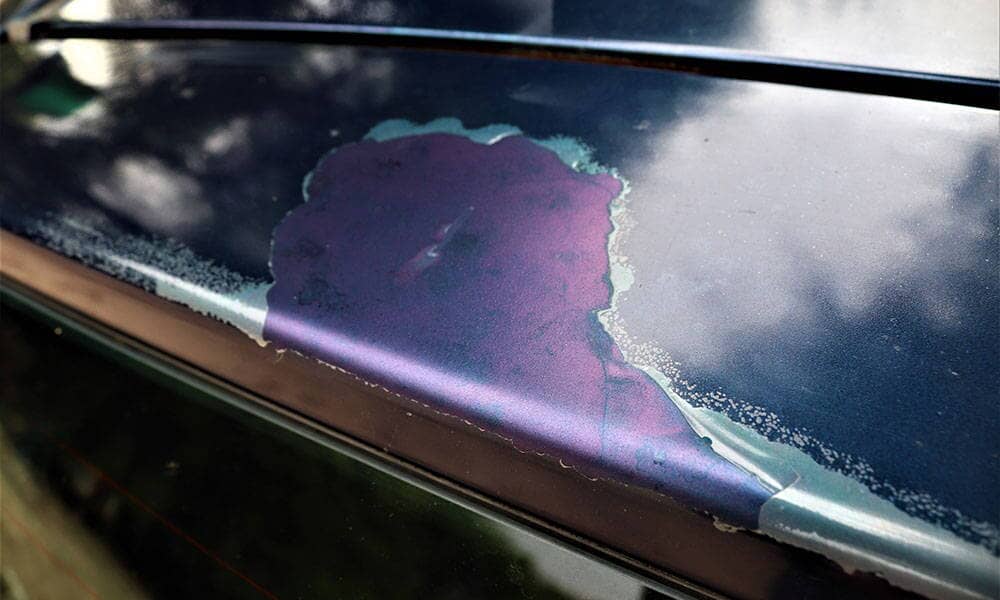
Common Clear Coat Problems
Clear coat can wear out over time. Sun exposure often causes it to fade or peel. Scratches and chips may break the protective layer. Pollution and acid rain can dull the clear coat’s shine. Improper washing or harsh chemicals can also damage it. When clear coat fails, paint becomes vulnerable to rust and fading. Recognizing these issues early helps protect your vehicle’s appearance.
Credit: www.torquedetail.com
When To Reapply Clear Coat
Knowing when to reapply clear coat helps maintain your vehicle’s shine and protection. Over time, clear coat can wear down due to weather, washing, and daily use. Reapplying it at the right moment restores the paint’s depth and guards against damage. Identifying the signs early prevents costly repairs and keeps your car looking fresh.
Signs It Needs Recoating
Look for dullness or fading on the paint surface. A loss of gloss often means the clear coat is thinning. Peeling or flaking clear coat shows it is failing and must be redone. Scratches that don’t buff out easily also signal the need for recoating. Water spots that won’t wash off can indicate clear coat damage. If you notice these signs, it’s time to consider reapplication.
Limitations Of Reapplication
Reapplying clear coat has limits. It cannot fix deep paint damage or rust beneath the surface. Applying new clear coat over peeling areas may worsen the problem. Proper surface preparation is essential for good adhesion. Multiple layers of clear coat can cause uneven texture or runs. Sometimes sanding down to the base paint is necessary before recoating. Knowing these limits helps set realistic expectations for results.
Surface Preparation Steps
Reapplying clear coat needs careful surface preparation. The surface must be smooth and clean to ensure the new layer sticks well. Poor preparation causes peeling or uneven finish. Follow these steps for best results.
Sanding The Old Clear Coat
Start by sanding the old clear coat. Use fine-grit sandpaper, like 600 to 800 grit. Sand lightly and evenly to remove any damaged or peeling clear coat. This roughens the surface so the new clear coat can bond better. Avoid sanding too deep to protect the paint underneath.
Cleaning And Degreasing
After sanding, clean the surface thoroughly. Use a degreaser or a mild soap and water mix. Remove all dirt, wax, and oils from the surface. Any leftover residue can stop the clear coat from sticking properly. Wipe the area with a lint-free cloth and let it dry completely.
Masking Surrounding Areas
Protect areas around the repair spot before spraying. Use painter’s tape and masking paper to cover trim, windows, and other parts. This prevents overspray and keeps your work neat. Be sure the tape edges are secure to stop paint from seeping underneath.
Applying New Clear Coat
Applying new clear coat can restore shine and protect your vehicle’s paint. It needs careful steps to ensure a smooth, lasting finish. Proper preparation and application are key to success.
Choosing The Right Clear Coat
Select clear coat that matches your paint type and finish. Water-based clear coats are eco-friendly and easy to use. Solvent-based clear coats offer stronger protection but require good ventilation. Check product labels for compatibility with your base paint.
Spray Techniques
Hold the spray gun or can about 6 to 8 inches from the surface. Use smooth, even passes to avoid runs and drips. Start spraying off the surface, then move across in steady motions. Overlap each pass slightly to ensure full coverage.
Layering And Flash-off Times
Apply multiple thin layers instead of one thick coat. Thin coats dry faster and reduce the risk of imperfections. Allow each layer to flash off, or dry to the touch, before applying the next. Follow the clear coat’s instructions for exact flash-off times.
Drying And Curing
Drying and curing are crucial steps after applying a clear coat. These stages allow the paint to harden and protect the surface. Proper drying ensures the clear coat adheres well and lasts longer. Curing strengthens the finish and prevents damage from dust, moisture, and handling.
Skipping or rushing these steps can cause imperfections like cloudiness or peeling. Patience during drying and curing results in a smooth, durable finish. Understanding the right drying times and how to avoid contaminants helps maintain the quality of the clear coat.
Recommended Drying Times
Clear coat drying time depends on temperature and humidity. Most products need 20 to 60 minutes between coats. Let the final coat dry for at least 24 hours before touching.
For full curing, wait 7 to 30 days. This time allows the clear coat to harden completely. Avoid rushing this process to prevent damage.
Avoiding Dust And Contaminants
Dust and dirt can ruin a fresh clear coat. Apply clear coat in a clean, dust-free area. Cover nearby surfaces to prevent overspray.
Keep the environment well-ventilated but free from strong winds. Avoid touching the surface during drying. Use a tack cloth to remove dust before applying new coats.

Credit: www.youtube.com
Touch-up Tips
Touching up your vehicle’s clear coat can restore its shine and protect the paint beneath. Proper touch-up helps extend the life of your clear coat. It also improves the look of small scratches and chips. Follow simple steps to handle minor damage with care. This section offers practical tips for a smooth touch-up process.
Handling Small Scratches
Start by cleaning the scratched area with soap and water. Dry it completely before proceeding. Lightly sand the scratch with fine-grit sandpaper. This creates a smooth surface for the new clear coat to stick. Avoid sanding too hard to prevent damage to the paint below. Wipe the area with a tack cloth to remove dust. Always work in a well-ventilated space with good lighting.
Using Touch-up Products
Choose a clear coat product designed for touch-ups. Use small brushes or applicators for precise application. Apply thin layers to avoid runs or drips. Allow each layer to dry before applying the next. Follow the product instructions for drying times. Avoid thick or heavy coats that may peel or bubble later. Store leftover product tightly sealed for future use.
Polishing After Touch-up
Once the clear coat dries fully, gently polish the area. Use a fine polishing compound and a soft cloth. Polish in small, circular motions to blend the touch-up with surrounding paint. This smooths the surface and restores shine. Avoid aggressive polishing that can remove too much clear coat. Finish with a wax or sealant to protect the repaired spot.
Common Mistakes To Avoid
Reapplying clear coat can refresh your car’s shine and protect the paint. Avoiding common mistakes helps you get the best results. Many errors happen during preparation, application, or drying. These mistakes can cause peeling, bubbling, or uneven finishes.
Focus on key steps to ensure the new clear coat sticks well and looks smooth. Below are some mistakes to watch out for.
Skipping Surface Prep
Never skip sanding the old clear coat. Sanding creates a rough surface for the new coat to stick. Clean the area with soap and wax remover. Dirt or wax left on the surface prevents proper adhesion.
Good surface prep saves time and prevents peeling later. Take your time here.
Applying Thick Coats
Apply thin, even layers of clear coat. Thick coats run, drip, or dry unevenly. Multiple thin coats build a strong, smooth finish. Spray lightly and keep the spray can moving.
Thick coats also take longer to dry and can trap solvents.
Rushing Drying Times
Allow each coat to dry fully before the next. Rushing causes smudges and cloudy finishes. Follow the product’s recommended drying time closely. Patience ensures a hard, glossy surface.
Drying in a dust-free, ventilated area also improves results.
Tools And Materials Needed
Reapplying clear coat demands certain tools and materials. Having the right supplies makes the job easier and the result better. Prepare well before starting to ensure smooth application and lasting protection.
Sanding Supplies
Sanding is key for a new clear coat to stick properly. Use fine-grit sandpaper, usually between 800 and 1500 grit. Wet sanding helps reduce dust and prevents deep scratches. A sanding block or sponge keeps pressure even and avoids uneven surfaces.
Cleaning Agents
Clean the surface thoroughly before applying the clear coat. Start with a mild detergent or car wash soap to remove dirt. Follow this with wax and grease remover to eliminate oils and residues. Use lint-free cloths to avoid leaving fibers behind.
Clear Coat Products
Choose a clear coat product suited for your car’s paint type. Spray cans are good for small areas or touch-ups. For larger jobs, use a spray gun with automotive clear coat paint. Make sure the product matches your paint system for best results.
Professional Vs Diy
Deciding between professional service and do-it-yourself (DIY) for clear coat reapplication depends on several factors. Both methods have pros and cons. Understanding these can help you make the right choice for your vehicle’s finish.
When To Hire Experts
Choose professionals if your clear coat is deeply damaged or peeling. Experts have the right tools and environment. They can handle complex repairs smoothly. Small scratches or minor wear can be tackled by DIY. But serious damage needs expert attention for best results.
Cost Considerations
DIY clear coat reapplication saves money upfront. You only pay for materials like clear coat spray and sandpaper. Professional service costs more because of labor and equipment. Yet, professionals often prevent costly mistakes. Consider your budget and skill level before deciding.
Benefits Of Professional Finish
Experts deliver a smooth, even finish with no streaks or bubbles. They ensure proper surface preparation for better adhesion. Professionals use high-quality products and controlled environments. This extends the clear coat’s lifespan. DIY results may vary and need rework sooner.
Frequently Asked Questions
Can You Apply Clear Coat Over Existing Clear Coat?
Yes, you can apply clear coat over existing clear coat. Sand the old coat to ensure adhesion, clean thoroughly, then apply thin new layers.
Is It Possible To Restore Clear Coat?
Yes, you can restore clear coat by sanding, cleaning, and applying new layers carefully. Deep damage may require full repainting.
Can Clear Coat Be Touched Up?
Yes, clear coat can be touched up for minor scratches or chips using touch-up pens or sprays. Proper surface cleaning and sanding ensure better results. For extensive damage, professional repainting may be necessary to restore the finish correctly.
How Often Should I Reapply Clear Coat?
Reapply clear coat every 2-3 years or when it shows signs of wear, fading, or peeling. Proper surface prep ensures better adhesion.
Can Clear Coat Be Reapplied Over Old Clear Coat?
Yes, clear coat can be reapplied if the old layer is properly sanded and cleaned first.
Conclusion
Clear coat can be reapplied with the right steps. Sand the old clear coat first. Clean the surface well to remove dirt and grease. Apply thin layers of new clear coat carefully. Let each layer dry before adding the next.
Proper preparation helps the new coat stick better. Taking time ensures a smooth and lasting finish. This simple process can refresh your paint’s shine. Reapplying clear coat is possible and effective when done right.


