Is your car making strange noises, or are you noticing issues with your vehicle’s performance? These could be signs that it’s time to replace the serpentine belt.
This essential component keeps your car’s engine running smoothly by powering various parts like the alternator and power steering pump. Replacing a serpentine belt might sound daunting, but it’s a task that can save you from bigger problems down the road.
A worn-out belt can lead to engine overheating, loss of power steering, and even a dead battery. Understanding when and how to replace it is crucial for maintaining your vehicle’s health. In this guide, we’ll walk you through the signs of a failing serpentine belt, the tools you’ll need, and step-by-step instructions to get the job done right. Get ready to boost your car’s performance and safety by tackling this essential maintenance task.

Credit: www.wikihow.com
Introduction To Serpentine Belts
The serpentine belt is a crucial part of your car’s engine. It powers many engine components. Without it, your vehicle won’t run properly.
Purpose And Function
The serpentine belt drives multiple engine parts. These include the alternator, power steering pump, and air conditioning compressor. It also powers the water pump in some cars.
Key Functions:
- Drives the alternator to charge the battery.
- Powers the power steering system.
- Runs the air conditioning compressor.
- Sometimes drives the water pump.
This single belt replaces older multiple belt systems. It is more efficient and simpler to maintain.
Common Issues
Serpentine belts can wear out over time. They face constant tension and friction. Common problems include:
| Issue | Description |
|---|---|
| Cracking | Small cracks appear on the belt surface. |
| Squealing | The belt makes a squealing noise when slipping. |
| Wear | General wear and tear from prolonged use. |
| Misalignment | The belt is not aligned properly on pulleys. |
Regular inspection can prevent serious engine problems. Replace the belt if you see signs of wear or hear unusual noises.
Ignoring these issues can lead to engine failure. Always keep an eye on the serpentine belt’s condition.

Credit: vatire.com
Tools And Materials Needed
Replacing a serpentine belt requires specific tools and materials to ensure the job is done right. This guide will help you gather everything you need for a smooth and efficient replacement process. Here’s a detailed list of the tools and supplies you’ll need.
Required Tools
You need these tools to replace the serpentine belt:
- Wrench Set: A set of open-end and box-end wrenches for loosening bolts.
- Socket Set: Different sized sockets to fit various bolt heads.
- Ratcheting Wrench: Provides quick and easy removal of bolts.
- Belt Tensioner Tool: Essential for releasing tension on the belt.
- Screwdrivers: Both flat-head and Phillips for removing covers.
- Jack and Jack Stands: For safely lifting and supporting the vehicle.
- Flashlight: To see clearly in tight engine compartments.
Recommended Supplies
Having these supplies on hand can make the replacement process easier:
- New Serpentine Belt: Ensure it matches your vehicle’s make and model.
- Gloves: Protect your hands from dirt and sharp edges.
- Safety Glasses: Shield your eyes from debris.
- Rags or Towels: Keep your work area clean and dry.
- Anti-Seize Lubricant: Prevents bolts from seizing in the future.
- Diagram or Guide: Helps you install the belt correctly.
Preparing Your Vehicle
Before replacing your serpentine belt, get your vehicle ready. Proper preparation can save time and prevent issues. Follow these steps to ensure a smooth process.
Safety Precautions
Always prioritize safety. Wear gloves to protect your hands. Keep your workspace well-lit. Make sure the engine is off and cool before you start. Disconnect the battery to avoid electrical accidents. Have a fire extinguisher nearby.
Locating The Belt
Open your car’s hood and prop it securely. Find the serpentine belt by checking the engine’s front area. Look for a diagram under the hood. This diagram shows the belt’s routing path. If there’s no diagram, take a picture for reference.
Credit: www.mystylelabel.com
Removing The Old Belt
Replacing a serpentine belt may seem daunting, but it’s a straightforward task. Follow these steps to remove the old belt and you’ll be ready to install a new one.
Loosening Tensioner
First, locate the tensioner pulley. This pulley keeps the belt tight. Use a wrench to rotate the tensioner. This will relieve the tension on the belt.
Consult your car’s manual for the tensioner’s location. Most are spring-loaded and easy to spot. Turn the wrench clockwise or counterclockwise, depending on your car’s design.
Hold the tensioner in place while you remove the belt. Be cautious, as the tensioner might snap back.
Taking Off The Belt
With the tensioner loose, you can now remove the belt. Carefully slide it off the pulleys. Start with the largest pulley, usually the crankshaft pulley.
Check the belt’s path. This ensures you remember how to install the new belt. You can also take a picture for reference. Gently pull the belt out from each pulley.
Inspect the old belt. Look for cracks, fraying, or other damage. This helps you understand why the belt needed replacing.
Once the old belt is out, you’re ready to install the new one. Ensure the area is clean and free of debris.
Inspecting Pulleys And Tensioner
Inspecting the pulleys and tensioner is a critical step in replacing the serpentine belt. This process ensures that all related components function properly. Neglecting this step can lead to further issues down the line.
Checking For Wear
Start by examining the pulleys for wear. Look for any cracks or chips. Rotate each pulley to check for smooth movement. Any grinding or resistance indicates a problem. The tensioner should also move smoothly. If it feels loose or too tight, it may need replacing.
Cleaning Components
Once you check for wear, clean the components. Remove any dirt or debris from the pulleys. Use a clean cloth or brush for this task. Ensure the tensioner is also clean. Keeping these parts clean helps the belt work efficiently.
Installing The New Belt
Installing the New Belt is a crucial step in replacing your serpentine belt. This part ensures your car’s accessories like the alternator and air conditioning work smoothly. Follow these steps to ensure a proper installation.
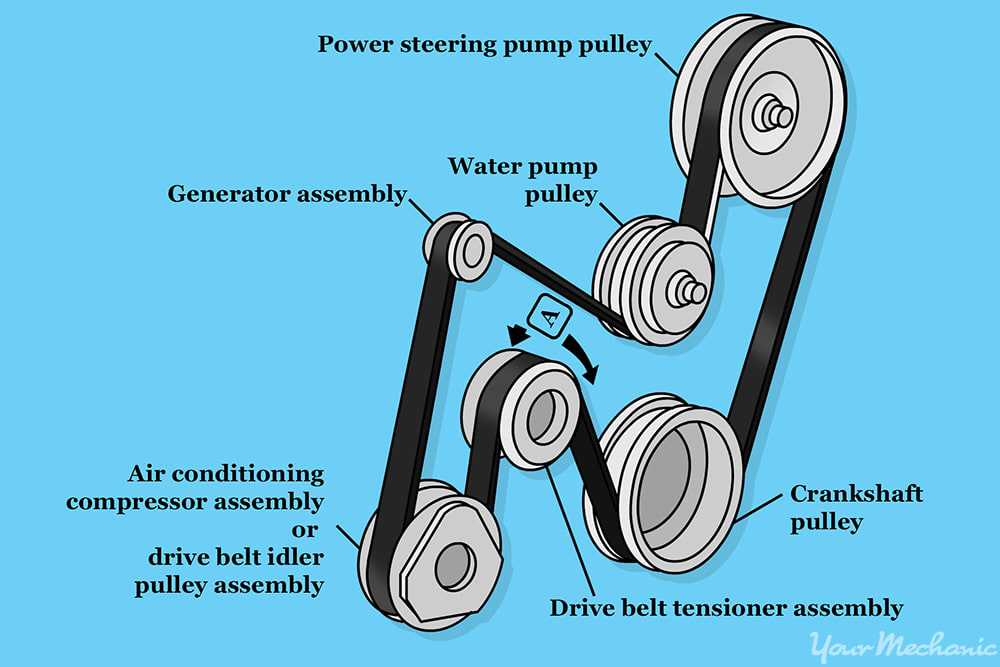
Routing The Belt
Before you start, refer to the belt routing diagram. You can find this under the hood or in the owner’s manual. This diagram shows the correct path for the new belt.
Use the diagram to guide you. Place the belt over the pulleys in the exact order. If you don’t, the belt may not function correctly. Here’s a simple step-by-step guide:
- Start at the crankshaft pulley.
- Move to the water pump pulley.
- Then, guide the belt over the alternator pulley.
- Followed by the power steering pump pulley.
- Finally, route it around the air conditioning compressor pulley.
Make sure the belt sits properly in the grooves of each pulley. This prevents slipping and ensures efficient operation.
Securing With Tensioner
Once the belt is routed correctly, the next step is securing it with the tensioner. The tensioner keeps the belt tight, ensuring it doesn’t slip off. Here’s how to do it:
- Locate the tensioner pulley.
- Use a wrench to rotate the tensioner and release the tension.
- Slide the belt onto the tensioner pulley.
- Slowly release the tensioner to apply tension to the belt.
Check the belt tension by pressing down on it. It should move slightly, about half an inch. If it’s too loose or tight, adjust the tensioner accordingly.
Double-check the belt routing and tension. A well-installed belt ensures your car runs smoothly without any issues.
Testing The Installation
After replacing the serpentine belt, it is crucial to test the installation. This ensures the belt works correctly and avoids future issues. Let’s go through the steps to test the installation effectively.
Starting The Engine
First, start the engine. Observe the belt’s movement. It should run smoothly without any wobbling. If the belt moves erratically, it may not be installed properly. Turn off the engine immediately. Recheck the installation.
Listening For Noise
Next, listen for unusual noises. A properly installed belt should run quietly. Listen carefully for any squeaking or squealing sounds. These noises can indicate a misaligned belt or an issue with the tensioner.
If you hear any abnormal sounds, turn off the engine. Inspect the belt and other components. Ensure everything is aligned and tightened correctly.
| Symptom | Possible Cause |
|---|---|
| Squeaking | Belt misalignment |
| Squealing | Incorrect tension |
| Rattling | Loose components |
Ensure the belt is properly aligned with all pulleys. Check the tension. Make sure it is neither too tight nor too loose.
- Start the engine and observe the belt.
- Listen for any unusual noises.
- Inspect belt alignment and tension.
A quiet and smooth-running belt means the installation is successful. If you notice any issues, address them immediately to ensure the longevity of your vehicle.
Maintenance Tips
Maintaining your serpentine belt is essential for the smooth operation of your vehicle. Regular inspections and knowing the signs of wear can help avoid breakdowns and costly repairs. Below are some practical tips to keep your serpentine belt in good condition.
Regular Inspections
Regular inspections can help catch problems early. Check your serpentine belt every 10,000 miles or at least twice a year. Look for any signs of damage or wear.
- Check for cracks: Small cracks are normal. Larger ones indicate a problem.
- Look for fraying: Edges should be smooth. Frayed edges mean the belt is wearing out.
- Listen for noises: Squealing or chirping sounds can signal a loose or damaged belt.
Use a flashlight to inspect the belt. Make sure the engine is off and cool before you start.
Signs Of Wear
Recognizing the signs of wear can prevent serious damage. Here are the common signs:
| Sign | Description |
|---|---|
| Cracks | Large cracks indicate the belt is old and brittle. |
| Fraying | Frayed edges mean the belt is misaligned or worn out. |
| Glazing | A shiny or glossy surface shows the belt is slipping. |
| Noises | Squealing or chirping sounds suggest a loose or damaged belt. |
If you notice any of these signs, replace the serpentine belt immediately. Delaying can lead to engine damage and expensive repairs.
Keep an eye on your serpentine belt and follow these maintenance tips. Your vehicle will run smoothly and efficiently.
Frequently Asked Questions
What Is A Serpentine Belt?
A serpentine belt is a long, winding belt. It drives multiple engine components.
How Often Should You Replace A Serpentine Belt?
Replace it every 60,000 to 100,000 miles. Check your car’s manual for specifics.
What Are Signs Of A Bad Serpentine Belt?
Squeaking noises, cracks, or wear. Loss of power in components.
Can You Drive With A Broken Serpentine Belt?
No, you shouldn’t. It can cause your engine to overheat and other failures.
How Much Does It Cost To Replace A Serpentine Belt?
Usually between $50 and $200. Prices vary by car model and labor rates.
Conclusion
Replacing a serpentine belt is crucial for your car’s health. Regular checks can prevent unexpected breakdowns. Always follow your vehicle’s manual for guidance. Investing time in maintenance saves you money later. Seek help if you’re unsure. Your car deserves proper care.
Keep it running smoothly. A well-maintained serpentine belt means fewer worries on the road. Stay proactive with car care. Happy driving!


