If you’re a Silverado owner looking to remove the overhead console, you’ve come to the right place. Whether you want to upgrade, repair, or simply clean behind it, knowing how to safely and efficiently take out the overhead console can save you time and frustration.
In this guide, you’ll learn easy steps to remove your Silverado’s overhead console without needing special tools or expert help. Keep reading, and you’ll have your console out in no time—ready for whatever project you have in mind.
Tools Needed
Removing the overhead console from your Silverado requires a few basic tools. These tools help avoid damage and make the process smooth. Having the right tools on hand saves time and effort.
Each tool serves a specific purpose in the removal process. Using them correctly protects your vehicle’s interior parts.
Phillips Screwdriver
A Phillips screwdriver is essential for removing screws holding the console. Most overhead consoles use Phillips screws. Choose the correct size to avoid stripping the screw heads. This tool helps safely detach the console from the roof.
Flathead Screwdriver
A flathead screwdriver assists in gently prying apart parts. It helps release clips or tabs without breaking them. Use it carefully to avoid scratching the surface. This tool is handy for loosening tight spots around the console edges.
Plastic Trim Tool
A plastic trim tool prevents damage to plastic and fabric surfaces. It slides between gaps to pop out clips safely. This tool is softer than metal screwdrivers, reducing scratches. It makes removing the overhead console easier and cleaner.
Prepare The Vehicle
Preparing your Silverado for overhead console removal is a crucial first step. Proper preparation helps avoid damage and ensures safety. This section covers two important tasks: disconnecting the battery and clearing the console area.
Disconnect Battery
Start by disconnecting the vehicle’s battery. This prevents electrical shorts or shocks during the removal process. Use a wrench to loosen the negative terminal first. Remove the cable and secure it away from the battery. Never touch the positive terminal while working on the electrical system. Taking this step keeps you safe and protects your truck’s electronics.
Clear Console Area
Next, clear everything from around the overhead console. Remove any loose items, such as sunglasses, papers, or chargers. This gives you full access to the console and stops things from falling or breaking. Clean the surface gently to avoid scratching. A clear work area makes the removal easier and faster.
Remove Console Cover
Removing the console cover from your Silverado overhead console is a simple first step. It allows easy access to the screws and components inside the console. Follow the steps carefully to avoid damaging the cover or surrounding parts. Use gentle pressure and locate the release points precisely.
Locate Release Button
Look closely at the front edge of the console cover. You will see a small button or tab designed for release. This button keeps the cover securely fastened during driving. Identifying the exact spot helps you avoid forcing the cover and causing cracks.
Depress Lid Release
Press the release button firmly but carefully. Use your finger or a flat tool if needed. The button will push inward, unlocking the cover from its latch. Hold the button down while preparing to lift the cover. This step frees the cover safely.
Lift Cover Gently
Once the release button is pressed, lift the console cover slowly. Avoid yanking or pulling hard to prevent breaking clips. Lift it just enough to clear the latch. Set the cover aside on a soft surface to keep it scratch-free.
Unscrew Console
Removing the overhead console from your Silverado starts with unscrewing the console. This step is key to safely detach the unit without damage. Take your time and prepare the right tools before you begin.
Find Phillips Screws
Look closely at the overhead console for Phillips screws. They are often hidden under small plastic covers. Use a flat tool to gently pry off these covers. Spot all screws to avoid missing any during removal.
Remove Screws Carefully
Use a Phillips screwdriver that fits well to avoid stripping the screws. Turn each screw counterclockwise slowly and steadily. Keep screws in a safe place for reinstallation. Handle the console gently as you unscrew to prevent cracks or breaks.
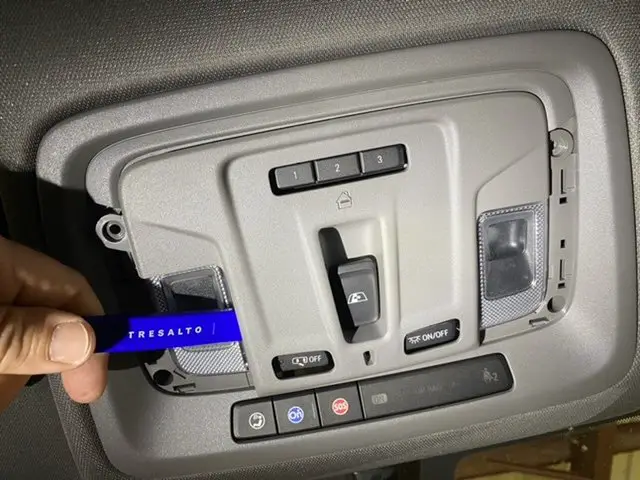
Detach Console
Detaching the overhead console from your Silverado is a key step in accessing wiring or replacing parts. This process requires careful handling to avoid damage. Follow these simple steps to safely remove the console.
Unclip Backside
Start by locating the clips at the back of the console. These clips hold the console firmly in place. Gently press or pry the clips to unfasten them. Avoid using too much force to prevent breaking the plastic.
Slide Console Forward Or Pull Down
After unclipping, move the console either forward or pull it downward. The direction depends on your Silverado model. Test both directions softly to find the right way. This action releases the console from its mounting points.
Use Trim Tool For Assistance
A plastic trim tool helps in releasing stubborn clips. Insert the tool between the console and the headliner. Pry carefully around the edges to loosen the console. The tool reduces the risk of scratches or damage to the interior.
Credit: www.gm-trucks.com
Disconnect Wiring
Disconnecting the wiring is a key step in removing the Silverado overhead console. This step ensures safety and prevents damage to electrical components. Take your time to handle the wiring carefully. Avoid pulling or yanking any wires to prevent breaks or shorts. Properly disconnecting wiring helps the console come out smoothly and prepares it for reinstallation or replacement.
Identify Connectors
Start by locating all the wiring connectors attached to the overhead console. Look for plugs that link the console to the vehicle’s electrical system. These connectors may vary in size and shape. Check for clips or tabs that hold them in place. Understanding where each connector is will make removal easier and faster. Use a flashlight if needed to see clearly inside the console area.
Release Wiring Harness
After identifying the connectors, gently release the wiring harness. Press the release tabs or clips on each connector to unlock them. Pull the connectors straight out without twisting or bending. Keep track of each connector’s position for easier reassembly. Handle the wires with care to avoid damage. Properly releasing the wiring harness ensures the console detaches cleanly and safely from the truck.
Install New Console
Installing a new overhead console in your Silverado requires careful steps. This ensures the console fits well and functions correctly. Proper installation keeps all components secure and operational.
Follow each step to install the new console smoothly. Take your time to avoid damage or loose connections.
Reconnect Wiring
Start by reconnecting the wiring harness to the new console. Match each connector to its correct port. Push connectors firmly until they click into place. This restores power to lights and other features.
Align Console Properly
Hold the console close to the mounting area. Align its edges with the vehicle’s roof slots. Make sure buttons and lights line up correctly. Proper alignment prevents gaps and uneven fitting.
Secure With Screws
Use the original screws to fasten the console. Tighten each screw evenly to avoid cracking the plastic. Check that the console feels sturdy and does not move. Secure mounting ensures durability and safety during driving.
Credit: www.silveradosierra.com
Replace Console Cover
Replacing the console cover on your Silverado overhead console is a simple task that refreshes the vehicle’s interior. A new cover fits snugly and restores the clean look of the console. Proper alignment ensures the cover stays secure and functions well over time.
Follow the steps carefully to snap the cover back into place without damage. After installation, testing the console functions guarantees everything works as expected.
Snap Cover Into Place
Align the console cover with the mounting points carefully. Hold it firmly and press gently but firmly. You will hear a soft click indicating the cover is locked. Avoid forcing the cover, which can cause cracks or break clips. Check all sides to ensure it is flush with the surrounding console.
Test Console Functions
Turn on the vehicle’s power to test the console features. Check the lights, buttons, and any electronic components. Confirm the cover does not block or interfere with any controls. If something does not work, remove the cover and inspect the connections. Make adjustments and retest until everything functions smoothly.
Troubleshooting Tips
Troubleshooting the Silverado overhead console removal can save time and prevent damage. This section covers common problems and practical fixes. Clear steps help you work with confidence and ease.
Console Won’t Detach
Check for hidden screws or clips holding the console. Use a plastic trim tool to avoid scratching surfaces. Press release buttons firmly while pulling gently. Avoid forcing the console to prevent breaking clips.
Wiring Issues
Disconnect the battery before handling wires. Inspect wires for damage or loose connections. Use a multimeter to test electrical continuity. Secure loose wires with electrical tape or zip ties. Reconnect everything carefully to avoid shorts.
Loose Or Rattling Console
Identify loose screws or mounting points. Tighten all screws evenly to hold the console firmly. Add foam or felt pads to reduce rattling noises. Check clips for wear and replace if needed. Ensure the console fits snugly without forcing.

Credit: www.youtube.com
Frequently Asked Questions
What Was The Worst Year For Chevy Silverado?
The worst year for the Chevy Silverado is often cited as 2014, due to engine, transmission, and air conditioning failures. Other problematic years include 2008, 2017, and 2019-2021, with issues like faulty airbags, transmission problems, and engine lifter failures.
How To Remove Center Console Lid Chevy Silverado 2016?
Press the lid release button to unlock the center console lid. Remove six Phillips screws holding the lid to the hinge. Lift the lid off carefully.
How To Remove 2018 Silverado Head Rest?
Press the release button at the base of the 2018 Silverado headrest. Pull the headrest upward firmly to remove it.
How Much Does It Cost To Replace A Tailgate On A Silverado?
Replacing a Silverado tailgate typically costs between $300 and $700. Prices vary by model year and parts quality. Labor charges may add $100 to $200. OEM parts cost more than aftermarket options. Always get a detailed quote from a trusted mechanic or dealership for accuracy.
How Do I Remove The Silverado Overhead Console Safely?
Start by pressing the lid release button to open the console. Then, gently pull down to release the clips.
Conclusion
Removing the Silverado overhead console is simple with the right steps. Use basic tools like a Phillips screwdriver and flathead. Gently press clips and screws to avoid damage. Taking your time helps prevent any issues. Following this guide saves you from costly repairs.
Now, you can customize or repair your truck’s console easily. Keep your Silverado looking and working great with small DIY fixes. Try it yourself and see how straightforward the process can be.


