The idle air control valve is crucial for smooth engine performance. It regulates the engine’s idle speed.
Is your car idling roughly? You might need to replace the idle air control valve. This small part plays a significant role in maintaining your car’s engine stability. Over time, it can wear out or get clogged, causing erratic engine behavior.
Replacing it can restore your engine’s smooth operation and improve your vehicle’s performance. In this blog, we’ll walk you through the process of replacing the idle air control valve. You’ll learn what tools you need, the steps to follow, and some tips to make the job easier. Let’s get started and help your car run smoothly again!
Introduction To Idle Air Control Valve
Replacing the idle air control valve can help maintain a smooth engine idle. This small part regulates airflow in the engine. A faulty valve can cause stalling or rough idling.
The Idle Air Control Valve (IAC) is a small but vital part of your car’s engine. It controls the amount of air that enters the engine when the car is idling. This ensures the engine runs smoothly when you are not pressing the gas pedal. A malfunctioning IAC can lead to various engine issues.Importance In Engine Performance
The IAC valve plays a key role in engine performance. It helps maintain a steady idle speed. This is crucial for engine stability. A well-functioning IAC valve ensures your engine does not stall. It also helps in reducing fuel consumption. An efficient IAC valve contributes to smoother engine operation.Common Symptoms Of A Faulty Valve
Recognizing a faulty IAC valve is important. Common symptoms include irregular idle speeds. You may notice the engine stalling frequently. Sometimes, the check engine light turns on. The car might also have trouble starting. Unusual sounds from the engine could indicate a problem. These symptoms suggest it’s time to replace the IAC valve. “`
Credit: www.youtube.com
Tools And Materials Needed
Replacing the Idle Air Control (IAC) valve in your vehicle can seem intimidating. But with the right tools and materials, the process becomes manageable. This section will guide you through the essential tools and recommended supplies needed for a smooth replacement.
Essential Tools
To replace the IAC valve, you need a few key tools. These tools ensure you can safely and effectively complete the task. Here are the must-have tools:
- Socket Set: A socket set will help you remove the bolts securing the IAC valve.
- Screwdrivers: Both flat-head and Phillips screwdrivers are necessary.
- Torque Wrench: This ensures the new IAC valve is properly tightened.
- Ratchet: A ratchet is useful for quick and easy bolt removal.
- Work Light: Good lighting helps you see the work area clearly.
Recommended Supplies
Besides the essential tools, having the right supplies is critical. These items support the replacement process and ensure a smooth installation:
- Replacement IAC Valve: Ensure you have the correct valve for your vehicle’s make and model.
- Gasket: A new gasket prevents air leaks around the valve.
- Cleaner: Use a throttle body or carburetor cleaner to clean the mounting area.
- Gloves: Protect your hands with durable work gloves.
- Rags: Keep rags handy for wiping away dirt and grease.
Locating The Idle Air Control Valve
To replace the Idle Air Control (IAC) valve, first locate it. The IAC valve controls the engine’s idle speed. It is usually found on the throttle body. Knowing where to look is crucial. Follow these steps to find it easily.
Engine Diagram
Consult your vehicle’s manual. It often has an engine diagram. The diagram can pinpoint the IAC valve’s location. Look for the throttle body on the diagram. The IAC valve is generally nearby. This visual guide makes the process simpler.
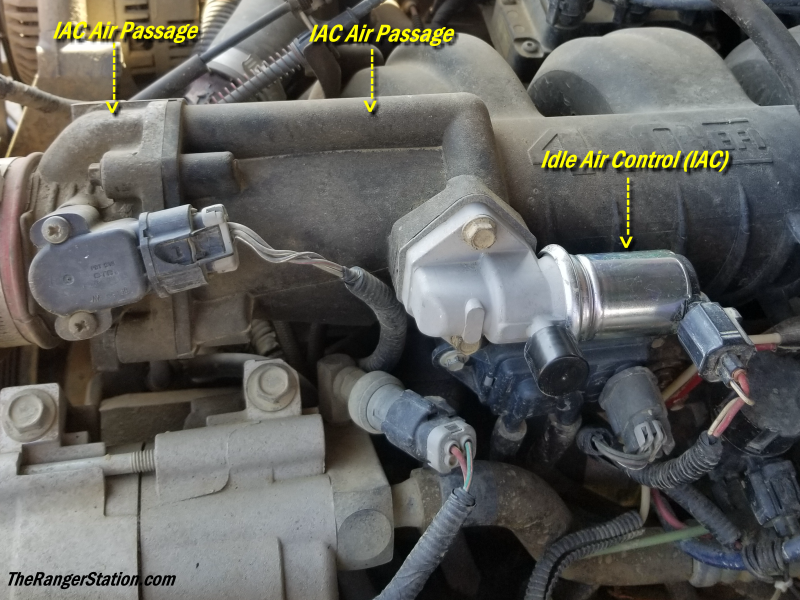
Identifying The Valve
Once you find the throttle body, identify the IAC valve. It is a small, cylindrical component. It might have wires connected to it. Check for labels or markings. They can confirm you have the right part. If unsure, compare it with a new IAC valve. This ensures you are replacing the correct component.
Removing The Old Idle Air Control Valve
Replacing the Idle Air Control (IAC) valve in your vehicle is essential for maintaining a smooth idle. This section will guide you through the process of removing the old IAC valve. Follow these steps carefully to ensure a successful replacement.
Safety Precautions
Before you start, make sure to take some basic safety precautions:
- Turn off the engine and remove the keys from the ignition.
- Disconnect the negative terminal of the battery to avoid electrical shocks.
- Wear safety gloves and goggles to protect your hands and eyes.
- Ensure the car is on a flat surface and the parking brake is engaged.
Step-by-step Removal Guide
- Locate the IAC Valve: The IAC valve is usually found on the throttle body. Refer to your vehicle’s manual for the exact location.
- Disconnect the Electrical Connector: Carefully unplug the electrical connector from the IAC valve. This may require a gentle pull or pressing a tab to release it.
- Remove Mounting Screws: Use a suitable screwdriver or socket wrench to remove the screws or bolts holding the IAC valve in place.
- Detach the IAC Valve: Gently pull the IAC valve away from the throttle body. Some resistance is normal, but avoid using excessive force.
- Check the Gasket: Inspect the gasket or O-ring for wear or damage. Replace it if necessary to ensure a proper seal with the new valve.
By following these steps, you can safely and effectively remove the old idle air control valve from your vehicle. Remember to keep all parts and screws organized for reinstallation. Ready to install the new IAC valve? Let’s move on to the next section!
Preparing The New Idle Air Control Valve
Preparing the new idle air control valve is a crucial step. Ensuring everything is in place will make the installation smooth. A well-prepared valve will help your engine run efficiently. Let’s dive into the details of what you need to do.
Inspecting The Replacement
First, check the new idle air control valve for any visible damage. Look for cracks, dents, or other imperfections. It should be in perfect condition before installation. A damaged valve can cause engine problems.
Compare the new valve with the old one. They should look similar. If they differ, you may have the wrong part. Double-check the part number to be sure. This step prevents future issues.
Pre-installation Checks
Before installing, ensure you have all the necessary tools. Gather wrenches, screwdrivers, and any other required tools. Having everything ready saves time and reduces frustration.
Clean the mounting area on the engine. Remove any dirt or debris. A clean surface ensures a good seal. This step is often overlooked but is very important.
Check the connector and wiring. Make sure they are in good condition. Damaged wires can cause the valve to malfunction. This can lead to engine stalling or poor performance.
Finally, follow the manufacturer’s instructions. Each vehicle may have specific requirements. Reading the manual helps you avoid mistakes.
Credit: www.therangerstation.com
Installing The New Idle Air Control Valve
Replacing the idle air control (IAC) valve can improve your engine’s performance. It’s a simple task if you follow the steps carefully. Here’s a guide to help you install the new IAC valve efficiently.
Detailed Installation Steps
- Prepare Your Tools and Workspace: Gather all necessary tools such as wrenches, screwdrivers, and the new IAC valve. Ensure your workspace is clean and well-lit.
- Disconnect the Battery: Safety first. Disconnect the negative cable from the car battery. This prevents any electrical issues.
- Locate the IAC Valve: The IAC valve is usually on the throttle body. Consult your vehicle’s manual if you need help finding it.
- Remove the Old IAC Valve: Unplug the electrical connector from the old valve. Use a wrench to remove the bolts securing the valve.
- Clean the Mounting Surface: Before installing the new valve, clean the area where the old valve was mounted. This ensures a good seal.
- Install the New IAC Valve: Place the new valve in position. Secure it with the bolts. Connect the electrical connector.
- Reconnect the Battery: Attach the negative cable back to the battery. Ensure the connection is tight.
- Test the Installation: Start your engine to test the new valve. Check for smooth idling and no warning lights on the dashboard.
Ensuring A Secure Fit
It’s crucial that the new IAC valve fits securely. A loose fit can cause air leaks, leading to poor engine performance.
- Check the Bolts: Ensure the bolts are tightened properly. Do not over-tighten as this can damage the valve.
- Inspect the Seal: Look for any gaps or misalignments. The valve must sit flush against the mounting surface.
- Verify the Electrical Connection: The electrical connector should be snug. A loose connection can cause the valve to malfunction.
By following these steps and ensuring a secure fit, you can effectively replace your idle air control valve. This will help maintain your vehicle’s performance and efficiency.
Post-installation Procedures
After installing a new Idle Air Control Valve, some steps ensure it works properly. These steps help your engine run smoothly and efficiently. Completing these tasks will maintain your vehicle’s performance.
Testing The Valve
First, start the engine and let it idle. Observe the engine’s behavior. Listen for any unusual sounds. Check if the idle speed is steady. A fluctuating idle might indicate a problem.
Next, drive the car for a short distance. Notice any changes in performance. Ensure the engine responds well during acceleration and deceleration. If the engine stalls, recheck the installation.
Adjusting Idle Speed
Locate the idle speed adjustment screw. This screw is usually near the throttle body. Turn the screw slightly to adjust the idle speed. Clockwise increases the speed, while counterclockwise decreases it.
Use a tachometer to check the idle speed. The ideal speed varies by vehicle. Consult your car’s manual for the correct idle speed. Adjust until the tachometer reads the desired RPM.
Finally, test the engine again. Ensure the idle is smooth and steady. Your new Idle Air Control Valve should now be functioning correctly.
Maintenance Tips For Longevity
Proper maintenance of the Idle Air Control Valve can extend its lifespan and ensure your engine runs smoothly. Follow these simple tips to keep your valve in top shape.
Regular Inspections
Check the valve at least once every six months. Look for any signs of damage or wear. Pay attention to the electrical connections. They should be secure and free of corrosion. This small step can prevent bigger issues later.
| Inspection Task | Frequency |
|---|---|
| Check for damage | Every 6 months |
| Inspect electrical connections | Every 6 months |
Cleaning And Care
Regular cleaning is essential. Dirt and debris can build up and cause malfunctions. Use a suitable cleaner and a soft brush. Clean the valve and the surrounding area. Make sure to dry the valve completely before reinstallation.
- Step 1: Remove the valve carefully.
- Step 2: Use a cleaner to remove dirt.
- Step 3: Dry the valve before reinstalling.
Never use harsh chemicals. They can damage the valve. Stick to cleaners designed for automotive parts. Regular care keeps your Idle Air Control Valve functioning well. This can prevent costly repairs and maintain engine performance.
Benefits Of Replacing The Idle Air Control Valve
Replacing the Idle Air Control Valve (IACV) offers numerous benefits. This component is vital for maintaining proper engine idling. A malfunctioning IACV can lead to various engine issues. Let’s explore the key advantages of replacing the IACV.
Improved Engine Performance
A new Idle Air Control Valve ensures a smooth and stable idle. This improvement reduces engine stalling and rough idling. Your engine runs more efficiently. It responds better to throttle inputs. This leads to a more enjoyable driving experience.
Enhanced Fuel Efficiency
A faulty IACV can cause your engine to consume more fuel. By replacing it, you restore proper air-fuel balance. This balance optimizes fuel consumption. You will notice better fuel economy. Your trips to the gas station will be less frequent. This can save you money over time.

Credit: www.yourmechanic.com
Frequently Asked Questions
What Is An Idle Air Control Valve?
The Idle Air Control Valve regulates the engine’s idle speed.
Symptoms Of A Bad Idle Air Control Valve?
Rough idling, engine stalling, or fluctuating RPMs.
How To Test An Idle Air Control Valve?
Use a multimeter to check resistance and voltage.
Can A Bad Idle Air Control Valve Affect Fuel Economy?
Yes, it can cause poor fuel efficiency.
How Often Should Idle Air Control Valve Be Replaced?
Check and replace every 50,000 to 70,000 miles.
Conclusion
Replacing the Idle Air Control Valve can improve your vehicle’s performance. It’s a straightforward task with basic tools. Regular maintenance ensures smoother idling and better fuel efficiency. Always consult your vehicle manual for specific instructions. Don’t ignore engine performance issues.
Addressing them early can save time and money. Trust your instincts and keep your car in top shape. With a little effort, your vehicle runs like new again. Happy driving!


