A malfunctioning coolant temperature sensor can cause engine problems. It’s crucial to replace it promptly.
The coolant temperature sensor monitors your engine’s heat levels. If it fails, you might experience poor fuel economy, overheating, or starting issues. Replacing the sensor is a straightforward task that you can do at home with some basic tools. This guide will help you understand the steps involved in replacing your coolant temp sensor.
Save time and money while ensuring your vehicle runs smoothly. Ready to get started? Let’s dive in!
Introduction To Coolant Temp Sensor
The coolant temp sensor is a small but vital part of your engine. This sensor monitors the temperature of the engine’s coolant. It sends this information to the engine control unit (ECU). The ECU then uses this data to adjust various engine functions. A properly working coolant temp sensor ensures your engine runs smoothly.
Role In The Engine
The coolant temp sensor plays a critical role in your engine’s performance. It helps manage the engine’s temperature by providing accurate data to the ECU. This data helps in regulating the fuel mixture and ignition timing. Proper temperature management prevents the engine from overheating. It also helps in maintaining fuel efficiency and reducing emissions.
Symptoms Of A Faulty Sensor
A faulty coolant temp sensor can cause various issues. Recognizing these symptoms can save you from costly repairs. Here are some common signs:
- Check Engine Light: A malfunctioning sensor often triggers the check engine light.
- Poor Fuel Economy: Incorrect temperature readings can lead to poor fuel mixture, reducing fuel efficiency.
- Engine Overheating: The ECU may not manage cooling properly, causing the engine to overheat.
- Hard Starting: The engine may have trouble starting, especially in cold conditions.
- Black Smoke from Exhaust: Incorrect fuel mixture can cause black smoke emissions.
If you notice any of these symptoms, it’s important to replace the coolant temp sensor promptly. This will ensure your engine runs efficiently and reliably.

Credit: www.youtube.com
Tools And Materials Needed
Replacing a coolant temperature sensor is a crucial task for maintaining your vehicle’s performance. Using the right tools and materials ensures the job goes smoothly and safely. Below is a comprehensive guide to the essential tools and recommended supplies you need for this task.
Essential Tools
Before you start, gather these essential tools:
- Socket Set: Needed to remove and install the sensor.
- Wrench Set: Useful for loosening bolts and nuts.
- Screwdrivers: Both flathead and Phillips.
- Multimeter: To check the sensor’s electrical connections.
- Pliers: For gripping and removing clamps.
Recommended Supplies
In addition to tools, have these supplies ready:
| Supply | Purpose |
|---|---|
| Coolant | Refill the system after sensor replacement. |
| Thread Sealant | Prevents leaks from the new sensor. |
| Rags | Clean up spills and messes. |
| Gloves | Protect your hands from chemicals. |
| Safety Glasses | Protect your eyes from splashes. |
Safety Precautions
When replacing your coolant temp sensor, it’s crucial to follow safety precautions. Safety ensures you avoid harm and complete the task effectively. Here are some key safety measures you should consider.
Protective Gear
Wearing the right protective gear is essential. Ensure you have the following items:
- Gloves: Protect your hands from chemicals and sharp objects.
- Safety glasses: Prevent coolant from splashing into your eyes.
- Long sleeves: Shield your skin from potential burns.
Handling Coolant Safely
Coolant is toxic and can be dangerous if mishandled. Follow these steps to handle it safely:
- Work in a well-ventilated area: Ensure the space is open or use fans.
- Contain spills: Use a catch pan to collect any coolant that spills.
- Dispose of used coolant properly: Follow local regulations for disposal.
| Item | Purpose |
|---|---|
| Gloves | Protect your hands |
| Safety Glasses | Shield your eyes |
| Long Sleeves | Protect your skin |

Credit: shop.advanceautoparts.com
Locating The Coolant Temp Sensor
Finding the coolant temperature sensor can be tricky. This component is vital for monitoring your engine’s temperature. Here’s how to locate it easily.
Consulting The Manual
Always start by checking your car’s manual. The manual provides detailed diagrams and instructions. This helps pinpoint the sensor’s exact location.
If you don’t have a manual, download one from the manufacturer’s website. Most manuals are available for free or a small fee.
Common Sensor Locations
Here are some common places where the coolant temp sensor might be:
- Near the thermostat housing
- On the cylinder head
- Close to the radiator
Use a flashlight to inspect these areas. The sensor is small, so look closely. It is often near a cluster of wires.
| Location | Description |
|---|---|
| Thermostat Housing | Usually at the engine’s top front. Easy to access. |
| Cylinder Head | May require removing engine cover. More challenging to access. |
| Radiator | Located near the radiator’s side. Check for small wires. |
Once found, take a picture of the sensor’s location. This can help during replacement.
Removing The Old Sensor
Replacing the coolant temp sensor in your car is crucial for engine performance. The first step is to remove the old sensor. This guide will walk you through the process easily.
Draining The Coolant
Start by draining the coolant from the radiator. Place a large container under the drain valve. Carefully open the valve and let the coolant flow into the container. This step ensures that no coolant spills during sensor removal.
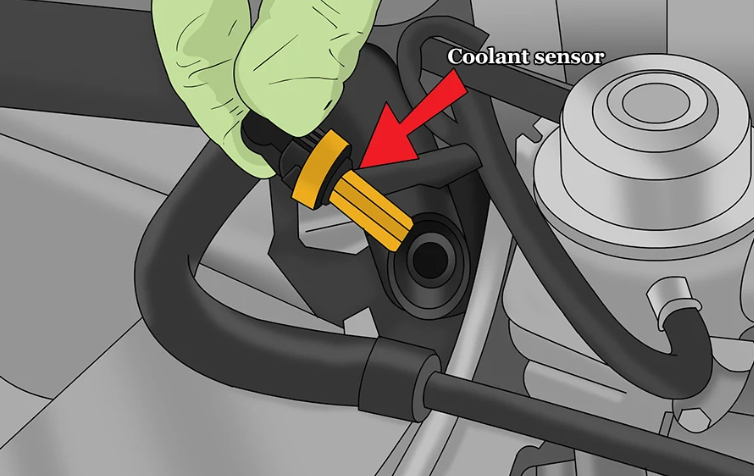
Disconnecting The Sensor
Next, locate the coolant temp sensor. It is usually near the thermostat housing. Once you find it, disconnect the electrical connector. Be gentle to avoid damaging the wires. After disconnecting, use a wrench to unscrew the sensor from its place. Keep the area clean to prevent dirt from entering the cooling system.
Installing The New Sensor
Installing the new coolant temperature sensor requires careful attention to detail. This guide will help you position the sensor and secure all connections properly. Follow these steps to ensure a successful installation.
Positioning The Sensor
First, locate the slot for the new sensor. Make sure the area is clean. Dirt can affect the sensor’s performance. Gently insert the sensor into the slot. Align it correctly. It should fit snugly. Avoid forcing it into place. This could damage the sensor. Once positioned, double-check the alignment. Ensure it’s seated properly.
Securing Connections
Next, secure the sensor connections. Attach the wiring harness. Make sure it’s tight. Loose connections can cause issues. Confirm the wires are not damaged. Replace any worn-out wires. Tighten the screws or clips holding the sensor. They should be secure but not overly tight. Double-check all connections. Ensure everything is in place. This step is crucial for the sensor’s proper function.
Refilling The Coolant
After replacing the coolant temperature sensor, it’s crucial to refill the coolant properly. This ensures your engine stays cool and performs well. Proper refilling also prevents air pockets and overheating.
Choosing The Right Coolant
Choosing the right coolant is essential. Different engines require different types of coolants. Always check your vehicle’s manual for the recommended coolant type. There are several types:
- Inorganic Acid Technology (IAT) – Common in older vehicles.
- Organic Acid Technology (OAT) – Suitable for modern cars.
- Hybrid Organic Acid Technology (HOAT) – A mix of both IAT and OAT.
Using the wrong coolant can damage your engine. So, make sure you choose the correct type.
Bleeding The System
Bleeding the cooling system removes air pockets. Air pockets can cause the engine to overheat. Follow these steps:
- Fill the radiator with the recommended coolant.
- Start the engine and let it run for a few minutes.
- Turn the heater to max setting. This helps to circulate the coolant.
- Look for a bleeder valve, usually near the thermostat. Open it slowly to let the air escape.
- Close the valve once coolant starts to flow without air bubbles.
Repeat these steps if necessary. Ensure the coolant level is correct after bleeding.
Testing The New Sensor
After replacing the coolant temperature sensor, it is crucial to test it. This ensures your engine runs smoothly. Follow these steps to make sure everything works correctly.
Starting The Engine
Begin by starting your vehicle’s engine. Let it run for a few minutes. Observe the temperature gauge on the dashboard. It should gradually rise to the normal operating range.
Checking For Errors
Next, use an OBD-II scanner to check for any error codes. This device plugs into your car’s diagnostic port. Follow the instructions for your specific scanner model.
- Plug in the OBD-II scanner.
- Turn on the ignition.
- Read the codes.
Ensure no error codes related to the coolant temperature sensor appear. If you see any, double-check your installation.
| Step | Description |
|---|---|
| Start the Engine | Observe the temperature gauge. It should rise gradually. |
| Check for Errors | Use an OBD-II scanner. Look for error codes. |
Maintenance Tips
Maintaining your coolant temp sensor ensures your engine runs smoothly. Regular inspections and timely replacements can prevent costly repairs. Follow these maintenance tips to keep your car in top shape.
Regular Inspections
Check the coolant temp sensor every six months. Look for signs of damage or wear. A faulty sensor can cause the engine to overheat. This can lead to severe engine damage. Use an OBD-II scanner to read the sensor’s data. Compare the readings with the manufacturer’s specifications.
Inspect the wiring and connections. Loose or corroded wires can affect the sensor’s performance. Clean the sensor area to remove any dirt or debris. This helps maintain accurate readings. Listen for unusual engine noises. These can indicate a problem with the sensor.
When To Replace Again
Replace the coolant temp sensor every 50,000 miles. This ensures reliable performance. Signs of a failing sensor include poor fuel economy and engine overheating. If the check engine light is on, the sensor may be faulty. A mechanic can diagnose the issue accurately.
Regular maintenance can extend the sensor’s life. Follow the manufacturer’s guidelines for replacement. Keeping your coolant temp sensor in good condition helps your engine run efficiently.
Credit: www.nevsemi.com
Frequently Asked Questions
What Does A Coolant Temp Sensor Do?
A coolant temp sensor measures the engine’s temperature. It helps the car’s computer adjust fuel and ignition timing.
How Can I Tell If My Coolant Temp Sensor Is Bad?
Common signs include engine overheating, poor fuel economy, and check engine light. Also, hard starting.
Where Is The Coolant Temp Sensor Located?
The coolant temp sensor is usually near the thermostat or on the engine block. Check your vehicle’s manual.
How Often Should I Replace My Coolant Temp Sensor?
Replace it every 100,000 miles or if faulty. Follow your car manufacturer’s recommendation.
Can I Replace The Coolant Temp Sensor Myself?
Yes, you can. With basic tools and a guide. Ensure the engine is cool before starting.
Conclusion
Replacing your coolant temp sensor is vital for engine health. Follow the steps to ensure accurate readings. This helps prevent overheating and costly repairs. Regular maintenance keeps your vehicle running smoothly. Always consult your manual for specifics. Stay proactive with car care to avoid bigger issues.
A functioning sensor ensures better performance and safety. Keep an eye on your engine’s temperature for a hassle-free drive. Simple steps now can save time and money later. Ensure your coolant temp sensor is in top shape. Happy driving!


