Removing window tint can seem tricky, but it’s simpler than you think. It just takes the right tools and steps.
Window tint can wear out or you might just want a change. Removing it yourself saves money and gives you control over the process. This guide will show you how to remove window tint safely and efficiently. You’ll find out what tools you need and learn the step-by-step process.
Whether it’s peeling, scraping, or using heat, you’ll be ready to tackle the job. Save time, avoid mistakes, and get your windows looking clean and clear again. Ready to learn how? Let’s get started!

Credit: www.wikihow.com
Tools And Materials
Removing window tint yourself can save money. To do it right, you need the right tools and materials. Below are the essential tools and materials required for the job.
Essential Tools
| Tool | Description |
|---|---|
| Heat Gun or Hair Dryer | Loosens the adhesive on the tint. |
| Utility Knife | Used for cutting and peeling the tint. |
| Razor Blades | Helps in scraping off the tint. |
| Squeegee | Removes air bubbles and smoothens the tint. |
| Spray Bottle | Holds soapy water for easy application. |
Required Materials
- Soapy Water: Mix a few drops of dish soap in water.
- Ammonia: Helps dissolve the adhesive.
- Paper Towels: Used for cleaning and drying.
- Garbage Bags: Helps in applying heat evenly.
- Microfiber Cloth: For a streak-free finish.
Having these tools and materials ready will make the process smoother. They will ensure you can remove the window tint effectively and safely.
Preparation Steps
Before you start removing window tint, it’s important to prepare properly. Good preparation ensures a smooth and safe process. Let’s look at the key preparation steps.
Choose A Suitable Workspace
First, find a good workspace. A well-lit and ventilated area is ideal. Make sure there’s enough space to move around your vehicle. Avoid working in direct sunlight. Heat can make the tint adhesive more stubborn.
Protect Surrounding Areas
Next, protect the areas around the windows. Use masking tape to cover door panels and upholstery. This prevents damage from any adhesive remover or tools. Lay down a drop cloth to catch any debris. This keeps your workspace clean and tidy.
Materials Needed
- Masking tape
- Drop cloth
- Protective gloves
Wear protective gloves to protect your hands. Safety first!
Initial Inspection
Before you start removing window tint, conduct an initial inspection. This step is crucial. It helps in identifying the tint’s condition and any potential issues. A thorough inspection ensures a smoother removal process.
Check Tint Condition
Start by checking the condition of the window tint. Look for signs of wear and tear. Is the tint peeling or bubbling? Are there any cracks or scratches? These signs indicate how much effort the removal process will need.
| Condition | Indicators |
|---|---|
| Peeling | Edges coming off |
| Bubbling | Air pockets visible |
| Cracking | Visible lines or splits |
| Scratches | Surface marks |
Identify Potential Issues
Identify any potential issues that might complicate tint removal. For instance, older tints may leave more residue. Tints applied incorrectly may be harder to peel off. Consider these factors:
- Age of the tint
- Quality of the tint film
- Method of application
By checking the tint condition and identifying potential issues, you prepare better. This preparation will make the removal process easier and more efficient.
Heat Application
Removing window tint can seem difficult, but it can be simple with the right methods. One popular technique is heat application. This method uses heat to loosen the adhesive, making the tint easy to peel off. Let’s explore how to apply heat effectively.
Using A Heat Gun
A heat gun is a powerful tool for removing window tint. First, plug in the heat gun and set it to a low heat setting. Hold the heat gun about two inches from the window. Move it in a circular motion to avoid overheating one spot. Heat the tint until it starts to bubble. Once the tint bubbles, use a razor blade to lift a corner. Slowly peel the tint while applying heat. This ensures the adhesive stays soft.
Alternative Heating Methods
If you don’t have a heat gun, you can use a hairdryer. Set the hairdryer to the highest setting. Hold it close to the window and heat the tint. Move the hairdryer in a circular motion. This will loosen the adhesive. You can also use a steam cleaner. The steam will penetrate the tint, making it easy to peel off. Both methods are effective and safe for your windows.
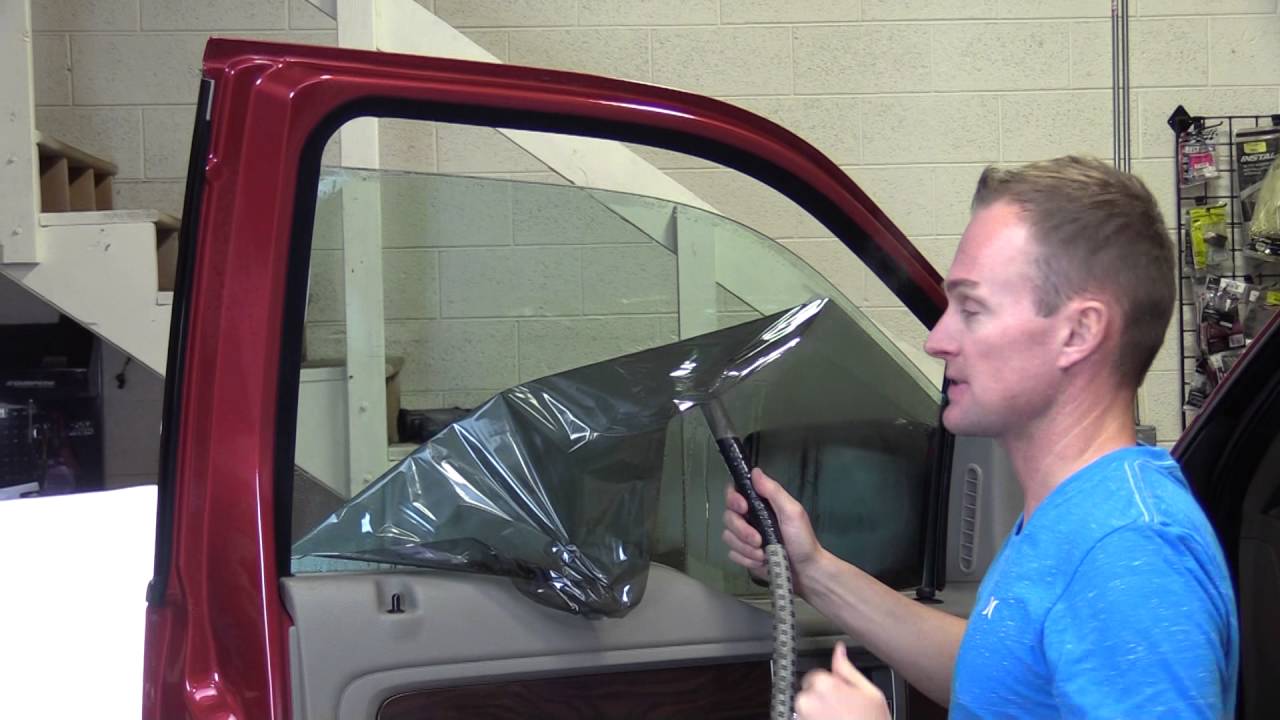
Peeling Off Tint
Removing window tint can seem daunting, but it is manageable. This guide will show you how to peel off the tint without damaging your windows. Follow these steps to make the process easier.
Starting At The Corner
First, you need to find a starting point. Locate a corner of the tinted window. Use your fingernail or a razor blade to lift the tint slightly. Be careful not to scratch the glass. Once you have a small section lifted, you can start peeling.
Slow And Steady Removal
Now, begin peeling the tint slowly. Use both hands to pull the film away from the window. Pulling too fast can cause the tint to tear. Go slow and steady to avoid this.
If the tint is stubborn, use a hairdryer to warm the adhesive. Hold the hairdryer close to the window and move it in a circular motion. This will help loosen the adhesive, making it easier to peel off the tint.
Continue peeling until all the tint is removed. If any adhesive remains, use a window cleaner and a microfiber cloth to clean it off. For tougher adhesive, a little rubbing alcohol can help.
By following these steps, you can successfully remove window tint without damaging your windows. Patience and care are key.

Credit: www.youtube.com
Removing Adhesive Residue
Removing adhesive residue left after peeling off window tint can be challenging. This sticky mess can ruin the appearance of your windows. But worry not, there are effective ways to tackle it.
Chemical Solutions
Chemical solutions can help dissolve the adhesive residue. A common option is rubbing alcohol. Apply it to a clean cloth. Gently rub the area with adhesive. The alcohol breaks down the sticky residue. Another option is ammonia. Spray it on the residue. Let it sit for a few minutes. Then, wipe it off with a cloth.
Scraping Techniques
Scraping techniques can also remove stubborn adhesive residue. Use a plastic scraper to avoid scratching the glass. Hold the scraper at a 45-degree angle. Gently push it under the residue. Move in small, controlled strokes. You can also use a razor blade. Ensure it is sharp and clean. Be very careful to avoid damage. Scrape slowly and patiently.
Cleaning The Window
After removing the window tint, the next step is cleaning the window. This step ensures all adhesive residues are gone. It also makes the glass clear and streak-free. Proper cleaning techniques will give your windows a fresh, new look.
Final Wipe Down
Begin by spraying a window cleaner on the glass. Use a microfiber cloth to wipe the surface. This type of cloth is gentle and effective. Make sure to cover the entire window. Repeat if any sticky spots remain. The final wipe down removes any leftover dirt and grime. Your window will look spotless.
Inspect For Streaks
After cleaning, inspect the window for streaks. Use natural light to spot any marks. If you see streaks, wipe them with a clean, dry cloth. Sometimes, a second wipe is needed. Ensure no streaks remain. This step gives the window a polished, professional look.
Post-removal Tips
Removing window tint can be a challenging task. After successfully removing the tint, it’s important to follow some post-removal tips. These tips will help maintain your car windows in the best condition.
Maintaining Clear Windows
Once the tint is removed, clean the windows thoroughly. Use a glass cleaner and a microfiber cloth. This helps remove any adhesive residue left behind.
Regular cleaning is vital. Dust and grime can build up quickly. Always use a gentle cleaner to avoid scratching the glass. Avoid harsh chemicals. They can damage the window surface.
Inspect the windows for any scratches or damage. If you find any, consider professional repair. Keeping windows clear ensures better visibility and safety.
Preventing Future Tint Issues
To prevent future issues, choose high-quality tint films. Cheap films can bubble and peel over time. A good-quality tint will last longer and look better.
Have the tint applied by a professional. DIY tinting can lead to bubbles and uneven application. Professionals have the right tools and experience.
Follow care instructions for tinted windows. Avoid using ammonia-based cleaners. They can break down the tint film. Use soft cloths and gentle cleaners instead.
Regularly check the tint for any signs of wear. Early detection can prevent bigger issues later on.
Credit: www.youtube.com
Frequently Asked Questions
How Do I Remove Window Tint At Home?
Use a razor blade and soapy water. Peel the tint off gently.
What Tools Are Needed To Remove Window Tint?
You need a razor blade, soapy water, and a hairdryer or heat gun.
Can I Use A Hairdryer To Remove Window Tint?
Yes, a hairdryer can help. Heat the tint to make it easier to peel off.
Is It Safe To Remove Window Tint Myself?
Yes, it is safe. Just be careful with the razor blade to avoid scratching the glass.
How Long Does It Take To Remove Window Tint?
It takes about 30 minutes to an hour per window. Patience is key.
Conclusion
Removing window tint can be simple with the right steps. Ensure you gather the necessary tools. Follow the step-by-step process for best results. Patience is key during this task. Removing tint improves your car’s appearance. It also enhances visibility and safety.
Always handle tools carefully to avoid damage. Now, enjoy your tint-free windows and clearer view. Happy driving!


