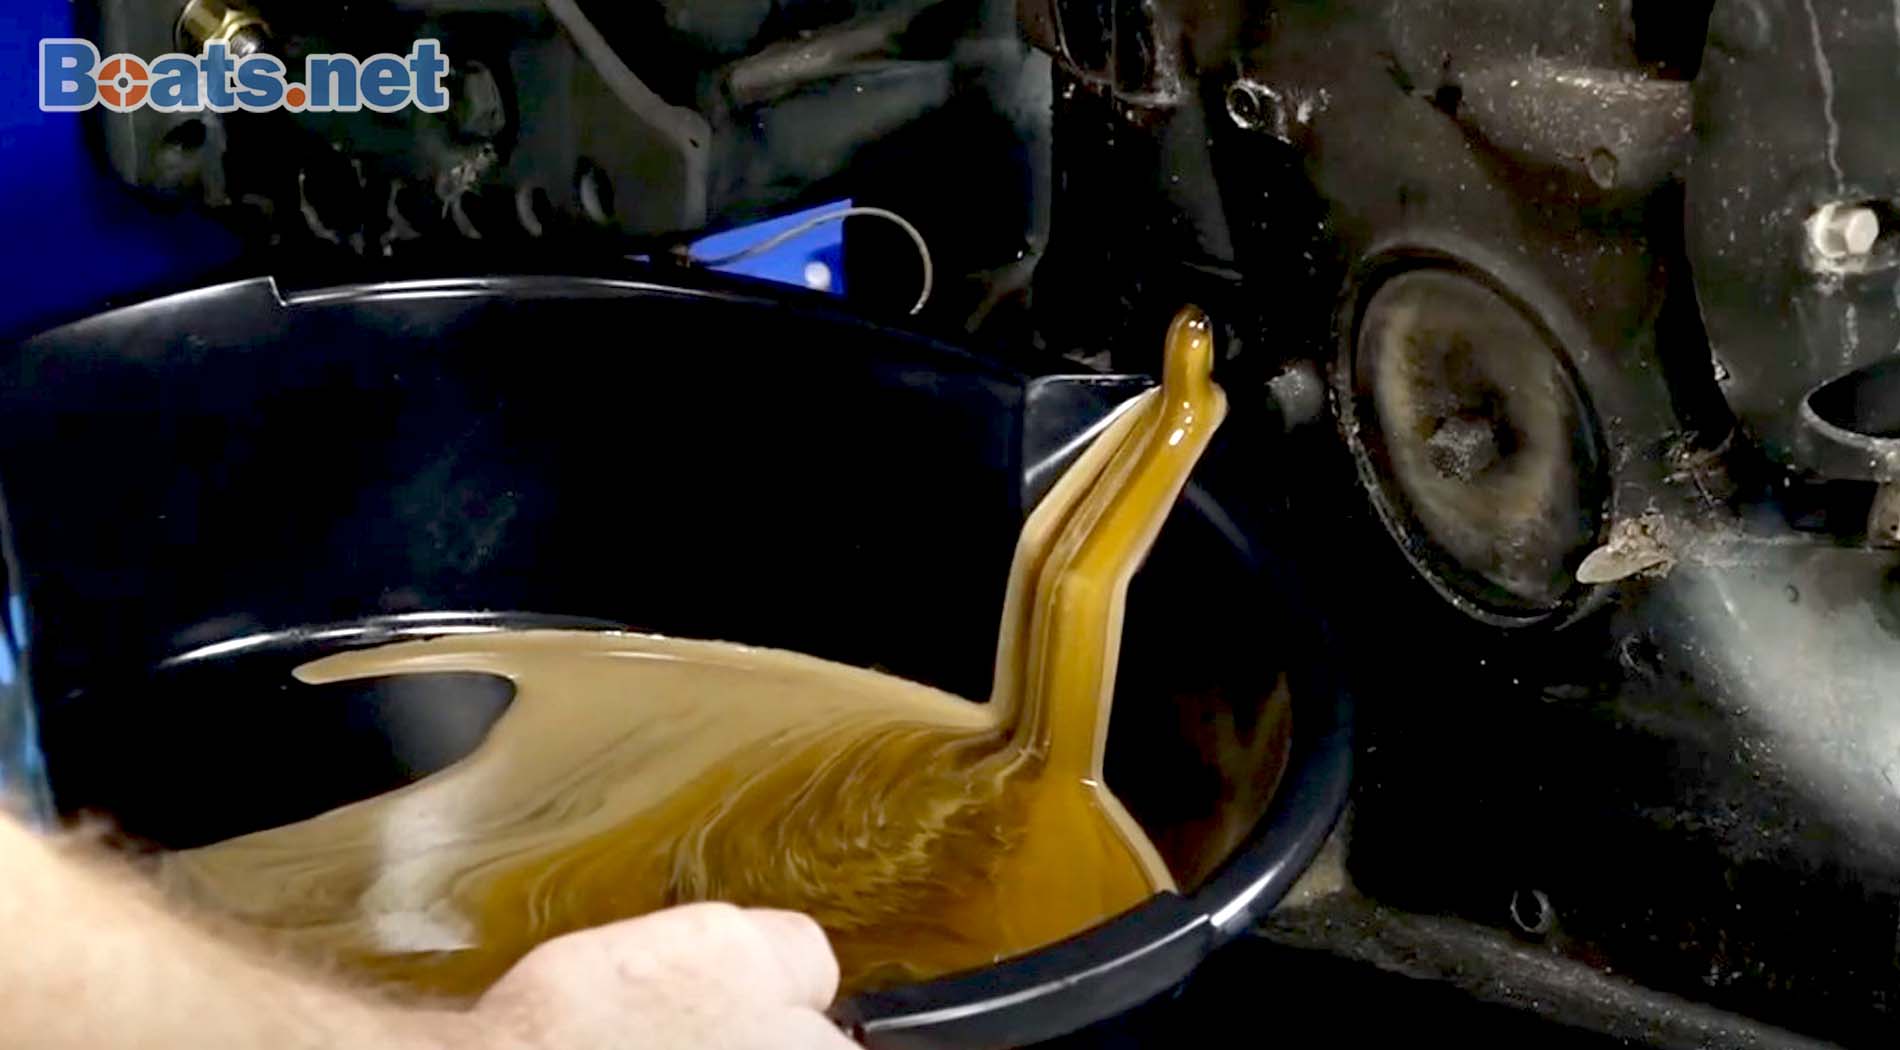
Flushing milky oil from your engine is essential to prevent damage. Milky oil indicates water contamination, which can harm your engine.
Water in your engine oil can cause serious problems. It often results from a coolant leak or condensation. This mixture of oil and water, known as milky oil, can reduce lubrication. It can also lead to overheating and rust. Regular maintenance and quick action are crucial to fix this issue.
In this blog, you will learn how to properly flush milky oil from your engine. This guide will help you protect your engine and keep it running smoothly. Follow these steps to ensure your engine remains in top condition.
Causes Of Milky Oil
Finding milky oil in your engine can be alarming. It often indicates a problem that needs immediate attention. Understanding the causes of milky oil can help you take the right steps to fix it.
Coolant Leak
A coolant leak is one of the most common causes of milky oil. This happens when the coolant mixes with the engine oil. Here are some signs of a coolant leak:
- White smoke from the exhaust
- Overheating engine
- Low coolant levels
To check for a coolant leak, inspect the head gasket, intake manifold gasket, and cylinder head. These areas are prone to leaks. Fixing a coolant leak promptly can prevent engine damage.
Condensation Build-up
Condensation build-up is another cause of milky oil. This is common in vehicles that are not driven frequently or only for short distances. Here’s why it happens:
- Moisture accumulates in the engine
- The engine doesn’t get hot enough to evaporate the moisture
To prevent condensation build-up, drive your vehicle for longer distances. This allows the engine to reach optimal temperature and evaporate any moisture. Regular oil changes also help keep the engine clean and free of water.
Credit: www.boats.net
Symptoms Of Milky Oil
Milky oil in your engine is a sign of trouble. Detecting it early can save you from costly repairs. Let’s explore the symptoms of milky oil and what to watch for.
Discolored Oil
Milky oil has a distinct appearance. Normal oil should be amber or dark brown. If you see a milky, frothy, or creamy texture, that indicates water or coolant mixing with the oil. This change in color is a clear sign of contamination. Check the oil dipstick for these signs.
Engine Performance Issues
Milky oil affects engine performance. You may notice a decrease in power or efficiency. The engine might run rough or struggle to start. Unusual noises could also occur. These performance issues arise because milky oil does not lubricate the engine parts properly.
Preparing For The Flush
Flushing milky oil from your engine is a crucial task. It ensures your engine runs smoothly. Proper preparation is key for a successful flush. Let’s dive into the steps needed before you start the flush.
Gather Necessary Tools
First, gather all the necessary tools. Having everything ready makes the process faster and smoother. Here is a list of tools you will need:
- Wrenches – Different sizes for various bolts.
- Oil Drain Pan – To catch the old oil.
- New Oil – For refilling the engine.
- Oil Filter – A fresh filter for the new oil.
- Funnel – To pour the new oil without spills.
- Rags or Paper Towels – For cleaning up any spills.
- Safety Gloves – To protect your hands.
- Owner’s Manual – For specific instructions.
Safety Precautions
Safety is vital during this process. Follow these safety precautions:
- Wear Safety Gloves – Protects your hands from oil and dirt.
- Work in a Well-Ventilated Area – Avoids inhaling harmful fumes.
- Use Jack Stands – Keeps the vehicle stable if you need to lift it.
- Turn Off Engine – Ensure the engine is cool before starting.
- Dispose of Old Oil Properly – Follow local regulations for oil disposal.
By gathering the necessary tools and following safety precautions, you are well-prepared for the flush. This preparation ensures a smooth and efficient process, keeping your engine in top condition.
Draining The Old Oil
Draining the old oil from your engine is an essential step. Milky oil suggests water contamination, which can damage your engine. Follow these steps to safely drain the old oil.
Locate The Drain Plug
First, locate the drain plug. The drain plug is usually at the bottom of the oil pan. Check your vehicle manual if you have trouble finding it.
Once located, place a drain pan beneath the plug. This will catch the old oil.
Proper Disposal Of Old Oil
Collect the old oil in a sealed container. Do not pour it down the drain. It’s harmful to the environment.
Take the container to a recycling center. Many auto parts stores also accept used oil for recycling.
Cleaning The Engine
Milky oil in the engine can cause damage. This happens when water mixes with the oil. Cleaning the engine is vital to avoid problems. Below are steps to clean your engine.
Flushing With Solvent
First, drain the milky oil from the engine. Use a wrench to remove the drain plug. Let all the oil drain out completely. Next, pour a solvent into the engine. Solvents help dissolve any milky residues. Follow the instructions on the solvent bottle. Typically, you need to let the solvent sit for a few minutes. Then, drain the solvent out of the engine. Make sure no solvent remains in the engine.
Rinsing With Fresh Oil
After flushing with solvent, rinse the engine with fresh oil. Pour fresh oil into the engine. This helps remove any leftover solvent. Start the engine and let it run for a few minutes. Then, drain this oil as well. This ensures all contaminants are flushed out. Finally, refill the engine with clean oil. Your engine is now free of milky oil.
Replacing The Oil Filter
Replacing the oil filter is crucial when flushing milky oil from an engine. The filter traps contaminants and ensures clean oil circulates. Skipping this step can lead to further engine damage. Let’s dive into the details.
Removing The Old Filter
First, locate the old oil filter. It’s usually near the engine’s bottom. Use an oil filter wrench to turn it counterclockwise. Be prepared for some oil to spill out. Place a pan underneath to catch it. Once loosened, remove the filter by hand. Check the filter’s gasket. Ensure it hasn’t stuck to the engine. If it has, remove it carefully.
Installing The New Filter
Before installing the new filter, apply a thin layer of fresh oil to the new filter’s gasket. This ensures a proper seal. Screw the new filter into place by hand. Turn it clockwise until it fits snugly. Avoid using the wrench for this step. Over-tightening can damage the filter.
After installation, check for any leaks. Start the engine and let it run for a few minutes. Inspect the filter area for drips. If you see any, tighten the filter slightly. Regular checks ensure your engine runs smoothly.
Refilling With New Oil
After flushing the milky oil from your engine, it’s crucial to refill with fresh oil. This step ensures your engine runs smoothly and efficiently. Choosing the right oil and using the proper filling technique is essential. Let’s delve into the details.
Choosing The Right Oil
Selecting the correct oil for your engine is vital. Check your vehicle’s manual for the recommended oil type. Generally, you will find two main types:
- Conventional Oil: Suitable for most vehicles, offers good protection.
- Synthetic Oil: Offers better performance, lasts longer, ideal for high-performance engines.
Consider your driving conditions and climate. For extreme temperatures, synthetic oil is often preferred. For regular use, conventional oil works well.
Proper Filling Technique
Once you have the right oil, follow these steps for a proper refill:
- Park your vehicle on a level surface. This ensures even distribution.
- Turn off the engine and let it cool.
- Locate the oil filler cap on the engine.
- Remove the cap and insert a funnel.
- Pour the new oil slowly to avoid spills.
- Check the oil level using the dipstick.
- If needed, add more oil until it reaches the full mark.
- Replace the oil cap securely.
Ensure you dispose of the old oil correctly. Many auto parts stores offer recycling services.
Following these steps will help keep your engine in top condition. Regular oil changes are essential for engine longevity and performance.

Credit: www.youtube.com
Post-flush Maintenance
After flushing milky oil from your engine, post-flush maintenance is crucial. This ensures your engine runs smoothly and remains healthy. Proper care extends the life of your vehicle.
Regular Oil Checks
Checking your oil regularly is essential. This helps spot any potential issues early. Follow these steps:
- Park on a level surface
- Turn off the engine and let it cool
- Remove the dipstick and wipe it clean
- Reinsert and remove the dipstick again to check the oil level
If the oil is low, add the recommended type and amount. Always use high-quality oil. This prevents future problems.
Monitoring Engine Performance
Keep an eye on your engine’s performance. This helps ensure everything is working correctly.
Listen for unusual noises. These can be signs of trouble. Pay attention to how your car drives. If it feels different, it may need attention.
Watch for warning lights on the dashboard. These can indicate engine issues. Address them quickly to avoid damage.
| Task | Frequency |
|---|---|
| Check oil level | Weekly |
| Listen for noises | Always |
| Watch for warning lights | Always |
By following these steps, you can keep your engine in top shape. Regular maintenance prevents costly repairs. Stay vigilant and proactive about your vehicle’s health.
Credit: www.tiktok.com
Frequently Asked Questions
What Causes Milky Oil In The Engine?
Milky oil happens due to coolant mixing with engine oil. This indicates a leak.
How Do I Know If My Oil Is Milky?
Check the oil dipstick. If the oil looks frothy or creamy, it’s milky.
Is It Safe To Drive With Milky Oil?
No, driving with milky oil can damage your engine. Address it immediately.
Can I Flush Milky Oil Myself?
Yes, you can. Drain the oil, replace the filter, and refill with fresh oil.
How Often Should I Check For Milky Oil?
Check your oil monthly. Regular checks help catch issues early.
Conclusion
Flushing milky oil from your engine is crucial for performance. Follow the steps outlined to ensure a clean, efficient engine. Regular maintenance helps avoid future problems. Always use quality oil and check your levels. Your engine will thank you. Save money and time by staying proactive.
Keep your vehicle running smoothly with these simple tips. Happy driving!


