If you’ve ever tried to remove your vehicle’s headlight switch knob and found yourself stuck or unsure where to start, you’re not alone. Whether you need to replace a faulty switch, upgrade your interior, or simply clean behind the dashboard, knowing the right way to remove the headlight switch knob is crucial.
In this guide, you’ll discover simple, step-by-step tips that make the process quick and hassle-free. No more fumbling or risking damage—just easy-to-follow advice that puts you in control. Keep reading to master headlight switch knob removal like a pro and get your car’s lighting controls working perfectly again.
Tools Needed
Removing a headlight switch knob requires the right tools. Using proper tools makes the job easier and safer. Having everything prepared saves time and avoids damage to parts. Below are the essential tools needed for this task.
Basic Tools
A flathead screwdriver is a must-have for prying the knob gently. A Phillips screwdriver helps remove screws securing the switch panel. Needle-nose pliers are useful for gripping small parts or connectors. A flashlight improves visibility in tight, dark areas behind the dashboard. A clean cloth or rag protects surfaces from scratches during removal.
Specialty Tools
A knob puller tool is designed to remove stubborn or stuck knobs without damage. A plastic trim removal tool helps to safely pry panels without scratching or cracking. Sometimes, a small pick tool can assist in releasing clips or tabs holding the knob. Having these specialty tools makes the process smoother and reduces the risk of breaking parts.

Credit: www.youtube.com
Locating The Release Mechanism
Removing a headlight switch knob starts with finding the release mechanism. This mechanism holds the knob firmly in place. Knowing where it is helps you avoid damage during removal. Different vehicles have varied designs. Some use buttons, others rely on clips or tabs. Understanding these will make the process smoother and safer.
Common Button Locations
Many knobs feature a small button that releases the lock. This button often sits on the side or front of the knob. Pressing it allows the knob to slide off the shaft. In some models, the button is near the base of the knob. Gently feel around the knob’s surface to find it. Use your thumb to press the button while pulling the knob.
Hidden Clips And Tabs
Other knobs use hidden clips or tabs to secure the knob. These clips are usually inside the knob’s base. You might need a small tool to press or lift them. Some tabs require pushing in while pulling the knob outward. Look closely at the knob’s edges for tiny slots or gaps. These clues help locate the clips or tabs that hold it tight.
Step-by-step Removal
Removing the headlight switch knob is a simple task with the right approach. Follow the steps carefully to avoid damage. This guide breaks down the process into easy-to-follow actions.
Pressing The Release Button
Locate the small release button near the base of the knob. Press it firmly with your thumb. This button unlocks the knob from the shaft. Keep the button pressed throughout the removal.
Pulling The Knob And Shaft
Grasp the knob with your fingers. Pull it straight out from the dashboard. Avoid twisting or bending the knob. The knob and shaft should slide out smoothly. If stuck, apply gentle, steady force.
Using A Screwdriver Or Scribe
If the knob is tight, use a flat-head screwdriver or scribe. Insert it carefully between the knob and dashboard. Pry gently to release the knob. Work slowly to prevent scratching or damage.
Handling Stuck Or Stiff Knobs
Removing a stuck or stiff headlight switch knob can be frustrating. The knob may resist turning or pulling off due to dirt, rust, or long-term use. Careful handling helps avoid damage to the knob or switch assembly. Use simple tools and techniques to ease the knob free without forcing it. Patience is key to a smooth removal process.
Applying Penetrating Oil
Start by applying a small amount of penetrating oil around the base of the knob. The oil seeps into tight spaces and loosens rust or grime. Let the oil sit for 10 to 15 minutes to work effectively. Use a cloth to wipe away excess oil before trying to remove the knob. Repeat the application if the knob remains stiff.
Gentle Pry Techniques
Use a flathead screwdriver or plastic pry tool to gently lift the knob. Place a cloth between the tool and knob to prevent scratches. Apply slow, steady pressure to avoid breaking the knob or switch. Wiggle the knob slightly as you pry to help it loosen. Stop if you feel strong resistance and try applying more penetrating oil.
Cleaning And Inspecting Components
Cleaning and inspecting the headlight switch knob and its components is a key step after removal. It helps maintain smooth operation and extends the life of the switch. Dirt and grime can build up over time. They may cause the knob to stick or function poorly. Taking time to clean and check parts prevents bigger issues later.
Careful inspection also ensures safety. Damaged parts can lead to electrical problems or failure of the switch. Identifying wear or cracks early allows for timely replacement. This keeps your vehicle’s lighting system reliable and safe on the road.
Removing Dirt And Debris
Start by wiping the knob and shaft with a dry cloth. Use a soft brush to clear out dust from small crevices. For stubborn dirt, dampen a cloth with mild soap and water. Avoid soaking any electrical parts. Dry everything thoroughly before reassembly. Clean components reduce friction and improve switch response.
Checking For Damage
Look closely at the knob for cracks or worn areas. Inspect the shaft or rod for bending or corrosion. Check that any locking mechanisms are intact and work smoothly. Replace parts if you see any signs of damage. Properly functioning parts ensure the switch operates safely and reliably.
Replacing Or Repairing The Knob
Replacing or repairing the headlight switch knob is a simple task that can restore full control over your vehicle’s lighting. A worn or broken knob affects the ease of turning headlights on or off. Repairing or replacing it improves both function and appearance. This section guides you through finding the right parts and installing new knobs correctly.
Finding Compatible Parts
Begin by identifying your vehicle’s make, model, and year. These details help find parts that fit perfectly. Check online stores or local auto shops for OEM or aftermarket knobs. Compare product descriptions and customer reviews for best results. Choose parts made from durable materials to ensure long-lasting use.
Installing New Knobs
Start by removing the old knob carefully. Pull or twist it off, depending on the model. Align the new knob with the switch shaft. Press or twist the knob firmly until it locks into place. Test the knob by turning the headlights on and off. Ensure smooth operation and proper fit before finishing.
Tips For Different Vehicle Models
Removing a headlight switch knob varies by vehicle model. Each make has unique features and designs. Knowing specific tips helps avoid damage and frustration. Use gentle force and the right tools for best results. Below are simple tips for common vehicle types.
Ford Vehicles
Ford knobs often have a pull-off design. Grip the knob firmly and pull straight out. Avoid twisting too hard to prevent breaking the shaft. Some models use a small retaining clip under the knob. Use a flat tool to carefully release this clip before pulling. Lubricate the shaft lightly if the knob is stuck. Check your owner’s manual for model-specific advice.
Gm Vehicles
GM headlight knobs usually twist to remove. Turn the knob counterclockwise gently until it loosens. Some GM switches have a locking tab inside. Press the tab with a thin tool to release the knob. Avoid using excessive force to protect the switch mechanism. If the knob is old, apply penetrating oil and wait a few minutes. Be patient to keep parts intact.
Classic Cars
Classic cars often have fragile, worn knobs. Use soft cloths to protect surfaces during removal. Many older models use push-pull knobs without screws. Pull straight out with steady pressure. If the knob resists, try warming it slightly to loosen any hardened grease. Avoid metal tools that can scratch or chip paint. Handle all parts carefully to preserve vintage value.
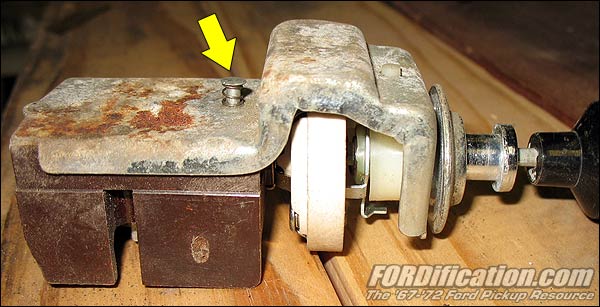
Credit: www.fordification.com
Safety Precautions
Removing a headlight switch knob requires careful attention to safety. Taking proper precautions prevents accidents and protects your vehicle’s electrical system. Follow these safety steps to ensure a smooth and safe removal process.
Disconnecting Power
Always disconnect the vehicle’s battery before starting. This stops any electrical current from flowing. Use a wrench to remove the negative battery cable first. This reduces the risk of electric shock or short circuits. Work in a dry area to avoid slipping or accidental contact with wires. Confirm power is off by testing the switch after disconnection. Never attempt removal with the power connected.
Avoiding Damage
Use the right tools for the job, like a plastic pry tool or small screwdriver. Avoid metal tools that may scratch or break parts. Apply gentle pressure to prevent cracking the knob or switch. Take note of how the knob fits before removal. Protect nearby surfaces by covering them with cloth. Handle wiring carefully to avoid pulling or breaking connections. Keep small screws and parts in a safe place for reassembly.

Credit: www.ford-trucks.com
Frequently Asked Questions
How To Safely Remove A Light Switch?
Turn off power at the circuit breaker. Remove the switch cover plate with a screwdriver. Unscrew the switch from the electrical box. Gently pull the switch out. Disconnect wires carefully, noting their positions.
How To Remove Knob Dimmer Switch?
Turn off power, gently pull the knob outward. If stuck, press the release button beneath the knob while pulling it off.
How To Remove Cover From Light Switch?
Turn off power, then use a screwdriver to remove screws holding the cover plate. Gently pull the cover off.
How To Fix A Light Switch Button?
Turn off power first. Remove the switch cover with a screwdriver. Tighten or replace loose or broken parts. Reattach wires securely. Restore power and test the switch.
How Do I Safely Remove A Headlight Switch Knob?
Gently pull the knob straight out while turning slightly if it resists. Avoid using force.
Conclusion
Removing a headlight switch knob can be simple with the right steps. Use gentle force and proper tools to avoid damage. Always ensure the car’s power is off before starting. Taking your time helps prevent mistakes and keeps parts intact.
This basic task saves money and improves your car’s look. Keep these tips in mind for an easy removal experience.


