Troubleshooting Harley Davidson turn signals often involves checking the bulb, fuse, and wiring connections. Malfunctioning signals typically result from these common issues.
Harley Davidson motorcycles are renowned for their robust engineering and iconic design, yet like any vehicle, they can experience electrical problems. Turn signals are a critical component for safe riding, providing essential communication with other road users about your intentions.
When these signals start malfunctioning, it can not only be frustrating but also dangerous. Riders may face issues such as signals not blinking, blinking too fast or slow, or not lighting up at all. Addressing these problems promptly ensures your Harley remains safe and compliant with road regulations. This guide aims to simplify the troubleshooting process, helping you quickly identify and rectify common turn signal issues, ensuring you get back on the road safely and efficiently.
Introduction To Harley Davidson Turn Signal Issues
Harley Davidson motorcycles symbolize freedom on the open road. Riders rely on their bike’s turn signals for safety. Understanding common turn signal problems is essential. Let’s explore these issues and their impact on your ride.
Common Symptoms Of Turn Signal Problems
Turn signal issues can affect your Harley’s performance. Look out for these symptoms:
- Non-functioning signals – Lights don’t flash or light up.
- Fast flashing – Signals blink quicker than normal.
- Dim lights – Signals appear fainter than usual.
- Intermittent functioning – Signals work sporadically.
The Importance Of Functional Turn Signals
Functional turn signals are crucial for safety. They:
- Communicate intentions to others.
- Prevent accidents and injuries.
- Keep your Harley road-legal.
Regular maintenance ensures signals work properly. Always fix issues promptly.
Initial Checks Before Troubleshooting
Harley Davidson motorcycles are known for their reliability and style. But even the toughest bikes can have signal issues. Proper troubleshooting can save time and money. Before diving into the nitty-gritty, some initial checks are essential. These ensure safety and readiness for the task at hand.
Safety Precautions
- Turn off the motorcycle.
- Remove the keys.
- Wear safety gloves and goggles.
- Ensure a well-ventilated area.
Tools Required For Troubleshooting
| Tool | Use |
|---|---|
| Multimeter | Test electrical connections |
| Screwdriver Set | Remove/Install components |
| Pliers | Handle wires |
| Wire Stripper | Prepare wires |
Assessing The Turn Signal Fuse
Assessing the Turn Signal Fuse is a key step in troubleshooting your Harley Davidson’s turn signals. A blown fuse can lead to signal failure. It is a quick and easy check. Understanding how to locate and replace the fuse will save time and money.
Locating The Fuse Box
The fuse box holds the turn signal fuse. It is usually under the seat or behind a side panel. Look for a small, rectangular box. It will have a cover listing the fuses inside. The cover snaps off, revealing the fuses.
How To Check And Replace The Fuse
Checking the fuse is straightforward. You will need a simple tool, like a fuse puller or pliers. Follow these steps:
- Turn off the motorcycle.
- Remove the fuse box cover.
- Find the turn signal fuse. It is often labeled.
- Inspect the fuse. Look for a broken wire inside.
- If broken, remove it with the tool.
- Insert a new fuse of the same amperage.
A functioning fuse will have a continuous wire visible. If the wire is broken, replace the fuse with one of the same type and rating. Always have spare fuses on hand. They are essential for a quick fix.
Note: Never replace a blown fuse with a higher rating. It can cause damage. Always consult your Harley Davidson’s manual for the correct fuse type.
Inspecting The Turn Signal Bulbs
Turn signals are vital for safe riding. They let others know your intentions. Over time, bulbs may fail. It’s essential to inspect and possibly replace them. This ensures your Harley Davidson remains visible and signals correctly.
Steps To Remove And Inspect Bulbs
Removing and inspecting the turn signal bulbs is straightforward. You’ll need a few tools and a bit of patience.
- Switch off the bike. Ensure the engine is cool.
- Locate the turn signal housing. It’s typically near the handlebars or on the tail.
- Use a screwdriver to open the housing. Do this gently to avoid damage.
- Remove the bulb by pushing in and turning counter-clockwise.
- Inspect the bulb for dark spots or a broken filament.
Determining If A Bulb Needs Replacement
After removal, check the bulb carefully. Look for signs of wear or damage.
- Dark spots on the bulb indicate a burnout.
- A broken filament means the bulb won’t light up.
- Corrosion on the base can cause poor contact.
If any of these are present, the bulb requires replacement. Always choose the correct bulb size and type for your Harley Davidson.
Turn Signal Switch Issues
Many Harley Davidson owners experience turn signal issues at some point. Often, the culprit lies within the turn signal switch. This section dives deep into switch-related problems and solutions.
Identifying Switch Problems
Recognizing switch issues is the first step. Symptoms include unresponsive signals, signals that won’t cancel, or erratic blinking. These signs suggest a deeper issue with the switch mechanism.
- Signals fail to engage or respond inconsistently.
- Lights blink rapidly or not at all, indicating possible electrical faults.
- Signal lever feels loose or stuck, which can signal a mechanical breakdown.
Cleaning Or Replacing The Switch
A dirty or faulty switch can disrupt signal function. Cleaning may restore performance. If cleaning fails, replacement becomes necessary.
- Turn off the motorcycle and remove the switch housing to access the switch.
- Inspect for dirt, debris, or corrosion. Clean with electrical contact cleaner.
- If cleaning doesn’t resolve the issue, procure a replacement switch suited for your Harley model.
- Install the new switch carefully, following the manufacturer’s instructions.
- Test the turn signals to ensure proper installation and functionality.
Regular maintenance on the turn signal switch can prevent future problems. Always refer to the Harley Davidson manual for specific guidance tailored to your motorcycle model.
Credit: m.youtube.com
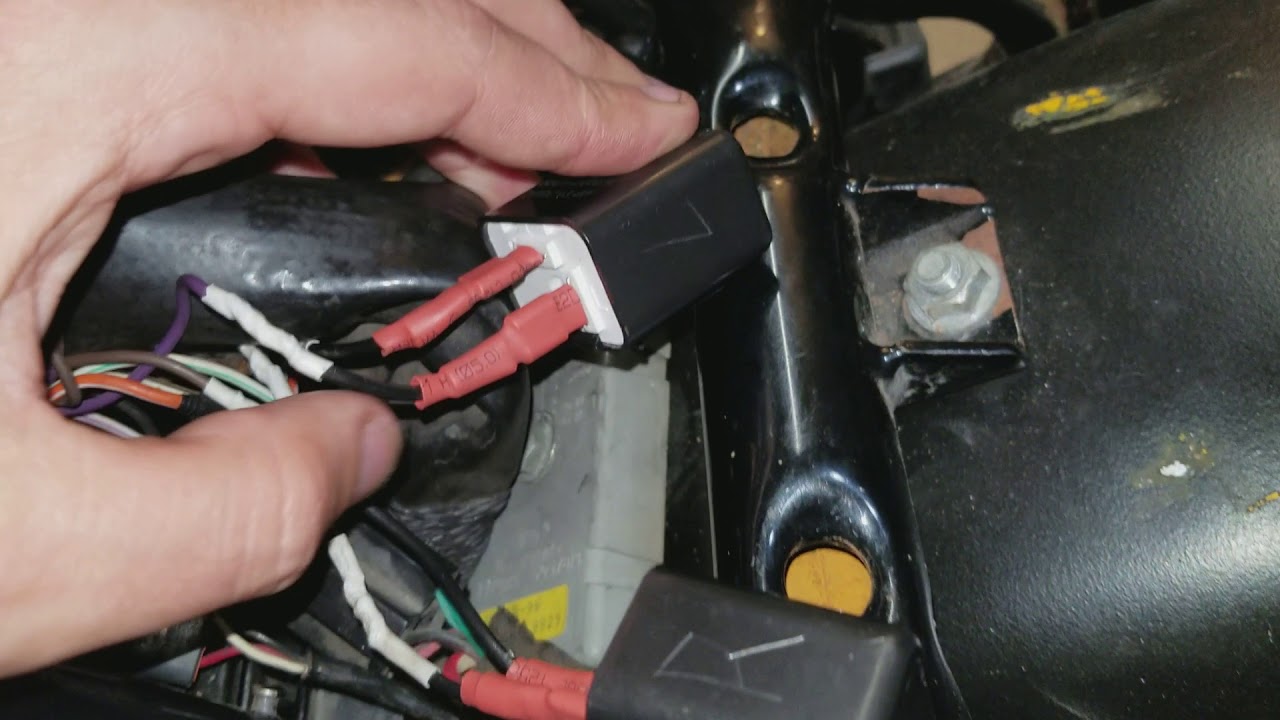
Wiring And Connector Inspections
When your Harley Davidson turn signals fail to work, it’s crucial to inspect the wiring and connectors. A thorough check can resolve issues without needing professional help. Let’s dive into how you can troubleshoot these electrical components yourself.
Tracing The Wiring Harness
Begin with a visual inspection of the wiring harness. Look for any signs of damage, such as cuts, frays, or corrosion. Ensure that the wires are securely attached and have no loose connections. A multimeter can help you check for continuity. If there’s a break in the circuit, you’ll need to repair or replace the damaged section.
Fixing Common Connection Issues
Connection problems often result in signal failure. Disconnect and inspect each connector for dirt, grime, or corrosion. Clean contacts with electrical cleaner and a soft brush. Tighten loose connections to ensure good contact. Apply dielectric grease to protect against future corrosion. Reconnect the wiring and test your turn signals.
Remember: Safety comes first. Always disconnect your battery before starting electrical work. Use proper tools and follow your Harley Davidson’s manual. This guidance can save time and money. Happy riding!
Relay And Flasher Module Examination
Let’s talk about Relay and Flasher Module Examination in Harley Davidson bikes. These parts help your turn signals work right. If they have issues, your signals might not flash correctly.
Locating The Relay And Flasher Module
First, we need to find where the relay and flasher module are. These are usually under the seat or behind the headlight. Harley Davidson models might have them in different spots. Look in your bike’s manual to find the exact location.
Testing And Replacing If Necessary
Now, let’s check if these parts work well. Use a multimeter for this task. Set it to the continuity mode. If the multimeter shows no continuity, it means the part is bad. Time to replace it.
Steps to test:
- Turn off your bike.
- Disconnect the battery.
- Find the relay and flasher module.
- Use the multimeter on the parts.
- Check the multimeter reading.
If the parts are bad, you need new ones. Here’s how to replace them:
- Remove the old relay and flasher module.
- Compare the new ones with the old to ensure they match.
- Install the new parts.
- Reconnect the battery.
- Test the turn signals.
Remember, always choose the right parts for your Harley. Wrong parts can cause more problems.
Credit: www.reddit.com
Advanced Diagnostics And Solutions
Welcome to the advanced section on troubleshooting Harley Davidson turn signals. This part is for riders ready to delve into deeper diagnostics. Let’s get your bike’s signals flashing properly again with some expert advice.
Utilizing A Multimeter For Troubleshooting
A multimeter is a crucial tool for diagnosing electrical issues. It measures voltage, current, and resistance. Understanding multimeter readings can pinpoint problems with your turn signals. Use these steps:
- Set your multimeter to the correct measurement type.
- Locate the turn signal wires. Consult your bike’s manual.
- Connect the multimeter probes to the wires. One to ground, one to the signal wire.
- Check for consistent voltage as you activate the turn signal.
- Compare readings with the standard values in your manual.
Fluctuating or absent voltage indicates an issue. This could be a faulty switch, bulb, or wiring.
When To Seek Professional Help
Some turn signal problems are complex. They require professional skills. Recognize when to call a technician:
- Persistent issues after basic troubleshooting.
- Electrical problems that affect other bike functions.
- Modifications to your Harley’s wiring or signals.
Professionals have specialized tools and knowledge. They ensure your bike remains safe and reliable. Don’t hesitate to seek their assistance for challenging issues.
Preventive Measures And Maintenance Tips
Keeping your Harley Davidson’s turn signals in top shape is key. A solid maintenance routine can save you from future hassles. This guide will help you keep those signals blinking strong and true.
Regular Maintenance Schedule
Set a routine to check your signals. Look for burnt bulbs and loose connections. Clean the contacts and replace parts as needed. This keeps your signals reliable.
- Inspect signals monthly
- Clean contacts regularly
- Test lights before rides
Upgrading Turn Signal System
Consider upgrading your turn signals. LED lights are brighter and last longer. They make you more visible to other drivers.
| Upgrade | Benefit |
|---|---|
| LED Bulbs | Brighter Light |
| Electronic Relay | Reliable Performance |
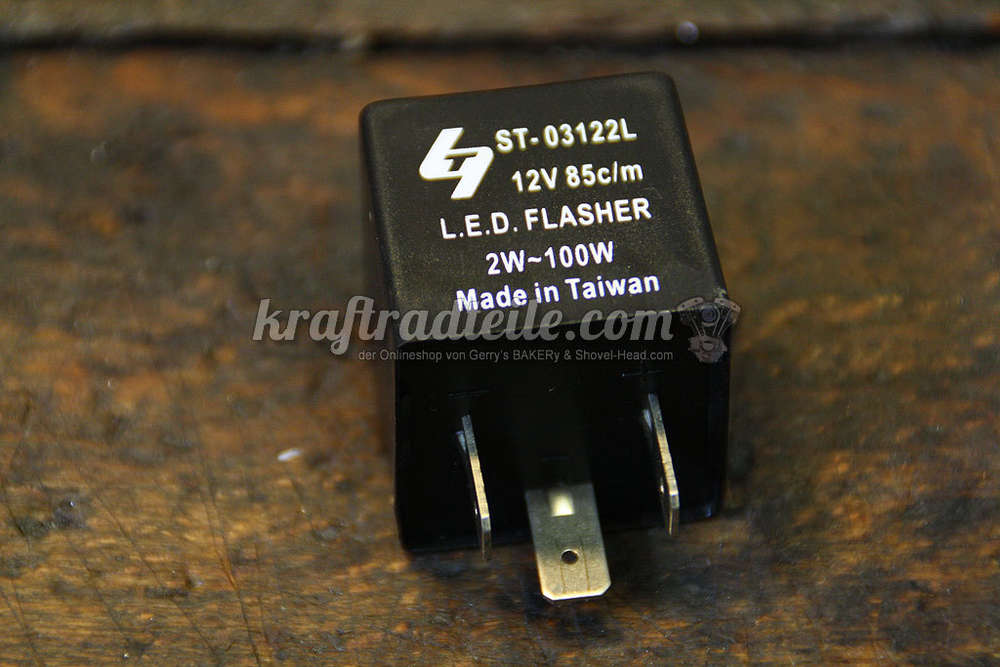
Credit: www.kraftradteile.com
Frequently Asked Questions
How Do You Diagnose A Turn Signal Operating Problem?
To diagnose a turn signal issue, check the bulb, fuse, and relay. Inspect the turn signal switch and wiring for faults. If necessary, consult a professional mechanic for a thorough assessment.
What Causes The Turn Signal To Stop Working?
A turn signal may stop working due to a burnt-out bulb, faulty flasher unit, damaged switch, or a broken wire connection. Regular checks can prevent such issues.
Why Did My Turn Signals Stop Working On My Motorcycle?
Your motorcycle’s turn signals might stop working due to a blown fuse, faulty relay, burned-out bulbs, or damaged wiring. Check these components to identify and fix the issue.
How Do You Diagnose A Bad Turn Signal Switch?
To diagnose a bad turn signal switch, observe for non-functioning signal lights, listen for clicking sounds, and check for dashboard indicator issues. If these signs are present, test the switch’s electrical connectivity with a multimeter. Replace the switch if inconsistencies are found.
Why Do Harley Turn Signals Stop Working?
Harley turn signals may stop functioning due to a blown fuse, faulty wiring, or a malfunctioning turn signal switch.
Conclusion
Troubleshooting your Harley Davidson’s turn signals doesn’t have to be daunting. With the right approach, you can swiftly pinpoint and fix issues. Remember, regular maintenance can prevent most problems before they start. For any persistent complications, seeking professional help is wise.
Safe riding begins with proper signal function—never compromise on that.


