Are you wondering if you can paint over JB Weld to make your repair look seamless? Whether you’ve just finished fixing a crack or patching a surface, the next step often comes down to aesthetics.
You want your repair to blend in perfectly with the surrounding area, right? The good news is, yes—you can paint JB Weld, but there are some important steps you need to follow to get the best results. You’ll learn exactly how to prepare JB Weld for painting, how long to wait before applying paint, and the best tips to ensure a smooth, long-lasting finish.
Keep reading to make your repair not only strong but also visually flawless.

Credit: www.reddit.com
Painting Jb Weld Basics
Painting JB Weld adds color and protection to repairs. It helps blend the fix with the surrounding surface. Knowing how and when to paint JB Weld ensures a strong, lasting finish.
Timing and preparation are key. The epoxy must cure fully before painting. The right type of JB Weld also affects paint adhesion and appearance.
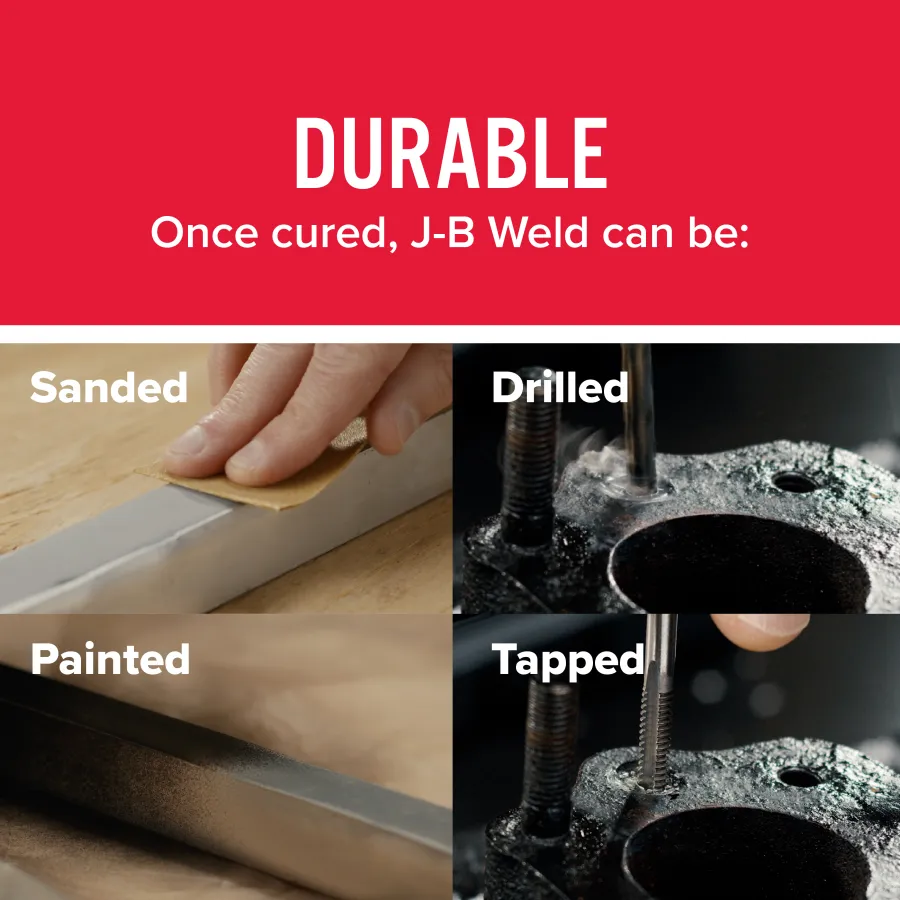
Can Jb Weld Be Painted?
Yes, JB Weld can be painted after it cures completely. Painting too soon can trap solvents and weaken the bond. Wait at least 15-24 hours depending on the product and temperature.
Some users sand the surface before painting. This step creates a rough texture for better paint grip. Applying primer improves paint adhesion and final look.
Types Of Jb Weld Suitable For Painting
Standard J-B Weld Original is paintable once cured. It cures to a hard, sandable surface ideal for paint. PlasticWeld and BumperWeld are also paint-friendly after full cure.
PlasticWeld works well on plastics and bonds strongly. BumperWeld is designed for flexible automotive parts and holds paint well. Always check product instructions for cure time before painting.
Preparing Jb Weld For Paint
Preparing JB Weld for paint is key to achieving a neat, long-lasting finish. Paint sticks best to a clean, smooth surface. Proper preparation removes dust, oils, and rough spots. This ensures the paint adheres well and looks professional.
Cleaning And Surface Prep
Start by letting the JB Weld fully cure. This usually takes 4 to 6 hours, but check product instructions for exact times.
Use a clean cloth with rubbing alcohol or mild soap and water to wipe the surface. Removing grease, dirt, and oils is crucial.
Allow the surface to dry completely before moving to sanding. A clean surface helps paint stick better and prevents peeling.
Sanding Techniques For Smooth Finish
Begin sanding with medium-grit sandpaper (around 120 grit). This shapes and smooths any uneven areas.
Switch to fine-grit sandpaper (220 grit or higher) to create a smooth finish. Sand lightly and evenly.
Wet sanding can help reduce dust and give a shinier surface. Use water with fine sandpaper for best results.
After sanding, wipe the area with a damp cloth and let it dry. This removes dust and prepares the surface for primer or paint.
Curing Time Before Painting
Before painting J-B Weld, it is important to understand the curing time needed. Curing is the process where the epoxy hardens and reaches its full strength. Painting too soon can affect the bond and finish quality. Patience during this phase ensures the best results for your repair or project.
Recommended Drying Periods
J-B Weld typically requires 15 to 24 hours to cure completely. Some types may need up to 48 hours for full curing. The exact time depends on temperature and humidity. Cooler or more humid conditions slow the curing process. Check the product instructions for specific drying times. Allow the epoxy to harden fully before any sanding or painting.
Risks Of Painting Too Early
Painting J-B Weld before it cures can trap solvents inside. This stops the epoxy from hardening properly under the paint. The paint may peel or crack as the epoxy continues curing. Early painting can also cause bubbles or blisters in the paint layer. These flaws reduce the strength and appearance of the repair. Wait until the epoxy is fully cured for a smooth, durable finish.
Choosing The Right Primer
Choosing the right primer is essential for painting JB Weld successfully. The primer helps the paint stick to the JB Weld surface. It also protects the repair and gives a smooth finish. Without a proper primer, paint may peel or chip off easily. Different types of JB Weld require different primers. This section explains how to select the best primer for your project.
Primers For Epoxy Surfaces
Most JB Weld products are epoxy-based. Epoxy creates a hard, smooth surface that paint often struggles to stick to. Using a primer made for epoxy surfaces improves paint adhesion. Look for primers labeled “epoxy primer” or “bonding primer.” These primers create a rough texture that paint can grip. Apply the primer after JB Weld fully cures. This step avoids paint bubbling or peeling later.
Primers For Plastic-based Jb Weld
Plastic-based JB Weld types, like Plastic Bonder, need special primers. Plastic surfaces are smooth and non-porous. Use a primer designed for plastic or flexible surfaces. These primers help paint stick and prevent cracking. Clean the surface well before priming. Allow the primer to dry completely before painting. This process ensures a long-lasting, durable finish on plastic JB Weld repairs.
Best Paint Types For Jb Weld
Painting JB Weld enhances its appearance and protects the repair. Choosing the right paint ensures durability and a smooth finish. Not all paints bond well with JB Weld. Understanding the best paint types helps achieve great results. Let’s explore which paints work best and how to add color effectively.
Compatible Paint Options
Oil-based paints stick well to JB Weld surfaces. They offer strong adhesion and weather resistance. Acrylic paints also work fine on cured JB Weld. Use water-based acrylics for indoor projects. Epoxy paints provide excellent durability and chemical resistance. They match JB Weld’s tough nature perfectly. Avoid latex paints as they may peel off. Always apply paint after the epoxy fully cures. This prevents bubbling or poor adhesion. Priming the surface can improve paint bonding. Use a primer made for metal or plastic. It creates a smooth base for paint application.
Adding Color To Jb Weld
JB Weld comes in a natural gray or black color. Painting allows customization to match your project. Sand the cured JB Weld to create a rough surface first. This step helps paint stick better. Choose your paint color based on the surrounding material. Apply thin, even coats of paint for best results. Let each coat dry completely before adding another. Use a clear sealant to protect the paint and repair. This extra layer improves longevity and shine. Painting JB Weld is simple with the right prep and materials.
Painting Techniques For Durable Finish
Painting J-B Weld requires careful preparation and technique for a long-lasting finish. The surface must be smooth and fully cured before painting. Proper painting methods prevent peeling, bubbling, and uneven color. These tips help achieve a durable and attractive coat on J-B Weld repairs.
Applying Paint Evenly
Start with a clean, dry surface. Use fine sandpaper to smooth the cured J-B Weld. Apply a suitable primer to improve paint adhesion. Use thin, even coats of paint. Avoid thick layers that can drip or peel. Allow each coat to dry fully before adding the next. Use a brush or spray for best results. Keep strokes consistent to prevent streaks.
Tips To Avoid Bubbles And Peeling
Ensure J-B Weld cures completely before painting. Painting too early traps moisture and causes bubbles. Work in a dust-free environment to avoid imperfections. Use light pressure when brushing or spraying paint. Avoid applying paint in very humid or cold conditions. Choose high-quality paint designed for epoxy or plastic surfaces. Let the paint dry slowly at room temperature for better adhesion.
Post-painting Care
After painting JB Weld, proper care is essential to keep the surface smooth and durable. Post-painting care helps the paint last longer and maintain its appearance. Taking time for sanding, polishing, and maintenance can improve results and extend the life of your repair.
Sanding And Polishing After Paint
Wait for the paint to fully dry before sanding. Use fine-grit sandpaper, around 400 to 600 grit, to gently smooth any rough spots. Sand lightly to avoid removing too much paint. After sanding, polish the area with a soft cloth or polishing compound. This step restores shine and removes minor scratches, giving a clean and smooth finish.
Maintenance Tips For Longevity
Keep the painted JB Weld clean by wiping it with a damp cloth regularly. Avoid harsh chemicals that can damage paint or epoxy. Inspect the surface for chips or cracks and touch up paint as needed. Protect the area from extreme heat or moisture to prevent peeling or damage. Proper care ensures the repair stays strong and looks good for a long time.
Credit: www.jbweld.com
Common Mistakes To Avoid
Painting JB Weld is common for a finished look. Avoid mistakes to ensure good results. Mistakes can cause paint to peel or look uneven. Follow correct steps to get smooth, lasting paint on JB Weld.
Skipping Surface Preparation
Clean the JB Weld surface well before painting. Dirt, oil, or dust stop paint from sticking. Lightly sand the cured JB Weld to create a rough surface. This helps paint hold better. Skip sanding and paint may peel off quickly.
Ignoring Cure Times
Let JB Weld cure fully before painting. Painting too soon traps moisture and chemicals. This ruins paint adhesion and weakens the repair. Follow the cure time on the JB Weld package. It usually takes several hours to days. Patience ensures the best paint finish and durability.

Credit: www.reddit.com
Frequently Asked Questions
Can A Jb Weld Steel Stick Be Sanded And Painted?
Yes, JB Weld steel stick can be sanded and painted after fully curing. Sand with fine grit for smoothness. Apply primer before painting for best adhesion and finish.
Is Jb Plasticweld Paintable?
Yes, JB PlasticWeld is paintable. Allow it to fully cure, then sand, prime, and apply your chosen paint for best results.
How Long Should Jb Weld Dry Before Painting?
Allow JB Weld to fully cure for 15-24 hours before painting. This prevents paint bubbles and ensures proper adhesion.
Can I Add Color To Jb Weld?
Yes, you can add color to JB Weld by painting it after full curing. Sand and prime the surface first.
Can You Paint Jb Weld After It Cures?
Yes, JB Weld can be painted once it is fully cured and properly sanded for better paint adhesion.
Conclusion
Painting J-B Weld is possible once it fully cures. Allow enough time for curing to avoid paint bubbles. Sand the surface smoothly before applying primer. Use a primer made for plastic or epoxy materials. After priming, apply your chosen paint carefully.
Patience ensures a clean, lasting finish on repairs. Proper preparation helps paint stick well to J-B Weld. This simple process improves the look of your fix.


