Is your brake light not turning on? You might be concerned about safety or legal issues.
This guide will help you understand why your brake light isn’t working and how to fix it. Brake lights are crucial for road safety. They alert other drivers when you are stopping or slowing down. When they fail, it can lead to accidents or fines.
Many factors could cause a brake light to stop working. It could be as simple as a blown bulb or a more complex electrical issue. Knowing the potential causes can save you time and money. In this post, we’ll explore common reasons why brake lights fail and provide tips on how to address these issues. Let’s get your brake lights working again!

Credit: www.reddit.com
Common Causes
Your brake lights are essential for safety. When they fail to turn on, it can be dangerous. Understanding the common causes can help you fix the issue quickly.
Burnt Out Bulbs
Brake light bulbs can burn out over time. This is a common issue. Check the bulbs first if your brake lights don’t work. Replacing a burnt-out bulb is easy and inexpensive. Always have spare bulbs in your car for emergencies.
Blown Fuse
A blown fuse can stop your brake lights from working. Fuses protect the electrical circuits in your car. Inspect the fuse box to see if any fuses are blown. Replacing a blown fuse is simple and can solve the issue. Make sure to use the correct fuse rating.
Credit: maxima.org
Inspecting The Bulbs
When your brake light won’t turn on, the first step is to inspect the bulbs. This can be a quick and easy fix. Follow these steps to get started:
Removing The Bulbs
First, you need to remove the bulbs from the brake light housing. This is a simple process:
- Open the trunk or rear hatch of your vehicle.
- Locate the brake light housing. It’s usually held by screws or clips.
- Use a screwdriver or your hands to remove the screws or clips.
- Gently pull the housing out to access the bulbs.
- Twist the bulb socket counterclockwise to remove it from the housing.
- Carefully pull the bulb out from the socket.
Checking For Damage
Once you have removed the bulbs, check them for any damage. Look for these signs:
- Burnt out filament: The thin wire inside the bulb is broken.
- Blackened glass: Indicates the bulb has burnt out.
- Cracks or breaks: Any visible damage to the bulb’s glass.
If you notice any of these signs, the bulb needs to be replaced. You can find replacement bulbs at auto parts stores. Make sure to get the right type for your vehicle.
Inspecting the bulbs is a crucial step. It can save you time and money. If the bulbs are fine, you may need to check other components. Stay tuned for more tips on fixing brake light issues.
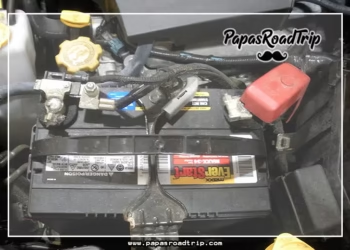
Checking The Fuse
One common reason for brake lights not working is a blown fuse. Checking the fuse is a simple process. It’s a good starting point before diving into more complex diagnostics.
Locating The Fuse Box
The first step is to locate the fuse box in your vehicle. Most cars have more than one fuse box. The main fuse box is usually found under the dashboard or near the engine bay.
- Consult your vehicle’s manual to find the exact location.
- Look for a diagram inside the fuse box cover.
- Identify the fuse for the brake lights using this diagram.
Testing The Fuse
Once you have located the fuse, it’s time to test it. You can use a fuse tester or a multimeter for this purpose.
- Turn off the car and remove the key from the ignition.
- Carefully pull out the brake light fuse using fuse pullers.
- Inspect the fuse for any visible damage or breaks.
- If the fuse appears intact, use a multimeter to check for continuity.
If the fuse is blown, replace it with a new one of the same amperage. This simple check can often solve the issue of brake lights not turning on.

Credit: www.wikihow.com
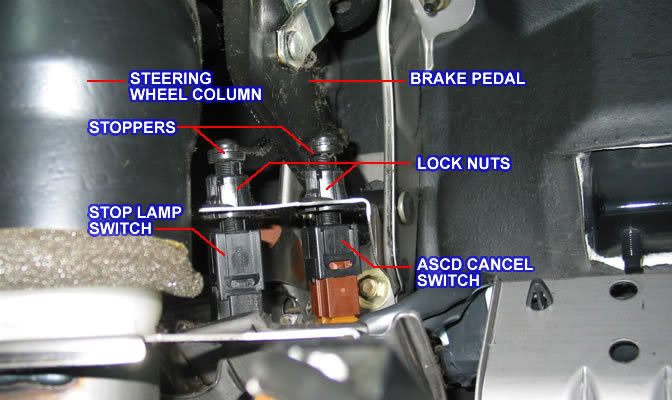
Examining The Brake Light Switch
The brake light switch plays a crucial role in your vehicle’s safety system. If your brake light won’t turn on, the switch might be faulty. This section guides you through finding and testing the brake light switch.
Finding The Switch
First, locate the brake light switch. It is usually near the top of the brake pedal. You may need a flashlight to see it clearly. Check your vehicle’s manual for the exact position.
| Step | Description |
|---|---|
| 1 | Look near the brake pedal. |
| 2 | Use a flashlight for better visibility. |
| 3 | Consult the vehicle manual. |
Testing The Switch Functionality
Testing the brake light switch requires some simple steps. You might need a multimeter for this task.
- Turn off the vehicle and remove the keys.
- Disconnect the brake light switch from its wiring.
- Set the multimeter to the continuity setting.
- Touch the multimeter probes to the switch terminals.
- Press the brake pedal and observe the multimeter.
The multimeter should show continuity when the pedal is pressed. If not, the switch is faulty. Replace it to restore brake light function.
Safety tip: Always ensure the vehicle is in park mode before starting any inspection.
Wiring Issues
Brake lights are crucial for safe driving. If your brake light won’t turn on, it could be due to wiring issues. Faulty wiring disrupts the flow of electricity. This prevents the brake light from illuminating. Let’s explore how to inspect and repair the wiring.
Inspecting The Wiring
Start by locating the brake light wires. These are usually found in the rear of the vehicle. Check for any visible damage. Look for cuts, frays, or corrosion. A multimeter helps test the wires for continuity. Ensure the wires are connected securely to the brake light assembly. Loose connections can prevent the light from working.
Repairing Damaged Wires
Found damaged wires? You need to repair them. Cut out the damaged section using wire cutters. Strip the insulation from both ends of the remaining wire. Use a wire stripper for this task. Connect the new wire segment using wire connectors. Crimp the connectors firmly to ensure a solid connection. Wrap the repaired section with electrical tape. This prevents moisture and further damage. Finally, test the brake light to ensure the repair was successful.
Faulty Brake Light Socket
A faulty brake light socket can be a common reason why your brake light won’t turn on. The socket holds the brake light bulb and ensures it connects properly to the electrical system. When the socket is damaged or corroded, it disrupts this connection. This leads to brake light failure. Learn how to spot socket problems and replace them with ease.
Identifying Socket Problems
To identify socket problems, follow these steps:
- Check the brake light bulb for signs of wear or damage.
- Inspect the socket for corrosion or dirt buildup.
- Look for burnt or melted areas on the socket.
- Use a multimeter to test the socket’s electrical connection.
If you notice any of these issues, the socket might be the culprit.
Replacing The Socket
Replacing a faulty brake light socket involves a few simple steps:
- Turn off your vehicle and ensure the brake light is off.
- Remove the brake light bulb from the socket.
- Disconnect the socket from the vehicle’s wiring.
- Install the new socket by connecting it to the wiring.
- Insert the brake light bulb into the new socket.
- Test the brake light to ensure it works properly.
Important note: Always use the correct socket type for your vehicle model. A wrong socket can cause further issues.
By following these steps, you can fix your brake light and drive safely.
Issues With The Brake Pedal
If your brake lights are not turning on, the brake pedal could be the cause. The brake pedal is crucial for signaling your car’s stop lights. Misalignment or poor adjustment can disrupt this critical function. Let’s explore two common problems: pedal alignment and adjustment.
Checking Pedal Alignment
First, inspect the brake pedal’s position. Misalignment can prevent the switch from activating the brake lights. Here’s how to check:
- Look at the pedal from the side.
- Ensure it sits parallel to the floor.
- Compare it to the gas pedal for accuracy.
If the pedal appears tilted, it may need realignment. A misaligned pedal can fail to press the switch, causing brake lights to stay off.
Adjusting The Pedal
If alignment looks good, adjust the pedal to ensure it contacts the brake light switch properly. Follow these steps:
- Locate the brake light switch under the dashboard.
- Press the brake pedal and notice where it hits the switch.
- If it misses the switch, adjust the pedal closer.
Some vehicles have an adjustment screw. Turn it until the pedal activates the switch. If no screw is present, a professional mechanic may be needed.
Regular maintenance of the brake pedal ensures your brake lights function correctly. This small effort can prevent accidents and keep you safe on the road.
When To Seek Professional Help
Sometimes, brake light issues can be fixed at home. But other times, it’s best to consult a professional. Knowing when to seek help can save time and ensure safety. Here are some signs that indicate it’s time to visit a mechanic.
Signs You Need A Mechanic
Your brake light still won’t turn on after replacing the bulb. This could mean a deeper electrical issue.
You notice a burning smell when you press the brake pedal. This could indicate a problem with the brake system.
Your car’s ABS light is on. The ABS (Anti-lock Braking System) light being on is a sign that there may be an issue with the brake system.
The brake lights are flickering or only work intermittently. This can be a sign of a wiring problem.
Finding A Reliable Service
To find a reliable service, ask for recommendations. Friends and family can often provide trusted suggestions.
Read online reviews. Websites like Yelp or Google Reviews can offer insight into a mechanic’s reputation.
Ensure the service center has certified technicians. Look for certifications like ASE (Automotive Service Excellence).
Check the warranty on services provided. A good service center will stand by their work.
Compare prices. While you don’t want to choose the cheapest option, ensure the prices are fair and competitive.
Frequently Asked Questions
Why Won’t My Brake Light Turn On?
The brake light bulb might be burnt out. Check and replace it if needed.
How Do I Check Brake Light Fuse?
Locate the fuse box. Check the brake light fuse for any signs of damage.
Can A Faulty Switch Cause Brake Light Issues?
Yes, a faulty brake light switch can prevent the lights from turning on.
What Tools Do I Need To Fix A Brake Light?
You might need a screwdriver and a replacement bulb or fuse.
How Do I Know If The Brake Light Bulb Is Bad?
Inspect the bulb. If the filament is broken or the glass is blackened, it’s bad.
Conclusion
Fixing a brake light that won’t turn on is essential for safety. Start by checking the bulb. If it’s fine, inspect the fuse. Sometimes, wiring issues cause problems. Seek professional help if unsure. Regular maintenance prevents future issues. Ensure all lights function properly before driving.
Safety should always come first. Stay alert and address any light issues promptly. Thanks for reading. Safe driving!


