Adjusting valve lash is crucial for engine performance. It ensures proper valve operation and prevents damage.
Valve lash adjustment is a vital maintenance task for your engine. This process involves setting the clearance between the valve and its lifter or rocker arm. Over time, this gap can change due to wear and tear. If left unchecked, it can lead to poor engine performance or even damage.
Regular adjustment ensures your engine runs smoothly and efficiently. In this blog post, we will explore the importance of adjusting valve lash, when it needs to be done, and the steps involved. By the end, you’ll understand why this small adjustment can make a big difference in your engine’s health.
Introduction To Valve Lash Adjustment
Valve lash, the gap between the valve lifter and the valve tip, is vital in an engine’s performance. Adjusting valve lash ensures your engine runs smoothly. Neglecting it can lead to engine damage. This guide will help you understand the importance of valve lash and the tools needed to adjust it.
Importance Of Valve Lash
Proper valve lash ensures valves open and close at the right time. This helps maintain engine efficiency. If the gap is too large, it can cause noise and wear. If too tight, it can cause power loss and potential engine damage.
Adjusting valve lash is crucial for:
- Optimal Engine Performance: Ensures efficient combustion and smooth operation.
- Preventing Damage: Reduces wear on the valve train components.
- Fuel Efficiency: Helps in achieving better fuel economy.
Tools Needed
Before adjusting valve lash, gather the necessary tools. These tools are essential for an accurate and safe adjustment:
| Tool | Purpose |
|---|---|
| Feeler Gauge | Measures the gap between the valve and lifter. |
| Wrench Set | Loosens and tightens the adjustment nuts. |
| Screwdriver | Adjusts the valve lash screws. |
| Torque Wrench | Ensures the nuts are tightened to the correct torque. |
Having these tools ready will make the adjustment process smoother and more efficient. Ensure to follow the manufacturer’s specifications for your engine type. This will help you achieve the best results.
Preparing Your Engine
Getting your engine ready for valve lash adjustment is crucial. Proper preparation ensures accurate adjustments and avoids damage. This section covers safety precautions and engine cooling. Follow these steps to prepare your engine properly.
Safety Precautions
- Wear protective gear: Safety glasses and gloves are a must.
- Work in a well-ventilated area: Ensure good airflow to avoid inhaling fumes.
- Disconnect the battery: This prevents accidental startups and shocks.
- Use proper tools: Have a set of wrenches, feeler gauges, and a torque wrench.
- Consult your manual: Refer to the vehicle’s manual for specific instructions.
Engine Cooling
Before adjusting the valve lash, the engine must be cool. A hot engine can give inaccurate readings. Follow these steps to ensure proper cooling:
- Turn off the engine: Let it sit for at least an hour.
- Check the temperature: Use a thermometer to ensure the engine is cool to touch.
- Open the hood: This helps speed up the cooling process.
Proper cooling is crucial for accurate adjustments. Ensure the engine is completely cool before proceeding. This simple step can save time and prevent errors.
Locating Valve Components
Locating valve components is a crucial step in adjusting valve lash. Knowing where each part is helps ensure a smooth and accurate adjustment. This section will guide you on how to find and identify these components within your engine.
Identifying Valves
Valves are essential for engine performance. They control air and fuel flow. To identify them, look for the cylinder head. This is where valves are located. Each cylinder has two valves: an intake and an exhaust valve. The intake valve allows air and fuel into the cylinder. The exhaust valve lets out burnt gases.
- Locate the cylinder head.
- Find the intake valve (larger).
- Identify the exhaust valve (smaller).
Understanding Engine Layout
Different engines have various layouts. Knowing your engine type helps you find valve components easily. Common types include inline, V, and flat engines.
| Engine Type | Description |
|---|---|
| Inline | All cylinders arranged in a single line. |
| V | Cylinders arranged in two banks forming a V shape. |
| Flat | Cylinders arranged horizontally in two banks. |
For an inline engine, locate the head at the top of the block. In V engines, there are two cylinder heads. Each side has its own set of valves. Flat engines have two heads as well, but they are placed horizontally.
- Identify your engine type.
- Locate the cylinder head(s).
- Find the intake and exhaust valves.
Understanding these basics will help you locate valve components efficiently. This ensures a smooth valve lash adjustment process.
Credit: www.dragzine.com
Measuring Current Valve Lash
Measuring current valve lash is crucial for maintaining optimal engine performance. It ensures that the valves open and close at the right times. Proper valve lash prevents engine damage and improves efficiency. Follow these steps to measure your current valve lash accurately.
Using Feeler Gauges
Begin by gathering the necessary tools, including feeler gauges. These thin metal strips come in various thicknesses. They help measure the gap between the valve stem and the rocker arm. Make sure the engine is cold before starting.
Remove the valve cover to access the valves. Insert the correct feeler gauge between the valve stem and rocker arm. The gauge should slide with slight resistance. Note the measurement on the feeler gauge. This indicates the current valve lash.
Recording Measurements
Keep a notebook or digital device handy. Record the lash measurements for each valve. This helps track any changes over time.
Organize your notes by cylinder and valve type. This makes future adjustments easier. Accurate records ensure consistent engine performance.
Compare the measured values with the manufacturer’s specifications. If any lash measurements are out of range, adjustments are necessary. Regular checks and records help maintain engine health.
Adjusting Valve Lash
Adjusting valve lash is a crucial part of engine maintenance. Properly adjusted valve lash ensures your engine runs smoothly and efficiently. This guide will walk you through the steps to adjust valve lash.
Loosening Lock Nut
First, locate the valve you need to adjust. Use a wrench to loosen the lock nut. This nut holds the adjustment screw in place. Turn it counterclockwise to loosen. Be careful not to remove it completely. This step is important for making adjustments.
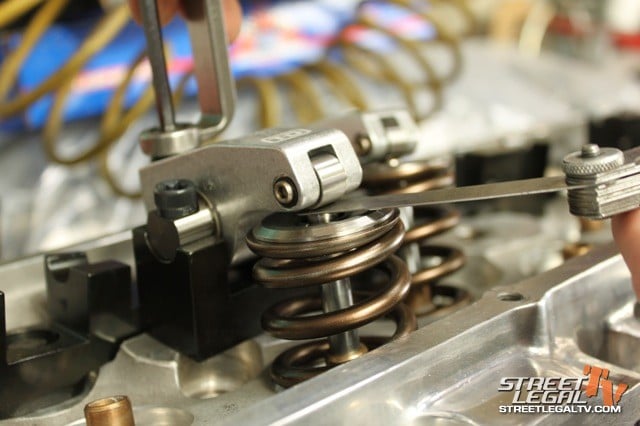
Setting Correct Clearance
Once the lock nut is loose, use a feeler gauge to set the correct clearance. Insert the gauge between the valve stem and the rocker arm. The clearance should match the specifications in your engine manual. Adjust the screw with a screwdriver until you achieve the right clearance.
Tighten the lock nut while holding the adjustment screw in place. This ensures the setting remains accurate. Double-check the clearance with the feeler gauge. It should slide with slight resistance. Repeat these steps for each valve that needs adjustment.

Credit: www.hotrod.com
Rechecking Adjustments
Rechecking adjustments is a crucial step after setting the valve lash. This process ensures the accuracy and longevity of your engine’s performance. Skipping this step can lead to inefficiency and potential damage. Let’s delve into the vital steps for rechecking adjustments.
Double-checking Measurements
First, double-check the measurements. Use a feeler gauge to measure the gap between the rocker arm and the valve stem. This gap should match the manufacturer’s specifications. If the gap is too wide or too narrow, readjust until it is perfect. Accurate measurements ensure optimal engine performance.
Always measure twice. This reduces the chances of error. Even a small deviation can impact engine efficiency. Consistency is key in maintaining a well-tuned engine.
Ensuring Proper Tightening
Next, ensure proper tightening of all components. Loose components can lead to engine wear and tear. Tighten the lock nuts and adjusters securely. Use a torque wrench to achieve precise tightness as specified.
Recheck each nut and adjuster after tightening. This step guarantees that all parts remain secure during engine operation. Proper tightening prevents parts from loosening over time. A well-tightened engine runs smoothly and lasts longer.
Final Engine Check
Properly adjusting valve lash ensures smooth engine performance. Regular checks prevent engine wear and maintain optimal power. Accurate adjustments lead to a quieter, more efficient engine.
Before you finish, it’s crucial to perform a final engine check. This ensures your adjustments were correct. It also helps detect any potential issues.Starting The Engine
Turn the key to start the engine. Pay attention to how it starts. The engine should start smoothly. If it struggles, the valve lash may need readjusting.Listening For Unusual Noises
Once the engine is running, listen carefully. Unusual noises can indicate problems. Clicking or tapping sounds may mean the lash is too loose. A humming noise could mean it’s too tight. Adjust as needed to ensure a healthy engine. “`
Credit: www.youtube.com
Maintenance Tips
Proper maintenance of valve lash is crucial for engine performance. Regular checks help avoid severe engine damage. Follow these tips to keep your engine running smoothly.
Regular Inspection
Consistent inspections ensure valves work efficiently. Check valve lash at every oil change. It helps catch issues early. Use a feeler gauge to measure gaps. Follow the manufacturer’s guidelines for the correct clearance.
- Inspect the valve lash every 5,000 miles.
- Use the correct tools: feeler gauge and wrenches.
- Ensure the engine is cold before checking.
| Tool | Purpose |
|---|---|
| Feeler Gauge | Measure gap between rocker arm and valve stem |
| Wrench | Adjust the nut on the rocker arm |
Common Issues To Watch
Be aware of common valve lash issues. These can affect engine performance. Look out for these signs:
- Excessive Noise: Loud tapping sounds indicate too much lash.
- Poor Engine Performance: Loss of power or misfiring may be due to incorrect lash.
- Increased Fuel Consumption: Bad valve adjustment can reduce fuel efficiency.
Address these issues promptly. Regular maintenance saves money on repairs. Keep your engine in top shape by following these tips.
Frequently Asked Questions
What Is Valve Lash Adjustment?
Valve lash adjustment sets the gap between the valve and rocker arm. Proper adjustment ensures engine performance.
Why Is Adjusting Valve Lash Important?
Proper valve lash prevents engine damage. It ensures efficient engine operation and longevity.
How Often Should You Adjust Valve Lash?
Check your vehicle’s manual. Typically, adjust every 15,000 to 30,000 miles.
What Tools Are Needed For Valve Lash Adjustment?
Common tools include a feeler gauge, wrench, and screwdriver. Always refer to your vehicle’s manual.
Can Improper Valve Lash Affect Engine Performance?
Yes, improper valve lash can cause poor performance. It may lead to engine noise or damage.
Conclusion
Proper valve lash adjustment ensures your engine runs smoothly and efficiently. Always check the manufacturer’s specifications before starting. Regular maintenance helps prevent major issues down the road. Use the right tools and take your time. This small effort can save you from costly repairs.
Keep an eye on your engine’s performance. If you notice changes, it might be time to adjust again. Happy driving!


