Having trouble with your 4Runner brake light? It’s a common issue that many drivers face.
A malfunctioning brake light can be both a safety hazard and a legal problem. Understanding why your 4Runner brake light isn’t working is crucial. It could be due to a blown fuse, a faulty bulb, or an issue with the wiring.
These problems might seem minor but can lead to serious consequences if ignored. In this blog post, we’ll explore the possible causes and solutions for a non-working 4Runner brake light. We’ll help you troubleshoot and fix the issue, ensuring your vehicle remains safe and roadworthy. Stay with us to learn more about keeping your brake lights in top shape.

Credit: www.youtube.com
Common Causes
Having a brake light out on your 4Runner can be frustrating and dangerous. Understanding the common causes can help you diagnose and fix the issue quickly. This section will guide you through the usual suspects.
Burnt Out Bulb
A burnt-out bulb is the most common reason for a brake light not working. Over time, brake light bulbs can wear out and stop functioning. Replacing the bulb is a simple and inexpensive fix. Check the bulb for any signs of blackening or filament damage.
Blown Fuse
A blown fuse can also cause your brake light to stop working. The brake light system relies on a fuse to function. If the fuse is blown, the circuit is broken, and the light won’t work. Locate the fuse box and check the brake light fuse. Replace it if needed.
Faulty Brake Light Switch
The brake light switch is another potential culprit. This switch activates the brake lights when you press the brake pedal. If the switch is faulty, it may not send the signal to the lights. Inspect the switch and replace it if it shows signs of wear or damage.
Initial Checks
Experiencing issues with your 4Runner brake light not working can be frustrating. Ensuring your brake lights function is crucial for safety on the road. Before diving into complex solutions, start with some initial checks. These simple steps can often solve the problem quickly.
Inspect The Bulb
The first step is to inspect the brake light bulb. A burnt-out bulb is a common cause. Remove the brake light cover and take out the bulb. Look for any signs of damage or a broken filament. If it appears dark or cloudy, replace it with a new one. Test the brake lights again after replacing the bulb.
Check The Fuse
If the bulb is fine, the next step is to check the fuse. The fuse box is usually located under the dashboard or in the engine compartment. Refer to the 4Runner’s manual to find the exact location. Look for the fuse labeled for brake lights. If the fuse appears blown or damaged, replace it with one of the same rating. This simple fix might restore your brake light functionality.
Test The Brake Light Switch
If the bulb and fuse are in good condition, test the brake light switch. This switch is located near the brake pedal. It activates the brake lights when you press the pedal. Use a multimeter to test the switch for continuity. If the switch is faulty, it needs replacement. This might require a bit more effort but can be done with basic tools.
Replacing The Bulb
If your 4Runner brake light isn’t working, it may be time to replace the bulb. This task is simple and can be done with basic tools. Follow these steps to ensure your brake light is functioning properly. Below are the steps for accessing, removing, and installing a brake light bulb.
Accessing The Brake Light
First, locate the brake light housing at the rear of your 4Runner. Open the tailgate to reveal the screws holding the housing in place. Using a screwdriver, remove these screws carefully. Set them aside where they won’t get lost.
Once the screws are removed, gently pull the brake light housing away from the vehicle. Be cautious not to damage any wiring connected to the housing. You may need to wiggle the housing a bit to free it completely.
Removing The Old Bulb
With the housing removed, identify the brake light bulb socket. Turn the socket counterclockwise to release it from the housing. Once the socket is free, pull the old bulb straight out. Be gentle to avoid breaking the bulb.
If the bulb is stuck, use a cloth to grip and twist it gently. Check the socket for any corrosion or damage. Clean the socket with a dry cloth if needed.
Installing The New Bulb
Take the new brake light bulb and insert it into the socket. Ensure it is firmly in place. Align the socket with the hole in the brake light housing. Turn it clockwise to secure it.
Reattach the brake light housing to the vehicle. Insert and tighten the screws you removed earlier. Test the brake light to make sure it works properly. If it doesn’t, check the bulb and socket connections.
Replacing the brake light bulb is a quick and easy process. This ensures your 4Runner remains safe on the road.

Credit: www.youtube.com
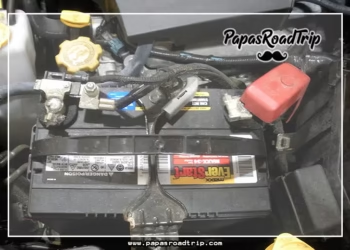
Checking The Fuse
If your 4Runner brake light is not working, the first step is to check the fuse. Fuses protect the electrical components of your vehicle. A blown fuse can easily cause the brake light to fail. Follow these steps to inspect and replace the fuse.
Locating The Fuse Box
The fuse box in a 4Runner is usually located under the dashboard on the driver’s side. You might need to remove a panel or cover to access it. The exact location can vary by model year, so consult your owner’s manual if needed.
Identifying The Brake Light Fuse
Once you have access to the fuse box, find the diagram on the fuse box cover. This diagram will help you identify the brake light fuse. The fuse box cover usually has a chart listing the functions of each fuse. Look for a fuse labeled “Brake” or “Stop Light”.
| Fuse Type | Fuse Rating |
|---|---|
| Brake Light | 10A – 15A |
Replacing A Blown Fuse
Use a fuse puller or a pair of pliers to remove the brake light fuse. Inspect the fuse to see if the metal strip inside is broken or burned. This indicates a blown fuse. Replace the blown fuse with a new one of the same rating.
- Remove the old fuse.
- Check the fuse rating (10A – 15A).
- Insert the new fuse.
Test the brake lights again to see if they are working. If the brake lights still do not work, there might be another issue. You may need to check the brake light switch or the wiring.
Testing The Brake Light Switch
Testing the brake light switch is a crucial step if your 4Runner brake light isn’t working. The brake light switch sends the signal to the brake lights when you press the pedal. If the switch fails, your brake lights won’t turn on. Follow this guide to locate, test, and replace the brake light switch.
Locating The Switch
The brake light switch is usually located near the brake pedal. To find it, look above the pedal where it connects to the bracket. You should see a small switch with wires attached to it. This is the brake light switch.
Use a flashlight to get a better view. Ensure your 4Runner is parked and the engine is off before you start.
Using A Multimeter
Testing the switch involves using a multimeter. Set your multimeter to the continuity setting. Disconnect the wires from the switch. Place the multimeter probes on the switch terminals.
| Step | Action |
|---|---|
| 1 | Press the brake pedal. |
| 2 | Check the multimeter reading. |
| 3 | If it shows continuity, the switch works. |
| 4 | If not, the switch is faulty. |
Replacing The Switch
If the switch is faulty, you need to replace it. Start by purchasing a new brake light switch compatible with your 4Runner. Follow these steps:
- Disconnect the battery to avoid any shocks.
- Remove the faulty switch by unscrewing it from the bracket.
- Install the new switch by screwing it into place.
- Reconnect the wires to the new switch.
- Reconnect the battery and test the brake lights.
Your brake lights should now work. If they still don’t, there may be other issues.
Credit: www.toyota-4runner.org
Wiring Issues
Wiring issues can cause your 4Runner brake light to stop working. Faulty wiring can disrupt the electrical flow. This prevents the brake light from lighting up. Let’s explore common wiring issues. Learn how to inspect, fix, and replace the wiring.
Inspecting The Wiring
First, inspect the wiring for visible damage. Check for frayed wires and broken insulation. Use a flashlight to see better. Look for any signs of wear and tear. Ensure all wires are connected properly.
Fixing Loose Connections
Loose connections can cause the brake light to fail. Tighten any loose connections you find. Use a screwdriver to secure them. Make sure all connections are firm. This ensures a steady flow of electricity.
Replacing Damaged Wires
Damaged wires need replacement. Cut the damaged section with wire cutters. Strip the insulation from the new wire’s ends. Connect the new wire to the existing ones. Use wire nuts to secure the connections. Wrap them with electrical tape for safety.
Using Diagnostic Tools
Using diagnostic tools can help you find why your 4Runner brake light isn’t working. These tools give you detailed information about your vehicle’s issues. Let’s explore how to use these tools effectively.
Obd-ii Scanner
An OBD-II scanner is a valuable tool for diagnosing car problems. Plug the scanner into the port under your dashboard. Turn on the ignition. The scanner will read the vehicle’s computer system.
It can identify problems with the brake light. This scanner can save you time and effort. It points you in the right direction.
Interpreting Error Codes
The scanner shows error codes. Each code points to a specific issue. Look up these codes in the scanner’s manual. You can also find them online.
Understanding these codes is crucial. It helps you know what part needs fixing. It could be a wiring issue or a blown fuse. Or even a faulty brake light switch.
Clearing Fault Codes
Once you fix the issue, you need to clear the error codes. The OBD-II scanner can do this. Clearing the codes resets the system.
This step ensures that the brake light will work correctly. And it helps verify if the problem is truly fixed. Your brake light should now function without issues.
When To Seek Professional Help
Sometimes, fixing your 4Runner brake light issue yourself is not possible. There are situations where professional help is necessary. Knowing when to call an expert can save time and money. Let’s explore some scenarios where seeking professional assistance is the best choice.
Complex Electrical Problems
Modern vehicles have intricate electrical systems. If your brake light issue seems complex, it might involve wiring or the vehicle’s computer system. These problems require advanced knowledge and specialized tools. A professional mechanic can diagnose and fix these issues correctly. Attempting to fix complex electrical problems on your own might cause more damage.
Persistent Issues
If you have tried to fix the brake light multiple times without success, it’s time to seek professional help. Persistent issues might indicate a deeper problem. A mechanic has the experience to identify and solve these problems. They can provide a long-lasting solution, ensuring your brake lights work properly.
Warranty Concerns
Fixing the brake light yourself can void your vehicle’s warranty. Many warranties require repairs to be done by authorized service centers. Check your warranty terms before attempting any fixes. Seeking professional help ensures your warranty remains intact. This can save you from expensive repairs in the future.
Frequently Asked Questions
Why Is My 4runner Brake Light Not Working?
A blown fuse, burnt-out bulb, or faulty wiring could cause it.
How Can I Fix A Blown Fuse In My 4runner?
Check the fuse box, find the brake light fuse, and replace it.
What Should I Do If The Brake Light Bulb Is Burnt Out?
Buy a new bulb, remove the old one, and install the new bulb.
Can Faulty Wiring Cause Brake Light Issues In 4runner?
Yes, damaged wires or loose connections can cause brake light problems.
How Do I Check The Brake Light Switch In My 4runner?
Locate the switch near the brake pedal and test it with a multimeter.
Conclusion
Fixing a 4Runner brake light can be simple. Start with checking the bulb. A new bulb often solves the problem. If not, inspect the fuse and wiring. These steps usually fix the issue. Regular maintenance prevents future problems. Safety on the road is crucial.
Always ensure all lights work. Keep your 4Runner in top shape. Safe driving depends on good maintenance. Stay proactive and avoid issues. Your 4Runner will thank you.


