Troubleshooting a 36-volt golf cart charger involves checking connections, power sources, and fuses. Ensure the outlet and charger are functioning and the cart’s batteries are viable.
Golf cart owners know the frustration of a charger that won’t work. A 36-volt golf cart charger is essential for keeping your vehicle ready for the course. To ensure your golf cart is charged and ready to go, understanding common charger issues is crucial.
Diagnosing problems early can save time and prevent further complications. Whether you’re facing issues with charging times, battery lifespan, or charger malfunctions, a systematic approach to troubleshooting can help you quickly identify and rectify the problem. This guide will help you navigate through the common pitfalls of 36-volt golf cart charger issues with practical solutions to get you back on the green in no time.
Introduction To Golf Cart Chargers
Golf cart chargers are essential for keeping your cart running. They replenish the power in your cart’s batteries after use. Proper charger function ensures your cart is ready for the next round.
The Role Of A 36 Volt Charger
A 36 volt charger powers up golf cart batteries efficiently. It matches the cart’s voltage requirement. This charger type is common for many carts. It ensures peak performance and long battery life.
Common Issues With Golf Cart Chargers
- Charger won’t start
- Battery doesn’t reach full charge
- Charger overheats
- Charging process stops unexpectedly
Regular charger maintenance avoids these issues. It saves time and money. Troubleshooting is simpler with some knowledge. This guide provides helpful tips.
Initial Steps Before Troubleshooting
Troubleshooting a 36 Volt Golf Cart Charger requires careful preparation. Ensure safety and gather necessary tools before beginning. These initial steps set the stage for effective troubleshooting.
Safety Precautions
Personal safety is paramount when working with electrical devices. Follow these guidelines:
- Turn off the charger and cart.
- Remove jewelry and wear protective gear.
- Work in a dry area to prevent shocks.
- Use insulated tools to protect against accidental contact.
Tools And Equipment Needed
Gather these tools before starting:
| Tool/Equipment | Use |
|---|---|
| Multimeter | Measure voltage and continuity |
| Screwdrivers | Open charger housing |
| Wire brushes | Clean contacts and terminals |
| Protective gloves | Ensure hand safety |
Preparation is key. Proper tools and safety measures prevent accidents and pave the way for successful troubleshooting.
Identifying The Problem
Identifying the Problem with your 36 Volt Golf Cart Charger can feel daunting. Yet, understanding the issue is the first step to a solution. Know the symptoms and perform diagnostic tests to pinpoint the fault. This guide will walk you through the troubleshooting process.
Symptoms Of A Faulty Charger
Recognizing a faulty charger is crucial. Look for these signs:
- Cart doesn’t charge: The most obvious sign.
- Charger doesn’t turn on: Indicates power issues.
- Charger turns off quickly: Suggests a faulty connection.
- Overheating: Chargers get warm, but not hot.
- Error codes: Some models display error messages.
Diagnostic Tests
Simple tests can reveal charger issues. Use these steps:
- Visual inspection: Check for damage or loose connections.
- Voltage test: Use a multimeter to check output voltage.
- Continuity test: Ensures the charger’s electrical path is complete.
- Ampere test: Measures the current leaving the charger.
Perform these tests safely. Always refer to the charger’s manual first.
Common Charging Issues And Fixes
Owners of electric golf carts know the frustration of charging issues. A 36 Volt Golf Cart Charger is key for a day on the greens. Understanding common problems helps fix them fast. Let’s dive into typical charging issues and their solutions.
Battery Won’t Charge
Check connections first. Ensure they’re clean and tight. A loose or dirty connection stops charging. If connections look good, test the battery voltage. Low voltage may need a battery replacement.
Charger Overheating
Overheating is a red flag. It can damage your charger. Make sure the charger’s vents are not blocked. Airflow is crucial. If vents are clear, but it’s still hot, the charger might be faulty. Seek professional help.
Incomplete Charging Cycle
An incomplete cycle can be tricky. Check for a timed charging setting. Adjust it if needed. If that’s not it, inspect the charger’s condition. Worn-out chargers often fail to complete cycles. Consider a replacement if wear is evident.
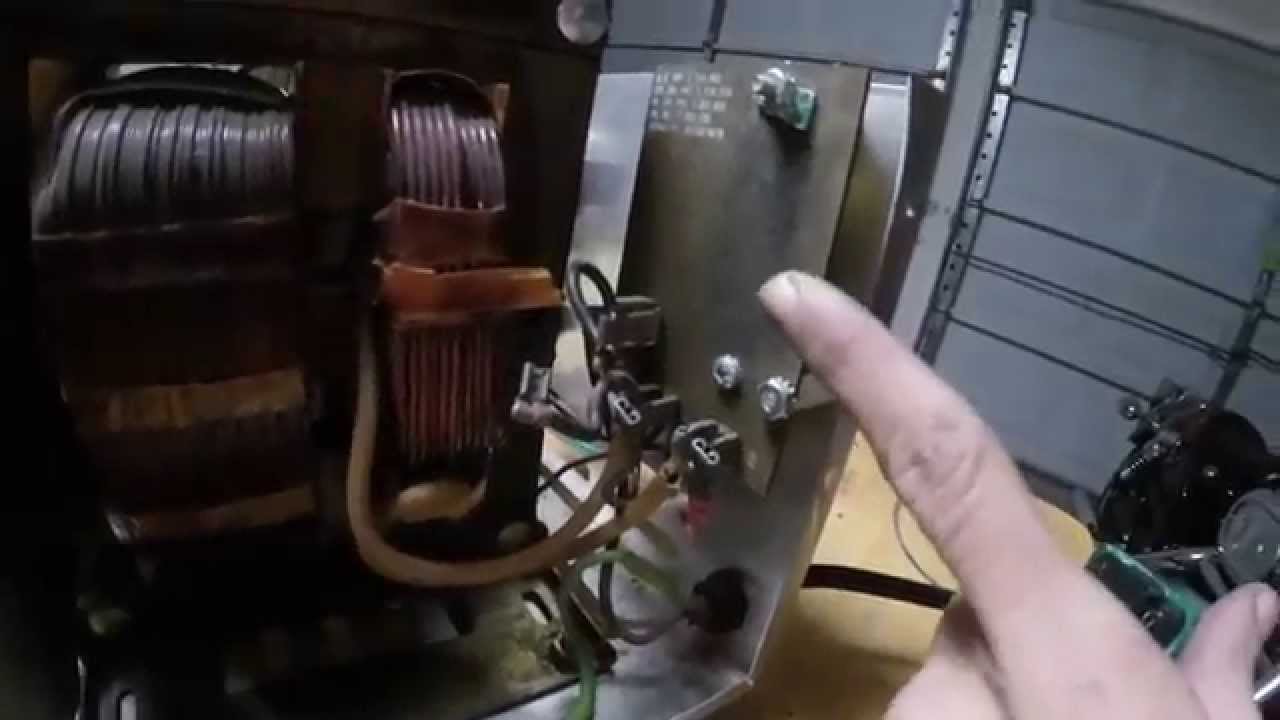
Electrical Components Check
When your 36 Volt Golf Cart Charger shows signs of failure, an electrical components check is crucial. This step-by-step guide helps identify the common issues. Follow safety procedures before you start.
Inspecting Charger Cables And Connectors
Charger cables and connectors are vital for power flow. Look for these signs:
- Visible wear or damage
- Burnt or corroded contacts
- Loose connections
Use a multimeter to test for continuity. Replace cables or connectors if damaged.
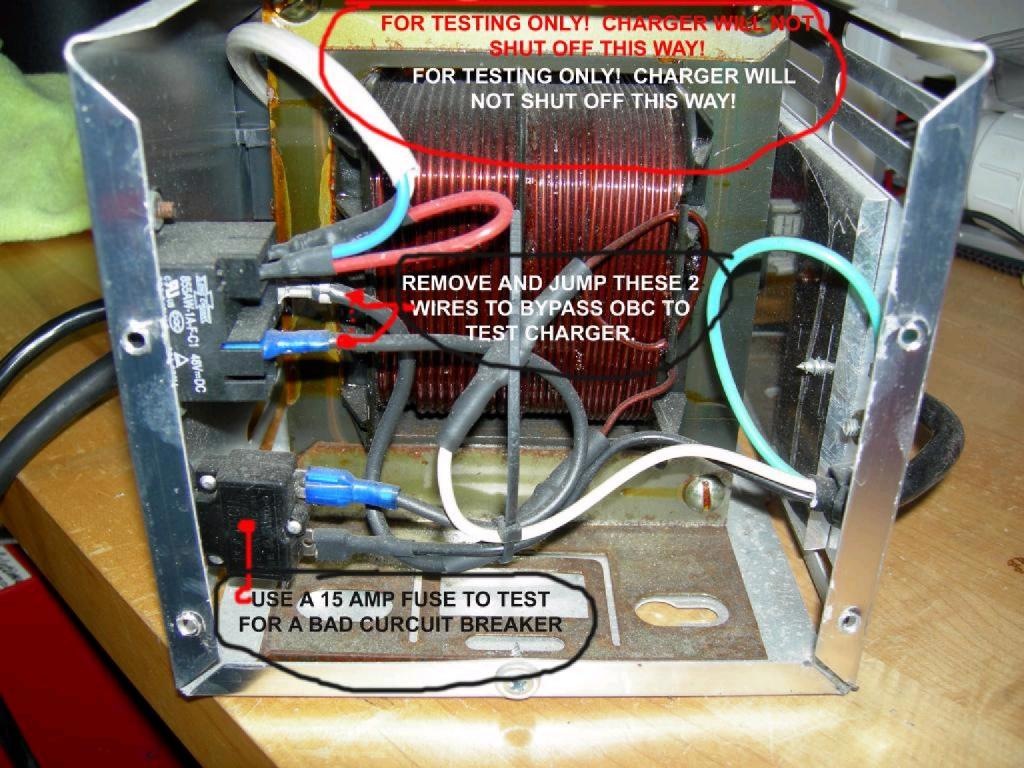
Testing The Charger’s Fuse
The charger’s fuse is a safeguard. A blown fuse stops the charging process. Here is how to test it:
- Locate the fuse in the charger.
- Remove the fuse carefully.
- Check for a broken wire inside.
- Use a multimeter to test for continuity.
Replace the fuse if it fails the test. Always match the fuse specifications.
Bold the most important keywords. Divide long paragraphs. Use tables, bullet-points, ordered lists, unordered lists, and code as needed. The content must be SEO-optimized, unique, plagiarism-free, easy to understand, and in active voice. Avoid fluff or unnecessary words/phrases. All content should be related to the main topic.
Credit: m.youtube.com
Battery Maintenance For Optimal Charging
A well-maintained battery ensures your golf cart performs its best. Regular battery upkeep can prevent charging issues. This guide will cover key steps to maintain your 36 Volt Golf Cart Battery. Simple, routine checks can save you time and money.
Cleaning Battery Terminals
Dirt and corrosion can block electricity flow. Clean terminals help maintain a strong connection. Use a mix of baking soda and water for cleaning. After, rinse with water and dry. Always wear protective gear and avoid contact with skin.
Checking Water Levels
Proper water levels are crucial for battery life. Use distilled water to fill cells after charging. Do not overfill as this can cause issues. Check levels monthly to ensure optimal performance.
Equalizing Charge For Batteries
Batteries can become imbalanced over time. An equalizing charge can fix this. Follow your charger’s instructions for equalizing. It restores balance and extends battery life. Perform this task regularly for best results.
Advanced Troubleshooting Techniques
Advanced Troubleshooting Techniques can help you fix your 36 Volt Golf Cart Charger. Sometimes, simple fixes don’t work. Then, you need to try these advanced methods. Let’s dive deep into two effective techniques.
Using A Multimeter
A multimeter is your best friend for troubleshooting. It checks for power problems. Follow these steps:
- Turn off your charger and golf cart.
- Set your multimeter to measure voltage.
- Connect the multimeter probes to your charger’s output terminals.
- Look for a reading. It should match your charger’s output voltage.
If the reading is too low or zero, your charger might have issues.
Assessing The Charger’s Circuit Board
The circuit board is the charger’s brain. It can fail sometimes. Here’s how to check it:
- Disconnect your charger from power.
- Open the charger’s case to see the circuit board.
- Look for burn marks or damaged components.
Burn marks or damage mean the board needs replacing.
Remember, safety first! Always turn off and unplug everything before checking.

Credit: www.wikihow.com
When To Seek Professional Help
Troubleshooting a 36-volt golf cart charger can be tricky. Sometimes, the best option is to seek professional help. Certain problems are beyond the scope of DIY fixes. Knowing when to call in an expert can save you time and prevent further damage to your charger.
Limitations Of Diy Fixes
DIY approaches have their limits. You may identify and fix minor issues. Yet, complex problems require special tools and expertise. Here are signs that DIY won’t cut it:
- Complex electrical issues
- Repeated charger failures
- Internal component damage
Bold attempts may lead to safety risks or costly errors.
Finding A Qualified Technician
Getting the right help is crucial. A qualified technician ensures your charger gets fixed correctly. Use these tips to find a pro:
- Check certifications
- Read reviews
- Ask for referrals
Choose technicians with experience in golf cart charger repairs.
Preventive Measures And Best Practices
Keeping your 36 Volt Golf Cart Charger in top shape is key. Preventive measures and best practices help avoid issues. This guide outlines simple steps for charger care and enhanced reliability.
Regular Charger Maintenance
Maintenance ensures your charger works well. Check the cables and connections often. Look for wear or damage. Clean the charger’s exterior with a dry cloth. Ensure the vents are free of dust.
- Inspect charger cables for frays or breaks.
- Verify connections for tightness and corrosion.
- Clean dust and debris from vents and casing.
Proper Golf Cart Storage
Store your golf cart in a cool, dry place. Moisture and temperature extremes harm chargers and batteries. Disconnect the charger when not in use. This prevents power surges from damaging the unit.
- Avoid moisture and direct sunlight for storage.
- Disconnect the charger to protect against surges.
- Charge the battery fully before long-term storage.
Upgrade Options For Reliability
Upgrades can boost charger performance. Consider a smart charger for automatic shutoff. This prevents overcharging. Quality cables and connectors also improve charging efficiency.
| Upgrade | Benefit |
|---|---|
| Smart Charger | Prevents overcharging |
| Quality Cables | Ensures stable connection |
| High-Grade Connectors | Improves current flow |
Credit: buggiesgonewild.com
Frequently Asked Questions
How Do You Test A 36 Volt Golf Cart Charger?
To test a 36-volt golf cart charger, first ensure it’s plugged in and connected to the cart. Check the charger’s indicator light for charging status. Use a multimeter to measure the output voltage. It should align with the charger’s specifications.
Lastly, observe if the cart charges effectively.
How Do I Tell If My Golf Cart Charger Is Bad?
To determine if your golf cart charger is faulty, check for no charging indicator light, a lack of output voltage, or unusual noises during operation. If your cart doesn’t charge or the charger feels excessively hot, it may be bad.
Why Is My 36 Volt Golf Cart Not Charging?
Your 36-volt golf cart may not charge due to a dead battery, faulty charger, or bad connection. Check and clean all connections, and ensure the charger is operational. If issues persist, test the battery and consider professional help.
When I Plug In My Golf Cart Charger, Nothing Happens.?
Check your golf cart’s power source and connections first. Ensure the charger is correctly plugged in. Inspect for damaged cords or faulty outlets. Sometimes, resetting the charger or trying a different outlet helps. If issues persist, consult a professional for a thorough inspection and potential repairs.
Why Won’t My 36v Golf Cart Charge?
A faulty charger, damaged cables, or a dead battery could be the cause. Check each component for signs of failure.
Conclusion
Navigating through the intricacies of a 36-volt golf cart charger can seem daunting. Yet, with the right approach, troubleshooting becomes manageable. This guide aimed to demystify the process, offering clear, actionable steps. Remember, patience and precision are key. By following these tips, you’ll ensure your golf cart’s charger remains in top condition, ready for your next adventure on the greens.


