The John Deere 100 Series can experience various problems, including issues with the fuel pump, starter, wiring diagram, and starting difficulties. Some common solutions include checking the valve cover, fuel pump, seat safety, wiring harness, and PTO switch.
Additionally, transmission disengagement lever, drive belt, and transaxle failure can lead to mower starting and driving issues. The longevity of a John Deere riding mower depends on usage and maintenance, but it should last for several hundred hours of operation.
High hours for a John Deere mower can vary among users. If a John Deere mower starts and then shuts off, it is likely a fuel-related problem, such as insufficient fuel flow. Other troubleshooting tips include checking for a plugged discharge chute, uncut patches of grass, slipping belt, excessive vibration, scalping blades, and attachments stopping when the reverse foot pedal is engaged.
Common Problems With John Deere 100 Series
As popular as John Deere 100 Series lawn tractors are, they are not without their fair share of problems. Here are some of the common issues you may encounter with these tractors, which can affect their performance and reliability.
Fuel Pump Issues
The fuel pump is a critical component in the fuel delivery system. Common issues with the fuel pump in John Deere 100 Series tractors include clogging, leaks, and malfunctions. These problems can lead to inconsistent fuel delivery to the engine, causing starting issues and poor performance.
Starter Problems
The starter is responsible for initiating the engine’s ignition process. Frequent starter problems in John Deere 100 Series tractors include faulty solenoids, worn-out gears, and electrical connections. These issues can result in difficulty starting the engine and intermittent starting failures.
Electrical Wiring Troubleshooting
Electrical wiring issues can manifest in various ways, such as malfunctioning lights, erratic gauge readings, and unresponsive switches. Identifying and resolving these problems requires thorough troubleshooting of the tractor’s electrical system.
Troubleshooting Techniques
When it comes to maintaining your John Deere 100 Series mower, it’s essential to be well-versed in troubleshooting techniques. Proper troubleshooting can help identify and resolve issues before they escalate, ultimately ensuring the longevity and efficient operation of your equipment. Below are specific troubleshooting techniques to aid in the smooth functioning of your John Deere 100 Series mower.
Valve Cover Inspection
Begin troubleshooting by inspecting the valve cover for any signs of damage or leaks. Ensure that the cover is securely in place and free from any cracks or wear that could compromise engine performance.
Fuel Pump Check
Verify the fuel pump’s functionality by checking for any signs of leaks or blockages. It is crucial to ensure a consistent and adequate fuel supply to the engine for optimal performance.
Seat Safety Verification
Check the seat safety switch to ensure it is effectively engaging when seated. Any malfunction in this safety feature can impact the mower’s operation and should be promptly addressed.
Testing The Wiring Harness
Thoroughly examine the wiring harness for any signs of fraying, damage, or loose connections. A secure and intact wiring harness is vital for the proper functioning of the mower’s electrical components.
Diagnosing The Pto Switch
Inspect the PTO (Power Take-Off) switch to ensure it is engaging and disengaging seamlessly when necessary. Any inconsistencies in this switch may lead to operational issues and require immediate attention.
Checking For Continuity
Utilize a multimeter to check for continuity in electrical circuits across the mower. Ensuring consistent electrical flow is critical for seamless operation and overall performance.
Spark Plug Connection Examination
Examine the spark plug connections for any signs of corrosion or loose connections. Properly functioning spark plugs are essential for ignition and overall engine performance.
Schematic Analysis
Refer to the mower’s schematic diagram to analyze the wiring and component layout. A clear understanding of the schematic can aid in identifying and addressing potential issues effectively.
Fixing Drive Issues
Transmission Disengage Lever Adjustment
If experiencing drive problems with your John Deere 100 Series mower, one fix could be adjusting the transmission disengage lever correctly.
Inspecting The Drive Belt
Another common issue affecting the drive performance is a worn or damaged drive belt. Checking and replacing it may solve the problem.
Detecting Transaxle Failures
Frequent drive issues might indicate transaxle failures. It’s essential to diagnose and address transaxle problems promptly.
Maintenance Recommendations
Proper maintenance is key to ensure the longevity and optimal performance of your John Deere 100 Series mower. By following these maintenance recommendations, you can keep your mower in top shape and prevent potential problems down the line.
Determining John Deere Mower Lifespan
Understanding the lifespan of your John Deere mower is essential to gauge its longevity. While there’s no fixed lifespan for these mowers, with regular maintenance and care, they can easily last for several years. On average, a well-maintained John Deere 100 Series mower can last anywhere from 500 to 1,000 hours of use.
Understanding High Hours For A John Deere Mower
High hours for a John Deere mower refer to the number of hours it has been in operation. Generally, anything above 1,000 hours is considered high for a residential mower. However, it’s important to remember that proper maintenance and care can extend the lifespan of your mower, even if it reaches high hours.
To ensure your John Deere 100 Series mower performs optimally and to prevent potential problems, follow these maintenance recommendations:
- Regularly check and change the oil according to the manufacturer’s recommendations. This will help keep the engine running smoothly and prevent damage.
- Clean or replace the air filter regularly to maintain proper air flow and prevent debris from entering the engine.
- Inspect and clean the spark plug to ensure proper ignition and prevent starting issues. Replace the spark plug if necessary.
- Check the fuel system for any clogs or leaks. Replace the fuel filter if needed and ensure the fuel tank is clean and free from debris.
- Inspect the blades regularly and sharpen or replace them as necessary. Dull blades can result in an uneven and poor quality cut.
- Check the tire pressure and ensure they are properly inflated to ensure smooth operation and prevent damage to the rims.
- Lubricate all moving parts, including the mower deck, to reduce friction and ensure smooth operation.
- Inspect and tighten all belts and pulleys to prevent slippage and ensure proper operation.
- Store your mower in a clean and dry area to protect it from the elements and prevent rust or corrosion.
By following these maintenance recommendations and regularly servicing your John Deere 100 Series mower, you can extend its lifespan and enjoy trouble-free operation for years to come.
Fuel-related Starting Problems
One of the common issues faced by John Deere 100 Series owners is fuel-related starting problems. If you find that your lawn mower starts but then shuts off or won’t start at all, chances are it is due to a fuel-related problem.
Diagnosing Starting And Stalling Issues
When you encounter starting and stalling issues with your John Deere 100 Series mower, the first step is to diagnose the root cause of the problem. Here are some common fuel-related culprits:
- Fuel Pump: The fuel pump is responsible for delivering fuel from the tank to the engine. If the fuel pump is not functioning properly, it can lead to insufficient fuel flow, causing starting and stalling issues. Check the fuel pump for any signs of wear or damage.
- Starter: A faulty starter can also be the cause of fuel-related starting problems. Make sure that the starter is properly connected and functioning. If you hear a clicking sound when trying to start the mower, it may indicate a problem with the starter.
- Wiring Diagram: Sometimes, starting issues can be traced back to electrical problems. Refer to the wiring diagram for your John Deere 100 Series mower to check if there are any loose connections or damaged wiring that may be affecting the fuel system.
Fuel Flow Concerns
Insufficient fuel flow is a common culprit when it comes to starting problems. Once the mower is started, the fuel flow needs to be consistent for it to keep running. Here are some factors that can affect fuel flow:
- Travel Speed: If you are operating your John Deere 100 Series mower at a high speed, it can lead to fuel flow issues. Make sure to adjust the travel speed to a suitable level to ensure proper fuel flow.
- Belt Slipping: A slipping belt can cause disruptions in the fuel flow. Check the belts on your mower and make sure they are properly tensioned and not worn out.
- Patches of Grass Uncut: If you notice that there are patches of grass left uncut after mowing, it could be an indication of a fuel flow problem. Make sure the discharge chute is not plugged and that the blades are properly sharpened.
- Mower Loads Down Tractor: If your mower is putting excessive strain on the tractor, it can lead to fuel flow issues. Ensure that the attachment is properly engaged and not causing the mower to load down the tractor.
By diagnosing starting and stalling issues and addressing fuel flow concerns, you can troubleshoot and resolve the fuel-related problems in your John Deere 100 Series mower. Regular maintenance and proper care of the fuel system can help prevent these issues and ensure smooth and reliable operation of your mower.
Common Lawnmower Performance Issues
When it comes to maintaining a well-groomed lawn with your John Deere 100 Series mower, it’s essential to address common performance issues that may arise. From discharge chute blockages to uneven cuts, understanding and troubleshooting these problems promptly can ensure your lawn stays in top condition.
Discharge Chute Blockage
If the discharge chute on your John Deere mower is blocked, it can lead to poor cutting performance and clogging issues. Regularly check and clear any debris or grass clippings stuck in the chute to ensure proper grass discharge.
Problems Caused By Excessive Travel Speed
Excessive travel speed can result in uneven cuts, missed patches of grass, and overall poor cutting performance. Always maintain an appropriate speed to ensure the mower can effectively cut the grass without issues.
Dealing With Uncut Grass Patches
Uncut grass patches can be a result of various factors, including mower deck height settings, blade sharpness, or mower speed. Adjusting these settings accordingly can help eliminate uncut patches and achieve a uniform lawn appearance.
Resolving Belt Slippage
Belt slippage can lead to poor blade performance and irregular cutting patterns. Regularly check the mower’s belts for wear and proper tension to prevent slippage issues.
Addressing Vibrations And Scalping
Vibrations and scalping can be indicators of an uneven surface or incorrect deck adjustments. Ensuring proper deck alignment and adjusting the mower height can help eliminate vibrations and prevent scalping of the grass.
Preventing Tractor Overloading
Overloading the tractor with heavy attachments or excessive grass clippings can strain the mower and affect its performance. Avoid overloading the tractor to maintain optimal cutting efficiency.
Getting An Even Cut
For a well-manicured lawn, achieving an even cut is essential. Proper deck adjustments, sharpened blades, and consistent mowing patterns can help you achieve a uniform and tidy lawn appearance.
Reverse Pedal Engaging Troubleshooting
If the mower stops when the reverse pedal is engaged and the attachment is in use, it could indicate issues with the reverse pedal mechanism. Inspect and troubleshoot the reverse pedal components to ensure smooth operation during mowing.
Advanced Troubleshooting Tips
Discover advanced troubleshooting tips for addressing common John Deere 100 Series problems. Learn how to tackle issues like electrical faults, fuel pump malfunctions, starter problems, and wiring harness failures. Dive into valve cover, seat safety, and continuity checks to ensure your John Deere mower runs smoothly.
John Deere Won’t Start – No Clicks
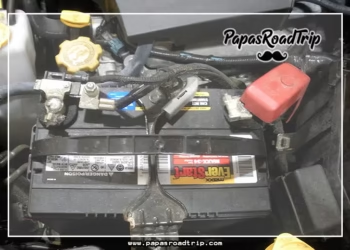
If you’re facing the frustrating issue of your John Deere tractor not starting, with no clicking sound when you turn the key, there are a few potential causes to consider. First, check the battery connections to ensure they are tight and free of corrosion. A loose or corroded connection can prevent the necessary power from reaching the starter motor. Additionally, verify that the battery itself is in good condition and fully charged. A weak or dead battery can also result in no clicks when you try to start your tractor.
Another possible cause for a John Deere not starting with no clicks is a faulty safety switch. Many John Deere models are equipped with safety switches that prevent the engine from starting if certain conditions are not met, such as the parking brake not being engaged or the seat not being occupied. Check these safety switches to ensure they are functioning properly and making the necessary connections.
If all the above checks out and you still encounter the problem of no clicks when starting your John Deere tractor, it might be a sign of a faulty starter solenoid or a wiring issue. In this case, it is recommended to seek professional assistance to diagnose and resolve the problem.
Tractor Turns Over But Won’t Start
If your John Deere tractor turns over but fails to start, there are several troubleshooting steps you can take to identify and address the issue. First, ensure that you have a sufficient fuel supply in the tank. If the fuel level is low, fill it up and attempt to start the tractor again.
Next, check the spark plug to see if it is wet or fouled. A wet spark plug could indicate a flooding issue, while a fouled spark plug may need to be cleaned or replaced. Additionally, inspect the spark plug wire for any signs of damage or poor connection.
Another potential cause for a tractor that turns over but won’t start is a clogged fuel filter. A dirty or clogged fuel filter restricts the flow of fuel to the engine, preventing it from starting. Consider replacing the fuel filter if it hasn’t been changed in a while.
If none of the above steps resolve the issue, it may be necessary to delve deeper into the troubleshooting process to identify the root cause. This is where an in-depth troubleshooting guide can come in handy.
In-depth Troubleshooting Guide
When facing more complex issues with your John Deere 100 Series tractor, an in-depth troubleshooting guide can be a valuable resource. This guide offers step-by-step instructions and insights to help you diagnose and resolve various problems that may arise.
The in-depth troubleshooting guide covers a wide range of issues, including electrical problems, fuel system malfunctions, transmission and drive belt issues, and more. It provides detailed instructions on how to test and inspect components, such as the valve cover, fuel pump, seat safety switch, wiring harness, and PTO switch.
Whether you’re facing issues with your John Deere not starting, experiencing drive problems, or encountering other troubleshooting concerns, consulting an in-depth troubleshooting guide can save you time, money, and frustration.
Conclusion
Navigating through John Deere 100 Series problems can be daunting. Understanding common issues like fuel pump malfunctions, electrical problems, or drive belt failures, can help in troubleshooting. Ensure regular maintenance to prolong the lifespan of your John Deere mower. Stay informed and proactive!


